



As a sysadmin and power user, it’s really a painful act to create a new bootable USB every time you want to install a new Operating System. Ventoy solves this problem by letting me create a multiboot USB drive for multiple Operating Systems.
I have been using Ventoy for quite some time and it has been a huge time saver for me. Since this article was written quite a long ago and Ventoy has come a long way, I decided to share my experience with the latest version of Ventoy.
When I started, Ventoy could only work with ISO files but the latest version of Ventoy can handle ISO, WIM, IMG, VHD and EFI file formats and works across a wide range of Operating Systems (1300+ tested OS images).
Let’s start with the initial setup and then discuss advanced features.
Table of Contents
What is Ventoy and how does it work?
Ventoy is a free and open-source tool to create multiboot USB drives. Multiboot means a single drive can be used to install multiple operating systems without creating a bootable USB every time you change the OS.
When you install Ventoy on a USB drive, it creates two partitions:
- A small boot partition that contains the Ventoy boot container.
- A large data partition where we can place the ISO/WIM/IMG/VHD images
Ventoy supports 1300+ OS images across hundreds of Linux and Windows distributions and specialized environments like WinPE, rescue disks, network boot tools etc. As of April 2026, the latest version of Ventoy is 1.1.11.
Ventoy System Requirements
Before getting started, make sure you have the following:
- USB drive: Minimum 8 GB recommended (any size works, but larger drives hold more images)
- Host operating system: Windows 7 or later, or any Linux distribution (for running the Ventoy installer)
- Firmware: Legacy BIOS or UEFI (both supported, including Secure Boot)
- ISO files: Any bootable ISO, WIM, IMG, VHD(x), or EFI files you want to use
Important Note: Installing Ventoy will erase all existing data on the USB drive. Back up any files before proceeding.
How to create a multiboot USB drive using Ventoy
- Download Ventoy installation package. Extract Ventoy files to a separate folder
- Make sure to plug in the USB flash drive and then run the Ventoy2Disk application.
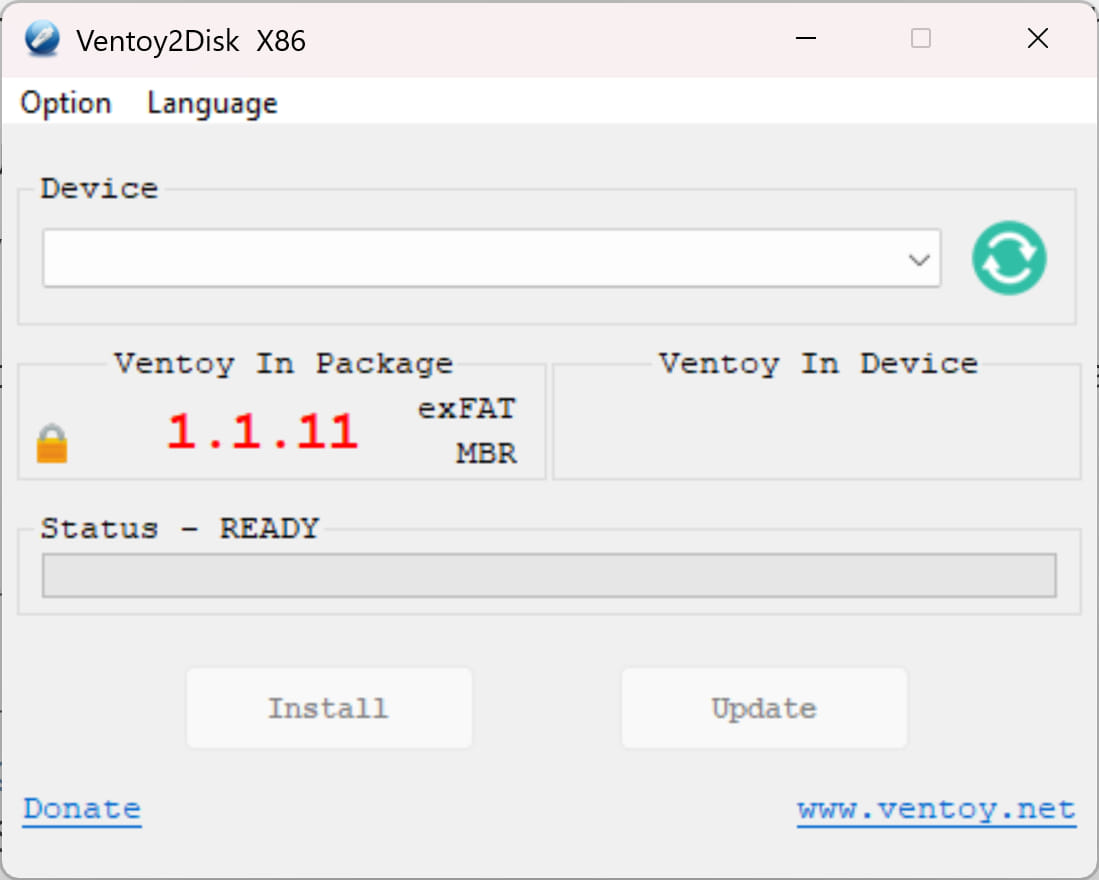
The application will automatically detect any USB flash drives on the local computer and show it below the Device. - If you wish to make a new installation from scratch, click Install. This will format the USB drive and remove any data on it. However, if you wish to only upgrade to the newer Ventoy version, click Update. This will make no changes to the data on the USB flash drive, including the existing ISO files.
How to boot from multi-boot USB flash drive
Once the USB is ready, all you need to do is copy the ISO files to it. According to the creators of Ventoy, more than 1300 ISO images have been tested. Here is a list of the tested images.
- After copying the required image(s), keep the USB plugged in and reboot the computer.
- Press F12 to bring up the temporary computer startup menu.
- There will be two USB bootable devices on the list. Select EFI USB Device to boot to the Ventoy menu.

- The screen will then display a list of the ISOs present on the USB, from which you may select to boot from and continue with the installation.
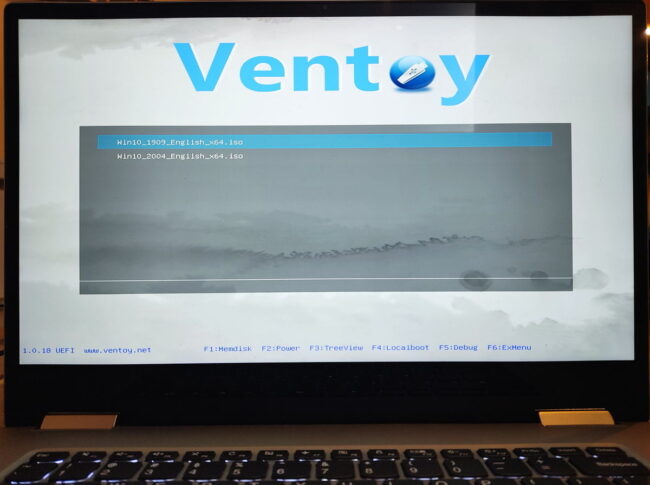
Carrying More Than One Operating System
This is what Ventoy is all about: containing multiple operating systems in the same USB drive, and using the same USB for daily portability as well. Meaning, it can still be accessed as a regular USB drive even after it has been formatted using Ventoy.
To add more ISO files to the USB, simply copy the ISO file, navigate to the USB drive using the Windows Explorer, and paste the ISO there. It is that simple.
If you wish to remove an ISO, navigate to the USB drive again and simply delete the ISO image of the operating system you want to remove.
If you have organized your ISOs into folders, you will see the folder structure in the menu. Press Enter on a folder to browse its contents.
Pro Tip: Press F1 in the Ventoy boot menu to switch between List Mode (default) and TreeView Mode, which displays the full directory structure as a tree for easier navigation.
Enabling UEFI Secure Boot With Ventoy
Many modern PCs and all systems meeting Windows 11 requirements ship with UEFI Secure Boot enabled. Ventoy supports Secure Boot, but requires a one-time key enrollment on first boot.
Here is how to complete the enrollment:
- Boot from the Ventoy USB drive with Secure Boot enabled. You will see a blue screen titled MOK Management (Machine Owner Key).
- Select Enroll key from disk.
- Navigate to the VTOYEFI partition and select the
ENROLL_THIS_KEY_IN_MOKMANAGER.cerfile. - Confirm the enrollment and select Continue when prompted.
- Select Reboot to restart the system.
After this one-time enrollment, Ventoy will boot normally on that machine with Secure Boot enabled. The enrollment is stored in the system’s UEFI firmware, so you only need to do this once per computer.
Important Note: If your system’s firmware does not support MOK management (rare on modern hardware), you may need to temporarily disable Secure Boot in BIOS/UEFI settings to use Ventoy.
Ventoy Plugins and Advanced Features
This is the most exciting part of the updated Ventoy version. Ventoy offers a powerful plugin system configured through a ventoy.json file placed in the ventoy folder on the data partition. Some of the most useful plugins/features include the following:
Persistence for Live Linux Sessions
By default, changes made during a live Linux session are lost on reboot. Ventoy’s persistence plugin lets you create a persistent storage file so that installed software, saved files, and settings survive reboots. This works with Ubuntu, Linux Mint, Fedora, Kali Linux, and many other distributions.
To set it up:
- Create a persistence data file using the script included with Ventoy:
sudo sh CreatePersistentImg.sh -s 10240 -l casper-rw - Copy the generated
.datfile to your USB drive (e.g., to apersistencefolder). - Create a
ventoyfolder on the root of the data partition, and inside it create aventoy.jsonfile with the following configuration:
{
    "persistence": [
        {
            "image": "/Linux/ubuntu-24.04-desktop-amd64.iso",
            "backend": "/persistence/persistence.dat"
        },
        {
            "image": "/Linux/kali-linux-2024.4-live-amd64.iso",
            "backend": "/persistence/kali-persistence.dat"
        }
    ]
}
The image path should match the exact location of your ISO on the USB drive. You can map different persistence files to different distros.
Boot Menu Themes and Customization
You can customize the Ventoy boot menu appearance by placing GRUB theme files on the USB drive and referencing them in ventoy.json. Community-created themes are available on GitHub that add background images, custom fonts, and styled menu entries.
Auto-Installation Scripts
Ventoy can automatically feed unattended installation scripts (such as autounattend.xml for Windows or kickstart/preseed files for Linux) to the OS installer. This is ideal for IT professionals deploying systems in bulk.
Place your answer files on the USB drive and map them in ventoy.json:
{
    "auto_install": [
        {
            "image": "/Windows/Win11_24H2_English_x64.iso",
            "template": "/ventoy/scripts/autounattend.xml"
        },
        {
            "image": "/Linux/ubuntu-24.04-server-amd64.iso",
            "template": "/ventoy/scripts/ubuntu-preseed.cfg"
        }
    ]
}
VHD and WIM Boot
Beyond ISO files, Ventoy can boot Windows VHD/VHDX virtual disk images and WIM files directly. This is useful for running pre-configured Windows environments without a traditional installation, or for deploying Windows images in enterprise scenarios.
VentoyPlugson (Web-Based Configuration)
If editing JSON files is not your preference, Ventoy includes VentoyPlugson — a web-based GUI for configuring plugins. Run VentoyPlugson.exe (Windows) or VentoyPlugson.sh (Linux) and it opens a local web interface where you can configure themes, persistence, auto-install scripts, and other options visually. Version 1.1.11 added a JSON preview feature to VentoyPlugson for verifying your configuration before applying it.
How To Update Ventoy
When a new version of Ventoy is released, you can update the bootloader on your USB drive without losing any of your ISO files. The update process only touches the boot partition and leaves the data partition untouched.
To update:
- Download the latest Ventoy release.
- Open
Ventoy2Disk.exe(or run the shell script on Linux). - Select your USB drive — the tool will detect the existing Ventoy installation and show the current and new version numbers.
- Click Update instead of Install.
The update completes in seconds, and all your ISO files, folders, and plugin configurations remain intact.
Recommended ISOs for Your Ventoy Toolkit
Once Ventoy is installed, the real power comes from what you load onto it. Here is a practical starting kit for IT professionals and power users:
- Windows 11 installer ISO — for fresh installations and in-place upgrades
- Windows 10 installer ISO — for older hardware that does not meet Windows 11 requirements
- Ubuntu Desktop or Fedora Workstation — a Linux live environment for file recovery when Windows will not boot
- Hiren’s BootCD PE — an all-in-one Windows PE environment packed with disk utilities, password recovery tools, and hardware diagnostics
- GParted Live — dedicated disk partitioning from a lightweight live environment
- Clonezilla Live — disk imaging and cloning for backup and migration
- Kaspersky Rescue Disk or Bitdefender Rescue Environment — offline antivirus scanning independent of the installed OS
- MemTest86 — hardware memory diagnostics (requires UEFI mode for v5+)
- SystemRescue — a Linux-based rescue toolkit with filesystem repair tools, network utilities, and hardware testing
A 64 GB USB drive comfortably holds all of the above with room to spare. Organize them into folders (Windows, Linux, Rescue, Diagnostics) and Ventoy will display a clean, navigable menu.
Comparing Ventoy with other multiboot tools
Ventoy stands out for its simplicity (just copy files), broad format support, and active development community. YUMI works well for basic multiboot needs but lacks Secure Boot support. Easy2Boot is highly capable but has a steeper learning curve.
| Feature | Ventoy | YUMI | Easy2Boot |
|---|---|---|---|
| Reformat required per ISO | No | No | No |
| UEFI Secure Boot support | Yes | No | Yes (via agFM) |
| Supported image formats | ISO, WIM, IMG, VHD(x), EFI | ISO | ISO, VHD, WIM, IMG |
| Plugin/theme system | Yes | No | Limited |
| GUI installer | Yes | Yes | Manual |
| Persistence support | Yes (via plugin) | Yes | Yes |
| Active development (2026) | Yes | Yes | Yes |
Conclusion
Ventoy is one of the most practical tools for anyone who regularly works with multiple operating systems or bootable utilities. The ability to simply copy ISO files to a USB drive and boot from them without any additional configuration makes it significantly faster and more convenient than traditional imaging tools. Combined with features like Secure Boot support, persistence, auto-install scripts, and VHD booting, it covers virtually every multiboot scenario you might encounter.
After so many years, Ventoy still seems to be the leader in multiboot USB devices. What are your thoughts on this?



2 comments
Pradip Shah
I have been using Yumi available from Pen Drive Linux site for several years now. Will give this a try if I can just copy any ISO and make it work. Would certainly go a long way for replacing any installation ISO with a newer version.
Usman Khurshid
Yes I’m loving the tool. Now I can just put any no. of ISO images without extracting anything and it starts working. You’re highly recommended to try :-)