Key Points
- By default, Windows 11 23H2 requires TPM 2.0, Secure Boot, at least 4GB RAM, and 64GB storage to install.
- To bypass these requirements and install Windows 11 23H2, you can use the latest Rufus utility or make changes to the Windows Registry before the OS is even installed.
When Microsoft launched the Windows 11 original release, they set some very specific system requirements that needed to be met to install or upgrade to Windows 11 from any previous OS. These requirements include TPM 2.0, Secure Boot, 4GB+ RAM, a minimum of 2 CPU cores, etc. However, not every computer can match these requirements, especially if you are under a budget.
There are instances where you may want the latest Windows 11 version, like Windows 11 23H2, but cannot install it because your hardware lacks the requirements for the OS. If you are going through a similar dilemma, then let us inform you that there are methods to install Windows 11 version 23H2 while bypassing the Windows 11-specific hardware requirements.
That said, the new requirements for Windows were meant to make the systems more secure due to the increasing cyberattacks. However, not every PC can be upgraded or needs to be upgraded to match these requirements.
Table of Contents
This page covers
Windows 11 23H2 system requirements
Windows 11 23H2 has the same system requirements as the original release. Before you plan on upgrading your current OS to the Windows 11 23H2, it is recommended that you check whether the hardware supports it by default, or do you need to bypass the requirements.
This is a list of the basic Windows 11 23H2 system requirements:
- Processor: 1GHz or faster CPU or System on a Chip (SoC) with two or more cores.
- RAM: At least 4GB.
- Hard drive: 64GB or larger.
- System firmware: UEFI, Secure Boot capable.
- TPM: Trusted Platform Module (TPM) version 2.0.
- Graphics: Compatible with DirectX 12 or later with WDDM 2.0 driver.
- Display resolution: High definition (720p) display greater than 9″ diagonally, 8 bits per color channel.
- Networking: Microsoft account and internet connectivity.
These specifications mean that not all computers will be able to install Windows 11 23H2 as-is. They’ll either need to sip it, upgrade their hardware, or bypass these requirements. The latter seems to be the better choice if you do not have the budget to upgrade your hardware, and the system security isn’t your main concern (in the case of test environments).
However, if you did want to upgrade your hardware, you’d want one of the following supported CPUs:
- [Intel supported processors] (complete list here)
- 8th Gen (Coffee Lake).
- 9th Gen (Coffee Lake Refresh).
- 10th Gen (Comet Lake and Ice Lake).
- 11th Gen (Rocket Lake and Tiger Lake).
- 12th Gen (Alder Lake).
- 13th Gen (Raptor Lake).
- Pentium – Gold and Silver.
- Xeon – Skylake-SP, Cascade Lake-SP, Cooper Lake-SP, Ice Lake-SP
- [AMD supported processors] (complete list here)
- Ryzen 2000, 3000, 4000, 5000, 6000, 7000 (including 3D V-cache chips).
- Ryzen Threadripper Pro 59xxWX.
- Ryzen Embedded V25xx and V27xx.
- EPYC 2nd Gen and 3rd Gen.
- Athlon – Gold, Silver, 3xxx, 300x.
- [Qualcomm supported processors] (complete list here)
- Snapdragon 850.
- Snapdragon 7c.
- Snapdragon 8c.
- Snapdragon 8cx.
- Snapdragon 8cx (Gen2).
- Microsoft SQ1.
- Microsoft SQ2.
Apart from these requirements, there are also other restrictions by Microsoft that you need to surpass to be able to install Windows 11 23H2 using the typical methods, such as a minimum of 4GB of RAM and at least 64 GB of free space on the hard drive. However, TPM 2.0 and Secure Boot are the two requirements that cannot be compromised.
Check if TPM 2.0 is available
Start by checking whether your computer has a TPM 2.0 chipset or not, using these steps:
-
Press the Windows Key + R to open the Run Command box.
-
Type in “tpm.msc” and press Enter to open the TPM Management console.
-
Here, look for TPM’s status in the Status section. You will also find its version in the TPM Manufacturer Information.

Check the TPM status and version from the TPM Console
If you find that the Status says “The TPM is ready for use,” it means that it is available and enabled. However, if you find written “Compatible TPM cannot be found,” it means that either the TPM isn’t available, or is present but disabled from the system BIOS/ UEFI firmware settings.
Learn other methods to check TPM availability.
Enable TPM
If you find that the TPM is disabled, then you must enable it from the UEFI settings. Here is how:
-
Press the Windows Key + i to open the Windows settings app.
-
Navigate to the following:
System >> Recovery
-
Click “Restart now” in front of “Advanced startup.”

Restart the computer for advanced startup -
On the confirmation popup, click “Restart now” again.

Confirm restart for advanced startup The computer will now start and then boot into Windows Recovery Environment (WinRE).
-
Click Troubleshoot.

Click Advanced options -
Then click “Advanced options.”

Click Advanced options -
Click “UEFI Firmware Settings.”

Enter UEFI firmware settings -
Now click Restart.

Restart computer The computer will now reboot again.
-
Now go to either Advanced, Security, or Boot settings. These depend on what kind of motherboard you have.
-
Select the TPM 2.0 option and select the “Enabled” and the “TPM On” options.

Enable TPM from firmware
If you find that the TPM 2.0 option is missing, or cannot be enabled, the chances are that it is not available on your motherboard. However, if the issue is something else, try these TPM troubleshooting methods.
Check for Secure Boot
The other non-negotiable requirement is Secure Boot. Check whether Secure Boot is enabled with these steps:
-
Press the Windows Key + R to open the Run Command box.
-
Type in “msinfo23” and press Enter.
-
In the System Summary tab, check for the information in front of “Secure Boot State.”

Check Secure Boot state from System Information
If you find that Secure Boot is Off or Disabled, you can enable it from the UEFI Firmware settings just as we did TPM 2.0 in the method shared above.
If you have confirmed that both TPM 2.0 and Secure Boot are available and enabled, only then can you proceed to install Windows 11 23H2 using the normal methods. However, if either one of the options isn’t available or turned on, then you must install Windows 11 23H2 while bypassing the system requirements using the methods shared below.
Installing Windows 11 23H2 on non-supported hardware
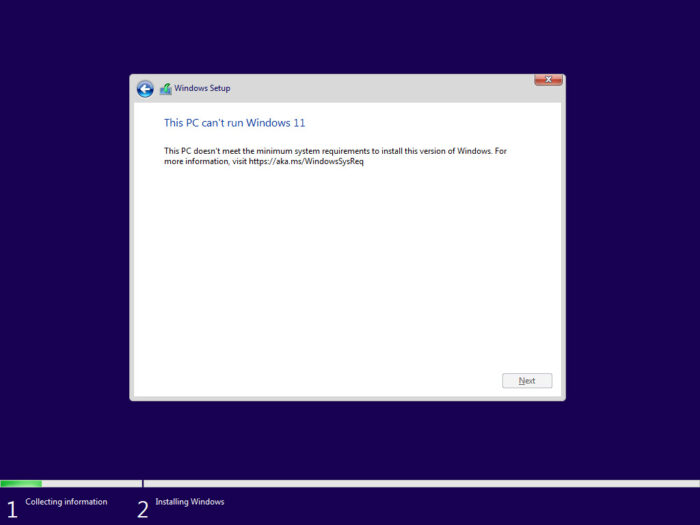
If you try to install Windows 11 23H2, or any Windows 11 version on a computer that does not meet the system requirements, then you won’t be able to install or upgrade to it using the conventional methods. Instead, you will see an error message such as the following while attempting to install it:
This PC can't run Windows 11
This PC doesn't meet the minimum system requirments to install this version of Windows.

If so, you can proceed to perform either one of the following solutions to bypass these system requirements and continue to install Windows 11 23H2 without upgrading your hardware.
Bypass Windows 11 23H2 installation restrictions
Bypass TPM and Secure Boot requirements from Windows Registry
To bypass the TPM 2.0 and Secure Boot system requirements while installing Windows 11 23H2, perform the following steps:
-
Start by downloading Windows 11 23H2 ISO.
-
Continue to create a bootable USB drive, or use Ventoy to create a multi-boot USB flash drive.
-
Boot from the bootable USB flash drive and click Next on the first Windows Setup screen.

Proceed to install Windows 11 23H2 -
Click “Install now.”

Install Windows -
Click “I don’t have a product key.”

Proceed without product key Even if you have a product key, you can use it to activate Windows later.
-
Select one of the Windows editions and click Next.

Select edition -
On the error screen, press the Shift + F10 keys simultaneously to open the Command Prompt.

Open the Command Prompt on the error screen -
Type in “regedit” and press Enter to open the Registry Editor.

Open the Registry Editor -
In the Registry Editor, navigate to the following path from the left pane:
Computer\HKEY_LOCAL_MACHINE\SYSTEM\Setup
-
Right-click “Setup,” expand New, and click Key. Name this Key “LabConfig.”

Create the LabConfig key under Setup -
Right-click “LabConfig,” expand New, and click “DWORD (32-bit) Value.” Name this DWORD “BypassTPMCheck“.
-
Repeat the steps again, and create another DWORD in the LabConfig key named “BypassSecureBootCheck.”

Create DWORDs to bypass Secure Boot and TPM checks -
Double-click both of these DWORDs and change their Value Data to “1“.

Change the Value Data for the DWORDs to 1 -
Close the Registry Editor and the Command Prompt windows.
-
Click the back button on the Windows Setup wizard.

Go back to selecting a Windows edition -
Now select a Windows edition again and click Next.

Select edition again You will now notice that the error prompt has disappeared and replaced with the terms and conditions. Continue forward with the remaining steps to install Windows 11 23H2 successfully without meeting the system requirements.
Note: The rest of the steps are typical for all modern Windows installations.
Bypass TPM and Secure Boot requirements with Rufus
Rufus, whose full name is “The Reliable USB Formatting Utility, with Source”, is an open-source utility for the Windows operating system, that lets you modify and create Windows operating system ISOs. This tool now also includes options that you can select, which will create a bootable USB drive where the Windows 11 23H2 system requirements are already bypassed.
Use the following steps to bypass TPMm Secure to and RAM requirements using Rufus:
-
Open the Rufus website and click on the latest Rufus version to download it.

Download the latest Rufus version -
Connect the USB flash drive to the PC and then run Rufus.
-
In Rufus, make sure that the USB drive is selected from the drop-down menu under Device.

Select the USB flash drive -
Click Select and then select the Windows 11 23H2 ISO file.

Choose the Windows 11 23H2 ISO file -
Ensure that the remaining settings are as follows:
- Image option: Standard Windows installation
- Partition scheme: GPT
- Target system: UEFI (non CSM)
- File system: NTFS
- Cluster size: default value
- Select: “Quick format” and “Create extended label and icon files”
-
Click Start.

Click Start -
In the popup window, select the following options and unselect all others:
- Remove requirement for 4GB+ RAM, Secure Boot, and TPM 2.0
- Remove requirement for an online Microsoft account
Once selected, click Ok.

Bypass Windows 11 23H2 system requirements using Rufus -
In the warning popup box, click Ok.
Rufus will now format the USB drive and create a bootable Windows 11 23H2 drive that will automatically bypass TPM 2.0, Secure Boot, and RAM requirements. When you proceed to install Windows using this drive, no additional steps will be required.
Conclusion
Although it is for our own benefit that we ensure that our systems meet the minimum requirements for Windows 11 versions, it is not always necessary. For example, if you have a dedicated PC for testing purposes, that is not connected to the internet and contains no sensitive information, then it is not necessary that you invest in upgrading its hardware simply to test on Windows 11.
Thus, you can safely bypass the TPM 2.0 and Secure Boot requirements using any of the 2 methods discussed above. Bypassing the Windows 11 minimum requirements using the Windows Registry method only allows you to bypass the Secure Boot and the TPM requirements, whereas, with Rufus, you can bypass both of these requirements as well as the minimum RAM restrictions.


