Virtualization technologies in the 21st century allow you to run isolated operating systems and use them as you wish, without affecting the host system. For this reason, we use hypervisors, also known as Virtual Machine Monitors (VMM), a virtualization software that allows you to run and manage virtual machines. Some frequently used hypervisors are:
Each of these hypervisors creates their own Virtual Hard Disk (VHD) using a different file format. Below is a summary of the supported file types for a virtual hard disk for the hypervisors:
- Hyper V: VHD & VHDX
- VirtualBox: VDI, VHD, VMDK
- VMWare Workstation: VMDK
This guide gives a brief introduction to each of the file types used by these hypervisors, and we then move on to discussing how you can convert VDI to VMDK.
Table of Contents
Types of Virtual Hard Disks
There are several types of virtual hard drives, each with its unique characteristics. However, one type of hard disk created using one hypervisor may not be compatible with another. For example, a virtualBox VDI hard drive cannot run on VMware Workstation. However, a WMware Workstation VMDK hard disk can run on VirtualBox.
Here is a list of types of virtual hard disks:
- Virtual Disk Image (VDI)
- Virtual Machine Disk (VMDK)
- Virtual Hard Disk (VHD)
- Virtual Hard Disk (VHDX)
- QEMU Copy on Write (QCOW)
Today, we are going to be discussing how you can convert a VDI hard disk into a VMDK hard disk so you can run a virtual machine that was created through VirtualBox on VMware infrastructure.
Why Convert Virtual Hard Disk Type
There may be several reasons for migrating from Oracle VirtualBox to VMware Workstation. You may want to check whether an environment is compatible with VMware’s Hypervisor, or simply because you like the interface and functionality of Workstation, and use it without having to create a new virtual machine from scratch.
We are now going to show you how you can convert a VDI disk into VMDK and then run it successfully using VMware Workstation.
How to Convert VirtualBox VDI to VMware VMDK
Convert VDI to VMDK using Virtual Media Manager in VirtualBox
If you have VirtualBox already installed on your PC, then there is no simpler way of converting a pre-existing VDI hard disk to VMDK.
During the creation of a newly created VM in VirtualBox, you may have noticed that it supports both VMDK and VDI hard drives. Using the Virtual Media Manager within VirtualBox, you can convert it from one type to another.

Follow the steps below to convert VDI to VMDK:
Ensure that the virtual machine is powered off before proceeding with the steps below.
- Open Oracle VirtualBox, click File from the menu at the top, and then click Virtual Media Manager.

- From the Virtual Media Manager, click on the VDI file that you want to convert and then click Copy.

- From the popup window, select VMDK (Virtual Machine Disk) and then click Next.

- On the next screen, enter the custom name for the VM and click Copy.

- The wizard will now begin to clone the virtual hard disk while converting it from VDI to VMDK file type.

You can close the Virtual Media Manager once the VMDK file has been created.
You may now proceed to use the VMDK hard disk and run it in VMware Workstation using the guide given at the end of this post.
Convert VDI to VMDK using VBoxManage.exe
There is another way to convert VDI disks to VMDK, but this method is also only applicable if you already have VirtualBox installed. VBoxManage.exe is a command-line tool that comes with VirtualBox which can be used to convert VDI hard disks to VMDK format.
Ensure that the virtual machine is powered off before proceeding with the steps below.
- Launch the Command Prompt with administrative privileges.
- Now paste the following command to navigate to VBoxManage.exe. Note that this command is only valid if VirtualBox is installed in the default location. Otherwise, change the path to the installation folder within the inverted commas:
cd d/ “C:\Program Files\Oracle\VirtualBox\”
- Now use the following command to convert the VDI file to VMDK. Replace SourceVDI with the complete path for the VDI file and TargetVMDK with the complete path to where you want to save the converted VMDK file.
VBoxManage clonehd <em>SourceVDI</em>.vdi <em>TargetVMDK</em>.vmdk -format VMDK
Once the cloning process is completed, you will find that a VMDK file has been created at the designated location.
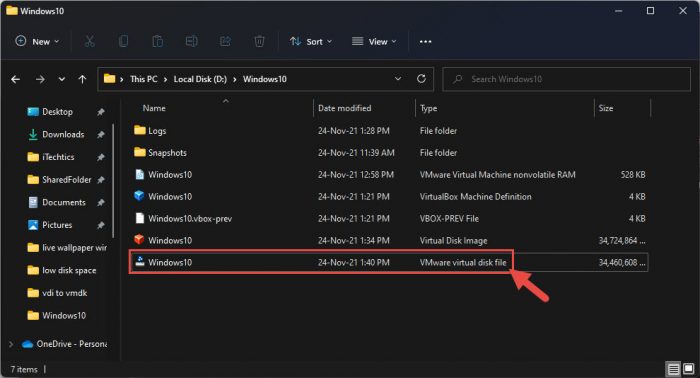
You can now use this file in VMware Workstation using the guide given at the end of this post.
Convert VDI to VMDK using VMWare VCenter Converter
VMware provides a tool for you to use to convert your VDI files to VMDK. The catch with this method is that the software needs to be installed on the running virtual machine that you wish to convert to VMDK. Therefore, you either need to have an active internet connection on the VM, or place the VMware VCenter Converter installer on the VM and install it.
We have divided this section into “Downloading and installing VMware VCenter Converter Standalone” and “Converting VDI to VMDK using VCenter Converter.”
Download and Install VMware VCenter Converter
Follow the steps below to download and install a standalone converter:
- Open the VCenter Converter page and click Download Now.

- You will navigate to a new page. Scroll down and click Go to downloads under the Product Downloads section.

- On the next page, click Download Now in front of VCenter Converter Standalone [version].

- You will now need to sign into VMware portal. Sign in using your credentials, or click Sign up now if you don’t already have an account.

- Now agree to the End User License Agreement by checking the box and then clicking Accept.
- VCenter Converter will now begin downloading. When it does, run the .exe file on the VM.
- Now go through with the installation wizard to complete the installation and then run the program.
Once installed, move onto the next phase of converting the VDI hard disk of the VM to VMDK.
Convert VDI to VMDK
- From the VMware VCenter Converter, click Convert machine.

- From the Conversion window, select Powered on and then select This local machine from the dropdown menu under it. Click Next when done.

- In the next window, select VMware Workstation or other VMware virtual machine from the drop-down menu in front of “Select destination type.” Then, in the Virtual machine details section, enter a name for the converted VM and click Browse to enter a location for the VMDK file to be saved. Click Next when done.

- On the next screen, click Next.

- On the next screen, click Finish.

The tool will now begin creating the VMDK file. You can view the progress of the process in the VMware VCenter Converter Standalone.

Once it is successfully created, you can find the converted VMDK hard disk at the designated location and then use it in VMware Workstation through the guide provided at the end of this post.
Convert VDI to VMDK using QEMU
QEMU is an emulator that is used to run an operating system designed for one platform on another platform. The tool can be downloaded, installed, and then used to convert a VDI hard disk to VMDK format. This process has also been separated into 2 segments: “Download and Install QEMU on Windows” and “Convert VDI to VMDK using QEMU.”
Download and Install QEMU on Windows
Ensure that the virtual machine is powered off before proceeding with the steps below.
- Open the QEMU directory for Windows x64. From there, select the folder named with the latest year (to download the latest version of QEMU).

- From the next page, click on the latest .exe file to download it.

- Now run the downloaded .exe file to begin QEMU installation.
- Follow through with the installation wizard to complete the installation.
Once installed, you can proceed to the next step to convert the VDI file to VMDK format.
Convert VDI to VMDK
- Launch the Command Prompt with administrative privileges.
- Now paste the following command to navigate to the QEMU folder:
cd /d C:\Program Files\qemu
- Now use the following command to convert a VDI file into VMDK. Replace SourceVDI with the complete path for the VDI file, and TargetVMDK with the complete path to where you want to save the converted VMDK file.
qemu-img convert "<em>SourceVDI</em>.vdi" -O vmdk "<em>TargetVMDK</em>.vmdk"
The last step in the process above can take a few minutes to execute, as it is creating a converted VMDK file. Once it is successfully created, you can find the VMDK hard disk at the designated location.
Let us now proceed to learn how you can use a converted VMDK file in VMware Workstation to create the same VM.
How to Create VM in VMware Workstation using VMDK file
The converted VMDK files are good enough for you to now create your new virtual machine in VMware Workstation. Here is how:
- Open VMware Workstation, click File from the top menu and then click New Virtual Machine.

- From the popup window, select Custom and then click Next.

- On the next screen, leave the default settings and click Next.

- Select “I will install the operating system later” and click Next.

- On the next screen, select the OS you are running and its versions from the dropdown menu, and click Next.

- Now enter a name for the new VM and click Next.

- On the next screen, select BIOS and click Next.

- Now adjust the number of processors for the VM according to your requirements and click Next.

- Adjust the RAM for the VM and click Next.

- On the next screen, leave the default settings and click Next.

- Leave the default settings again and click Next.

- On the next screen, leave the default settings and click Next.

- Now select Use an existing virtual disk and click Next.

- On the next page, click Browse and then navigate to the converted VMDK file. When selected, click Next.

- On the confirmation popup, click Keep Existing Format.

- Now click Finish to finalize the VM setup.

- You can now run the VM by clicking on the VM name in the left column, and then click Power on this virtual machine.

You have now successfully converted the VDI hard disk to VMDK and then run it through VMware Workstation.
Take Away
It is easier to convert a virtual hard drive type to use it on another hypervisor than having to create a new one from scratch.
We have discussed 4 methods to convert a VDI file to VMDK in this post, but we think that using the Virtual Media Manager in VirtualBox is the most convenient way to accomplish the task. This process does not involve downloading or installing any additional tools (other than VirtualBox itself) and also does not involve the use of the command line.




1 comment
Ray
This command is incorrect:
VBoxManage clonehd SourceVDI.vdi TargetVMDK.vmdk -format VMDK