Key Points
- Unlink OneDrive by opening OneDrive Settings > Account > Unlink this PC.
- Uninstall OneDrive by going to Settings > Apps > Installed apps > Microsoft OneDrive > Uninstall > Uninstall.
OneDrive is a cloud storage facility by Microsoft that is now integrated directly into the Windows operating system. Both Windows 10 and Windows 11 have built-in applications and support for OneDrive. Not only that but it is enabled by default.
If you have had the privileges of performing a clean Windows 11 install or resetting a Windows 11 PC, you’ll notice that the Out of Box Experience (OOBE) screens ask for your Microsoft account information, and there is no normal way around it. Once you enter your Microsoft account details, the Windows OS automatically enables and synchronizes the pre-selected folder locations.
However, some people may not want to sync their information to the cloud. This is why we have put together this informative article that shows you how to unlink, disable, or uninstall Microsoft OneDrive from your Windows 11 computer.
Table of Contents
Difference between OneDrive Unlinking, Disabling, and Uninstalling
Your Microsoft Account can be used to sign into multiple computer accounts across different devices. Therefore, the same OneDrive account can synchronize with different PCs. Unlinking OneDrive from a particular computer means that your OneDrive account will not sync anything from that particular computer.
Once unlinked, you will be able to sign into the OneDrive application using any other Microsoft account.
Disabling OneDrive means that the application is only disabled, but still installed on your computer. This halts all operating of OneDrive, including backup and restoration, but can be re-enabled easily since the application is still available.
That said, uninstalling OneDrive is self-explanatory. This means that the OneDrive application is not only disabled but also removed from your computer. This is for the people who think of OneDrive as bloatware and have no use for it.
Unlink OneDrive in Windows 11
As mentioned earlier, unlinking your OneDrive account stops any synchronization on your current computer. The account will still be available, and the other linked devices may still be backing up your data, but this one won’t.
Here are the steps to unlink your Microsoft account from the OneDrive application in Windows 11:
Click on the OneDrive application in the taskbar.

Open OneDrive from Quick Access in the taskbar Click the gear icon in the top-right corner of the flyout.

Click the gear icon in the OneDrive app Click Settings.

Open OneDrive settings Click Account from the left.
Click “Unlink this PC.”

Unlink the computer from OneDrive Click “Unlink account.”

Unlink OneDrive account
Your OneDrive account will now be unlinked and the OneDrive app will show the setup page again.

Stop OneDrive from Automatically Opening on Startup
Whether you have set up OneDrive, not set it up, or unlinked it using the steps above, the OneDrive application is programmed to start up as soon as you sign into your account. This is because this app is part of the startup programs on Windows 11.
To prevent the OneDrive application from automatically opening on startup, use these steps:
Press CTRL + Shift + Esc to open the Task Manager.
Switch to the “Startup apps” tab.

Open Startup apps in Task Manager Right-click “OneDrive” and click Disable.

Disable OneDrive from opening at the startup
This will disable OneDrive from starting up as soon as you sign into your account. However, you can still launch the app on demand.
To re-enable OneDrive at startup, all you need to do inside the “Startup apps” tab in the TaskManager is right-click “OneDrive” and click “Enable.” from the context menu.
Disable OneDrive from Group Policy
When we say “disable OneDrive,” we mean temporarily disabling it so it can be re-enabled at a later time. On Windows 11, there is only one way to disable OneDrive, and that is through the Group Policy.
Follow these steps to disable OneDrive on Windows 11:
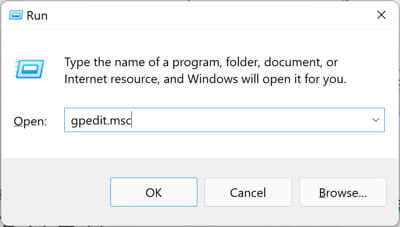
Press the Windows Key + R to open the Run Command box.
Type in “gpedit.msc” and press Enter to open the Group Policy Editor.

Open the Group Policy Editor Expand “Administrative Templates” under Computer Configuration.
Then expand “Windows Components,” and then click “OneDrive.”
Double-click the policy “Prevent the usage of OneDrive for file storage.”

Open Group Policy for OneDrive Select “Enabled,” and then click Apply and Ok.

Enable policy to disable OneDrive Now press the Windows key + R again to open the Run Command box.
Type in “cmd” and then press CTRL + Shift + Enter to launch an elevated Command Prompt.
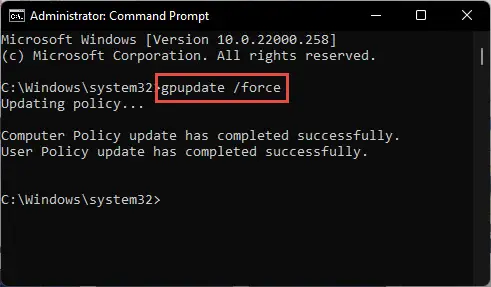
Run the following command to implement changes in the Group Policy:
GPUPdate /Force
Enforce changes to Group Policy
This will disable OneDrive for good unless you manually revert the changes and re-enable OneDrive.
To re-enable OneDrive, return to the “Prevent the usage of OneDrive for file storage” Group Policy and select either “Disabled” or “Not configured.”
Uninstall OneDrive
You can uninstall OneDrive from your PC if you have no use for it. Here are two ways to uninstall Microsoft OneDrive:
Uninstall OneDrive from Settings
Here is how to uninstall OneDrive from the Settings app:
Press the Windows key + i to open the Settings app.
Click Apps.
Then click “Installed apps” on the right.
Look for “Microsoft OneDrive” and click on the 3 dots in front of it.
Click Uninstall.

Uninstall OneDrive from Settings Click “Uninstall” again.

Confirm uninstall
OneDrive will now be removed from your computer for good.
Uninstall OneDrive from PowerShell
If you are a fan of the command line, then here are the steps to uninstall OneDrive using PowerShell:
Press the Windows Key + R to open the Run Command box.
Type in “powershell” and then press CTRL + Shift + Enter to run PowerShell as an admin.
Now run the following command:
winget uninstall onedrive
Uninstall OneDrive from PowerShell When asked for confirmation, type “yes” and press Enter.

Confirm uninstallation of OneDrive using PowerShell
Uninstall OneDrive from Command Prompt
Alternatively, you can also uninstall OneDrive from the Command Prompt. Here is how:
Press the Windows Key + R to open the Run Command box.
Type in “cmd” and then press CTRL + Shift + Enter to run Command Prompt as an admin.
Run the following command:
winget uninstall Microsoft.OneDrive
Uninstall OneDrive from Command Prompt When asked for confirmation, type “yes” and press Enter.

Confirm uninstallation of OneDrive using Command Prompt
OneDrive will now be uninstalled from your PC.
If you want to reinstall OneDrive at a later time, you can always get OneDrive from the Microsoft Store.
Ending Thoughts
OneDrive is an excellent Windows-native cloud storage service integrated into the OS. However, not everyone is a fan of it. If you are using another backup and synchronization service, or don’t prefer using one at all, then this article shows you how to unlink your account, disable OneDrive, or even uninstall it if needed.


