Printer Test Pages: Check Quality, Alignment & Ink Levels

Color Tests
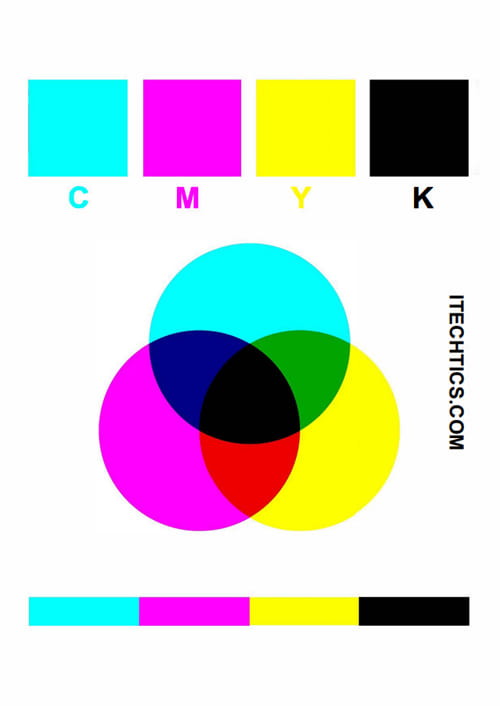
1) CMYK Color Test
The CMYK Color Test evaluates the accuracy and quality of color printing using the CMYK color model, which stands for Cyan, Magenta, Yellow, and Key (Black). It ensures that printers produce the correct colors by mixing these four inks in varying proportions.
To identify if the CMYK Color Test fails, examine the printed test page for:
- Color Accuracy: Colors should match the expected CMYK values. Deviations indicate failure.
- Color Banding: Gradients should be smooth. Visible bands suggest issues.
- Color Consistency: Uniform areas should have consistent color. Variations show problems.
- Color Bleeding: Colors should not bleed into each other. Bleeding indicates errors.
If any of these issues are present, the test has failed.
To fix this issue, you can use the following tips:
- Calibrating the Printer: Adjust printer settings to ensure accurate color reproduction.
- Checking Ink Levels: Ensure CMYK cartridges are full and not expired.
- Cleaning Print Heads: Remove any clogs or debris affecting ink flow.
- Updating Drivers: Install the latest printer drivers and firmware.
- Using Quality Paper: Ensure the paper is suitable for high-quality color printing.
- Adjusting Color Profiles: Use correct ICC profiles for accurate color matching.
- This test is important for designers and businesses that need high color accuracy for branding or artwork.
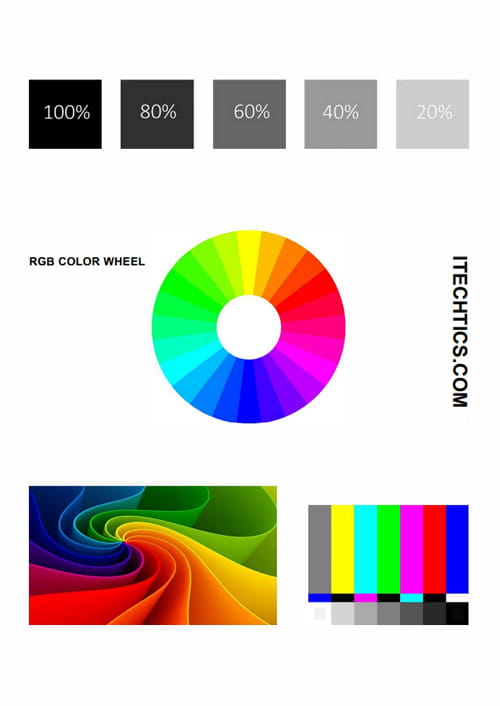
2) RGB Color Spectrum Test
The RGB Color Spectrum Test evaluates colors based on the RGB model, which uses red, green, and blue light to create a wide range of colors. Each color is defined by a combination of these three primary colors, with values typically ranging from 0 to 255.
To identify if the RGB Spectrum Test fails, examine the printed test page for:
- Color Accuracy: Colors should match the expected RGB values. Deviations indicate failure.
- Color Banding: Gradients should be smooth. Visible bands suggest issues.
- Color Consistency: Uniform areas should have consistent color. Variations show problems.
- Color Bleeding: Colors should not bleed into each other. Bleeding indicates errors.
If any of these issues are present, the test has failed.
To fix this issue, you can use the following tips:
- Calibrating the Printer: Adjust printer settings to ensure accurate color reproduction.
- Checking Ink Levels: Ensure CMYK cartridges are full and not expired.
- Cleaning Print Heads: Remove any clogs or debris affecting ink flow.
- Updating Drivers: Install the latest printer drivers and firmware.
- Using Quality Paper: Ensure the paper is suitable for high-quality color printing.
- Adjusting Color Profiles: Use correct ICC profiles for accurate color matching.
- The RGB Color Spectrum Test is useful for digital imaging, display calibration, and color consistency. It ensures accurate color representation across devices, aids in graphic design, and helps in color correction for photos and videos.
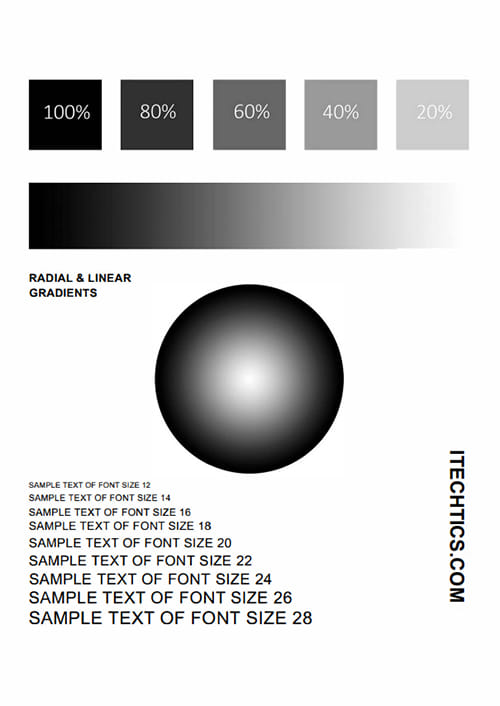
3) Grayscale Gradient Test
The Grayscale Gradient Test evaluates the smoothness and accuracy of transitions between different shades of gray in an image or display. It helps identify issues like banding or color inaccuracies.
To identify if the Grayscale Gradient Test fails, examine the printed test page for:
- Smooth Transitions: Gradients should transition smoothly from black to white. Banding or abrupt changes indicate failure.
- Detail Clarity: Fine details in grayscale should be sharp. Blurred or fuzzy details suggest issues.
- Uniformity: Uniform gray areas should be consistent without variations or streaks.
- Contrast Levels: Different shades of gray should be distinct. Poor contrast indicates problems.
If any of these issues are present, the test has failed.
If the Grayscale Gradient Test fails, resolve it by:
- Calibrating the Printer: Adjust settings for accurate grayscale reproduction.
- Checking Ink Levels: Ensure ink cartridges are full and not expired.
- Cleaning Print Heads: Remove clogs or debris affecting ink flow.
- Updating Drivers: Install the latest printer drivers and firmware.
- Using Quality Paper: Ensure the paper is suitable for high-quality grayscale printing.
- Adjusting Color Profiles: Use correct ICC profiles for accurate grayscale matching.
- It is critical for black-and-white document printing, as well as for checking how printers handle shadows and highlights in photos.
4) Resolution Charts Test
Printer Resolution Charts Test evaluates a printer’s ability to reproduce fine details and sharpness. It uses standardized charts with various patterns and lines to measure the printer’s resolution and quality.
To identify if the Printer Resolution Charts Test fails, examine the printed test page for:
- Detail Clarity: Fine details should be sharp. Blurred or fuzzy details indicate failure.
- Line Sharpness: Lines should be crisp and well-defined. Soft or jagged lines suggest issues.
- Gradient Smoothness: Gradients should transition smoothly. Banding or abrupt changes show problems.
- Color Accuracy: Colors should match expected values. Any color deviations indicate errors.
If any of these issues are present, the test has failed.
If the Resolution Charts Test fails, resolve it by:
- Calibrating the Printer: Adjust settings for optimal resolution.
- Checking Ink Levels: Ensure cartridges are full and not expired.
- Cleaning Print Heads: Remove clogs or debris affecting print quality.
- Updating Drivers: Install the latest printer drivers and firmware.
- Using Quality Paper: Ensure the paper is suitable for high-resolution printing.
- Adjusting Print Settings: Set the printer to the highest resolution mode.
- Graphic designers and photographers can use this to ensure prints contain the required level of detail.
Text Quality Tests
1) Font Size Variations
A Printer Font Size Variations test checks a printer’s ability to accurately reproduce text in different font sizes. It involves printing a document with text in various sizes to evaluate clarity, sharpness, and legibility at each size.
This test is useful for any office or individual that frequently prints documents where text clarity is essential.
To identify if the Font Size Variations Test fails, examine the printed test page for:
- Inconsistent Size: Fonts should match specified sizes. Any deviation indicates failure.
- Blurriness: Fonts should be clear. Blurry text suggests issues.
- Alignment: Fonts should be properly aligned. Misalignment signals problems.
- Spacing: Letter and word spacing should be even. Irregular spacing shows errors.
If any of these issues are present, the test has failed.
If the test fails, make sure to check the following settings:
- Check Printer Settings:
- Access the printer settings menu.
- Ensure the correct paper size and type are selected.
- Verify that the print quality is set to the desired level.
- Verify Driver Installation:
- Go to the computer’s device manager.
- Locate the printer under “Printers.”
- Ensure the latest driver is installed; update if necessary.
- Document Settings:
- Open the document in the software used for printing.
- Check font sizes and styles.
- Ensure no scaling options are altering the font size.
- Clean Print Heads:
- Access the printer’s maintenance menu.
- Select the option to clean the print heads.
- Run a test print to check for improvements.
- Update Printer Firmware:
- Visit the printer manufacturer’s website.
- Download the latest firmware for your printer model.
- Follow the instructions to update the firmware.
- Test Print Again:
- Print a test page after performing the above steps.
- Check if the font size variations issue is resolved.