Windows allows you to share almost all sorts of content over the network with your friends and colleagues. This is usually achieved through a shared folder on which you have created and configured permissions.
But there can come a time when you may no longer need to share any content, or simply do not want to. In this case, Windows allows multiple ways to stop a folder from being shared and visible on your network.
Learn how to create a hidden shared folder.
Let us show you 6 methods to prevent a folder from being shared anymore.
Table of Contents
How to Stop File Sharing Over the Network
From Context Menu
Here is how to stop sharing a folder using the context menu in File Explorer:
Navigate to the shared folder using File Explorer.
(Windows 11 only) Right-click on the shared folder and click Show more options.

Expand context menu by clicking “Show more options” Now expand Give access to and then click Remove access.

Remove access from context menu The Network access wizard will now open. Click Stop sharing.

Stop sharing from Network Access wizard
The folder will now be inaccessible to others on your network.
From Folder Properties
You can also disable file sharing for the folder from its properties. Here’s how:
Navigate to the shared folder using File Explorer.
(Windows 11 only) Right-click on the shared folder, click Properties.

Access folder properties From the Properties window, switch to the Sharing tab and then click Advanced Sharing.

Access advanced sharing settings From the Advanced Sharing window, uncheck the box next to “Share this folder,” then click Apply and Ok.

Disable sharing from properties Now close the Properties window.
The folder will no longer be shared on your network.
From Shared Folders/Computer Management Console
Windows comes with preinstalled Microsoft Management Consoles used to perform administrative tasks. You can use the Shared Folders Console or the Computer Management Console to stop a folder from being shared. Here is how:
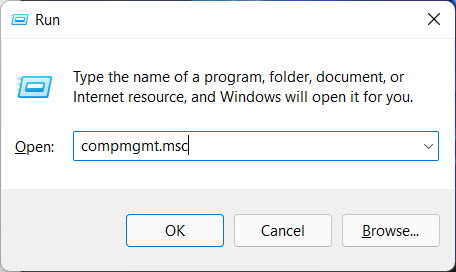
Open either the Shared Folders Console or the Computer Management Console by typing in either fsmgmt.msc or compmgmt.msc in the Run Command box.

Open the Computer Management Console 
Open the Shared Folders Console Now navigate to the following from the left pane:
In the case of Computer Management Console:
System Tools >> Shared Folders >> Shared
In the case of Shared Folders Console:
Shared Folders >> Shared
Here, right-click on the folder in the right pane and then click Stop sharing.

Stop sharing folder from Management Console When asked for a confirmation, click Yes.

Click Yes to confirm
The folder will no longer be shared on your network.
From Control Panel
Follow the given steps to prevent a folder from being shared using the Control Panel. Note that this method will prevent all files, folders, and printers from being shared from your computer.
Navigate to the following:
Control Panel >> Network & Internet >> Network and Sharing Center >> Change advanced sharing settings
Under the Current Profile, beneath “File and printer sharing,” select Turn off file and printer sharing, then click Save changes.

Disable file sharing from Control Panel
Your computer will no longer be sharing any folders. However, this also means that any printer connected to your PC won’t be able to print jobs from other computers on your network either.
From Command Prompt
If you prefer the Command Line Interface (CLI), you can stop folder sharing directly from the Command Prompt. Here is how:
Enter the following cmdlet to view all shared folders and directories and get their names:
net share
View all shared folders in Command Prompt Now use the following command to stop a folder from being shared. Replace FolderName with the name of the folder that you wish to stop sharing.
net share FolderName /delete
Stop sharing a specific folder from Command Prompt
Note that the Command Prompt states that the folder has been deleted. However, the folder remains on your PC and has only been removed from the sharing list.
From Windows PowerShell
Perform the following steps to stop a folder from being shared using Windows PowerShell:
Enter the following cmdlet to view all shared folders and directories and get their names:
Get-SmbShare
List of shared folders and directories using PowerShell Now use the following command to stop a folder from being shared. Replace FolderName with the name of the folder that you wish to stop sharing.
Remove-SmbShare -Name "FolderName"
Enter folder name to stop sharing in PowerShell When asked for a confirmation, enter A for “Yes to all.”

Confirm all
The folder will now no longer be accessible to anyone on your network as it has been stopped from sharing.
Closing Words
The methods discussed above to stop a folder from sharing all achieve the same task. You can pick one that suits you best and manage your shared folders accordingly.
We must remind you that the Control Panel prevents all folders from being shared, as well as any additional printers, scanners, or peripherals that may be connected to your computer. Therefore, only adopt that method when you want to stop all kinds of shared elements from your computer.


