According to StatCounter, Google Chrome has had the highest market share among all web browsers in the past year, and even before that. Since most users use Chrome, it would be in your best interest to optimize it, especially the download speed in Chrome.
You can download movies, music, files, and so much more using the browser from any website available. How about we make those downloads even faster than before?
Although Chrome is a fast browser, users may experience slow download speeds due to its configuration.
There are many things that affect your online download speed, such as your internet connection and bandwidth, the number of simultaneous downloads, and your hardware. Even with the same infrastructure, you can ramp up your download speed using Chrome with a few tweaks.
In this article, we show you multiple ways to increase Chrome download speed that are proven to be effective.
Table of Contents
Why Downloads in Chrome may be Slow?
As mentioned earlier, downloads can be slow due to a plethora of factors. From having an incorrect software configuration to using the wrong transmission medium; many possibilities could result in a slow internet speed.
For example, it may be possible that your Internet Service Provider (ISP) has given you a slow internet connection, or maybe put a cap on your VLAN. Other times, multiple devices on your network could be consuming up the bandwidth, leaving very little space for your device. Or it may be slow because you have configured the wrong DNS server on your PC.
Either way, here are 19 ways to speed up your internet download speed. Other than this, we have also listed a few below specific to the Chrome browser which will give your downloads an additional boost.
How to Increase Download Speed in Google Chrome
Enable Parallel Downloading
Parallel downloading is a feature introduced in Chrome to download files faster by downloading the file using multiple connections. The browser splits large download files into smaller packets, and then downloads them individually. This approach significantly increases Chrome’s download speed.
Note that the feature is still experimental, therefore it needs to be manually enabled using a Chrome flag.
To enable Parallel Download in Google Chrome, use these steps:
-
Paste the following into Omnibox and hit Enter.
chrome://flags/#enable-parallel-downloading

Access Chrome Parallel Downloading flag -
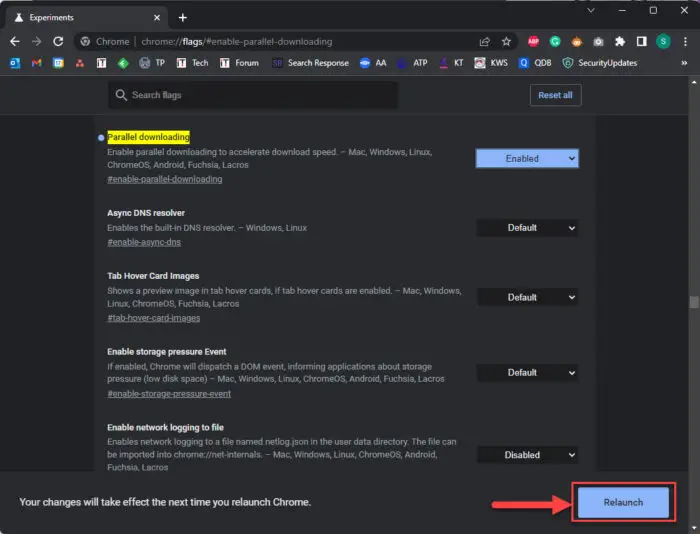
Expand the drop-down in front of “Parallel downloading” and select “Enabled.”

Enable Parallel Downloading in Chrome -
Click “Relaunch” to implement the changes.

Relaunch Chrome Chrome will now restart and Parallel Downloading will be enabled.
You will now notice a significant change in your download speeds on Google Chrome.
There are also a few other things you can do to speed up your download speed.
Change DNS to Google
Changing your Domain Name Server (DNS) makes all the difference in browsing and download speeds. It may be possible that your ISP has configured a DNS for you. If not, manually assign Google’s DNS IPs on your Windows computer using these steps:
-
Open the Network Connections applet by typing in “ncpa.cpl” in the Run Command box.

Open the Network Connection applet -
Right-click on the network adapter that is currently connected and then click “Properties.”

Open adapter properties -
Select “Internet Protocol Version 4 (TCP/IPv4)” and then click “Properties.”

IPv4 properties -
Select “Use the following DNS server addresses” and then enter the following addresses as the Preferred DNS server and the Alternate DNS server:
8.8.8.8
8.8.4.4

Enter DNS addresses manually -
Click OK on all windows to save and close them.
Now check and confirm that your internet is still working and performing better than it did before. If it does, your downloads should also be quicker.
Update Chrome
Keep Google Chrome updated to the latest version to enjoy all the new speed and performance features from the vendor.
Find the latest Chrome version in this post.
Follow these steps to update your Chrome browser:
-
Open Google Chrome and click on the ellipses (3 dots) in the top-right corner.

Click the ellipses -
Expand Help and click “About Google Chrome.”

About Google Chrome The browser will now search and download the latest available version of Chrome.
-
Once the update is complete, click “Relaunch” to update Chrome.

Relaunch Chrome
Disable Browser Extensions
Browser extensions integrate into the browser and can be beneficial for different purposes. However, they can often consume internet bandwidth without your knowledge in the background. Therefore, if you have any extensions that you no longer use, we suggest that you disable or remove them.
Use these steps to remove unnecessary Chrome extensions:
-
Open Google Chrome and click on the ellipses (3 dots) in the top-right corner.

Click the ellipses -
Click “Settings.”

Open Chrome settings -
Switch to the “Extensions” tab.

Open Extensions tab -
Click “Remove” on any extension not being used.

Remove Chrome extension -
When asked for confirmation, click “Remove” again.

Confirm extension removal -
Repeat Steps 4 & 5 to remove all unused Chrome extensions.
After removing the extensions, your internet bandwidth should not be going to waste anymore.
Clear Cookies and Cache
It might not seem relevant at first, but clearing out your browsing history, especially your cookies and cache, can often make a huge impact on your browsing and download experience.
Old and corrupt files that store your browsing history can cause congestion for incoming traffic, thus affecting your download speed.
Use these steps to clear all browsing history from Chrome and have a fresh start:
-
When in Chrome, press the CTRL + H shortcut keys to open History settings.
-
Click “Clear browsing data” from the left.

Clear browsing data in Chrome -
Select Time Range “All Time,” then check all the boxes below. Now click “Clear Data.”
Note: Clearing all browser history will sign you out of all websites.

Clear all browsing data including cookies and cache
Close Unused Tabs
Although it should be a given, tabs running in the background could be consuming up the bandwidth. If they are no longer in use, you should close them to allow more bandwidth for your downloads.
Enable Page Preload
Chrome’s preload feature allows the browser to prefetch data from linked pages and store it in your cache so that it can be loaded faster when you access them.
Although this feature does not directly impact your Chrome downloads, it will surely enhance your browsing experience.
Note: This feature is enabled by default unless the settings have been changed explicitly.
Use these steps to enable preload in Chrome:
-
Open Google Chrome and click on the ellipses (3 dots) in the top-right corner.

Click the ellipses -
Click “Settings.”

Open Chrome settings -
Switch to the “Privacy and security” tab.

Open the Privacy and security tab in Chrome -
Go to “Cookies and other site data.”

Open settings for cookies and other side data -
Toggle the slider in front of “Preload pages for faster browsing and searching” into the On position.

Enable preloading in Google Chrome
Preloading will now be enabled, making your browsing experience smoother and faster.
Takeaway
This article lists everything you can do to improve your download speeds on Google Chrome. However, there are many other tricks and tweaks that you can perform to speed up the general internet speed on a Windows PC.
If the methods stated above to improve the download speed on Chrome are insufficient for you, then we suggest that you also perform the steps given in the linked post above to improve it further.
That said, using a download manager would be an ideal situation to download large files, as they are engineered to optimize the download speeds. However, we have not mentioned this as a solution since the focus of the article is Chrome and not its alternatives.


