A file extension is the last part of the file name coming after the last dot (.). For example, if we have created a Microsoft Word file, its file extension will show up as .docx. File extensions help us to identify the file type associate a program with the file which can open it in a readable manner.
By default, file types are hidden in Windows 10. It can be a security risk as we could run an executable whose icon was set as a document type. Normally the viruses and other malware disguise their executables as documents or pictures. A user can, unknowingly, double-click and run the file expecting the file to open in its appropriate program. Instead, the executable could wreak havoc on the system.
That’s why it is recommended to change the Windows setting to always show file extensions. In this article, we share five ways to show file extensions in Windows.
Table of Contents
How to show file extensions in Windows 10
Although these methods will work in earlier versions of Windows like Windows 8.1, Windows 8, Windows 7 and even Windows XP, but since we have only tested these on Windows 10, that’s why we have specified the specific Operating System.
Using Folder Options
- Go to Run –> control folders

- Go to View tab

- Un-check “Hide extensions of known file types”

Hide extensions for known file types
That’s it. Now you will see the file extensions for each filetype.
Using File Explorer
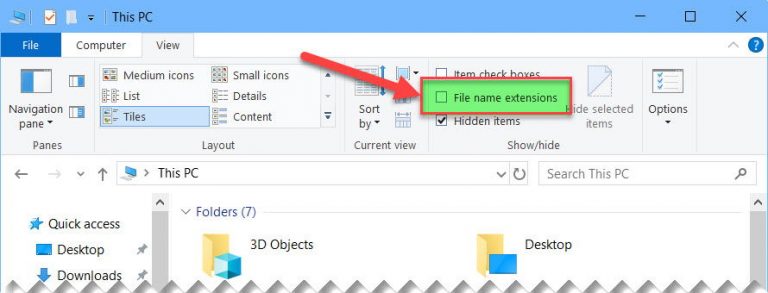
Windows 10 File Explorer ribbon interface makes it easier to instantly show or hide file extensions. Here are the steps to show/hide file extensions in Windows Explorer:
- Open File Explorer (Windows Key + E)
- Go to View Tab on the Ribbon menu

- Check “File Extensions” under Show/Hide section

Checking File Extensions will show the file extensions while unchecking it will hide the extensions.
Using Registry Editor
- Open Registry Editor by going to Run –> regedit

- Navigate to the following key:
HKEY_CURRENT_USER\Software\Microsoft\Windows\CurrentVersion\Explorer\Advanced - Double-click HideFileExt from the right-hand pane.
- Set the value to 0 to show File extensions of known files and 1 to hide File extensions.

Show file extensions in Windows using Registry
Usually, the changes will be immediate. If you don’t see the changes, you may want to restart File Explorer from the task manager or restart the computer altogether.
Using Command Line
Command line method can be used to quickly change the File extension settings for many computers at once. You can create a batch file with the following commands and run the batch file on any computer to change the settings immediately.
To hide file extensions using command line, open command-prompt and run the following command:
reg add HKCU\Software\Microsoft\Windows\CurrentVersion\Explorer\Advanced /v HideFileExt /t REG_DWORD /d 1 /f
To show file extensions, run the following command:
reg add HKCU\Software\Microsoft\Windows\CurrentVersion\Explorer\Advanced /v HideFileExt /t REG_DWORD /d 0 /f
For your ease, you can download the batch files from below and run them according to your situation.
 Hide File Extensions (108 bytes, 2,425 hits)
 Show File Extensions (108 bytes, 2,154 hits)
Using Group Policy Editor
This method is limited for system administrators who want to implement the show or hide file extensions policy across their domain network.
- Open Domain Group Policy Management Editor
- Go to User Configuration –> Preferences –> Control Panel items –> Folder Options
- Right-click Folder Options on the left-hand pane and select New –> Folder Options (Windows XP) or Folder Options (Atleast Windows Vista)
- This will open the regular Folder Options window. You can make changes to this window and the changes will be made across the domain or where the group policy is applied.

Group Policy management folder options for domain
Which method do you prefer to show or hide file extensions on your computer? We have listed all the techniques used for almost all versions of Windows including Windows 10, Windows 8.1, Windows 7, Windows Vista and even Windows XP. These methods also work for Windows Server Operating Systems including Windows Server 2008, Windows Server 2012, Windows Server 2016 and Windows Server 2019.


