The Windows operating system hides critical system files and folders by default. These are hidden so that the users do not intentionally or accidentally manipulate them since those could damage the OS itself and affect its functionality.
However, occasionally, these hidden and protected files and folders need to be accessed to make informed changes, like the pagefile.sys. Therefore, one needs to be able to view and access them.
In this post, we are going to show you multiple ways to view and access the hidden and protected system files in both Windows 10 and Windows 11 operating systems.
Table of Contents
Before we dig into the methods to view these hidden files and folders, there is some insight we would like to share with our readers.
Windows Hidden Folders VS. Protected Folders
Windows has 2 categories of files and folders that are not visible to the users by default. One is the “Hidden” files and folders, and the other is the “Protected” files and folders.
The hidden files and folders can be accessed by a user using either File Explorer or other command-line tools. However, the protected items are blocked by the Windows operating system. If you try to access these items, you will encounter a prompt such as the following:
Access is denied
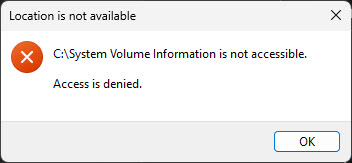
This is because the protected files and directories are critical to the functionality of the Windows OS and a user has no concern with them. This means that the protected items have nothing to do with what a user might be using the computer for and has no business there.
With that said, files and folders can also be hidden due a malware or virus in your computer. These are usually hidden by ransomware where you are asked to pay a certain amount to bring back your hidden files. In this case, you may need to access/view those protected files as well.
The methods given in this post cover all bases and allow you to view and access when Windows-hidden items as well as those hidden by a virus.
View Hidden and Protected Folders using File Explorer
Using File Explorer to view the hidden files and folders is perhaps the most desired way. However, this method probably won’t work if your device is infected by malware. You can still use this method to access and view the hidden content by Windows.
In Windows 11
The methods to view both the hidden items and the protected items are different when using File Explorer. Therefore, we have divided the method to view them.
Show Hidden Files and Folders in Windows 11 using Explorer
Follow these steps to view the hidden files and folders on Windows 11 OS using Windows Explorer:
-
Open File Explorer and navigate to the directory where you want to view the hidden items.
-
Now click View from the ribbon menu.

Expand View menu -
Now expand Show from the menu, and then click Hidden items.

Show hidden items
You should now be able to see the hidden items inside File Explorer. The icons of these files and folders would be less opaque than the others.
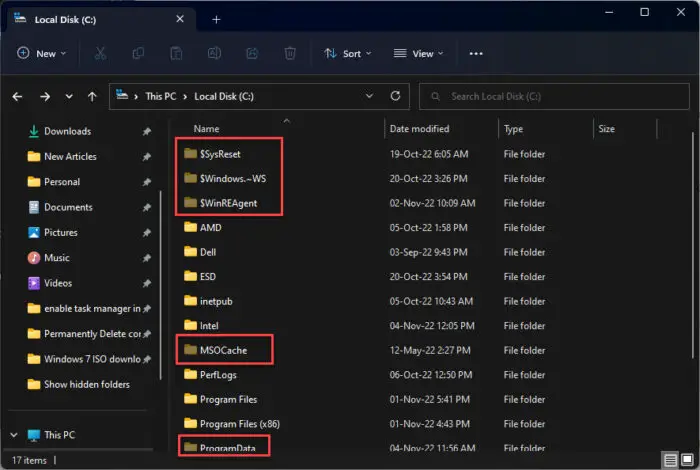
Show Protected and Hidden Items in Windows 11 using Explorer
When viewing the protected items, the hidden items are also shown in File Explorer. Follow these steps to view both hidden and protected files and folders in Windows 11:
-
Open File Explorer and navigate to the directory where you want to view the protected items.
-
Click the ellipses (3 dots) from the ribbon menu and then click Options.

Open Explorer options -
From the Folder Options popup, switch to the View tab, then select the “Show hidden files, folders, and drives” radio button. Also, uncheck the box next to “Hide protected operating system files.”

Show protected items -
You will now be prompted for confirmation. Click Yes.

Confirm action -
Now click Apply and Ok on the Folder Options popup to implement the changes.

Apply changes
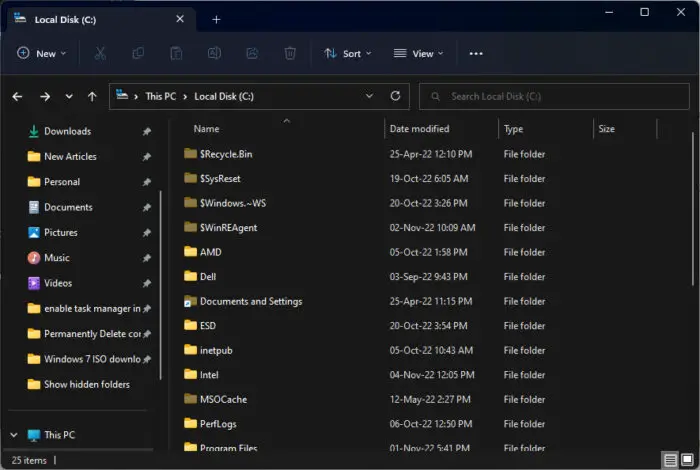
You will now be able to see both the hidden as well as protected items in this directory, as well as any other you navigate to. However, there will be no visible difference between the two types.
In Windows 10
Similar to Windows 11, you can also view the hidden folders, or the hidden as well as the protected folders. However, since the Explorer layout is a bit different than the one in Windows 11, we decided to write for Windows 10 in a separate section.
Show Hidden Files and Folders in Windows 10 using Explorer
Follow these steps to view the hidden files and folders on Windows 10 OS using Windows Explorer:
-
Open File Explorer and navigate to the directory where you want to view the hidden items.
-
Now click View from the ribbon menu, and then check the box next to Hidden items in the Show/hide section.

Show hidden items
You will now be able to see the hidden items in Explorer.
Show Protected and Hidden Items in Windows 10 using Explorer
Similar to Windows 11, when viewing the protected items, the hidden items are also shown in File Explorer. Follow these steps to view both hidden and protected files and folders in Windows 10:
-
Open File Explorer and navigate to the directory where you want to view the protected items.
-
Click View from the ribbon menu and then click Options.

Open Explorer options -
From the Folder Options popup, switch to the View tab, then select the “Show hidden files, folders, and drives” radio button. Also, uncheck the box next to “Hide protected operating system files.”

Show protected items -
You will now be prompted for confirmation. Click Yes.

Confirm action -
Now click Apply and Ok on the Folder Options popup to implement the changes.

Apply changes
You will now be able to view both the hidden and protected items.
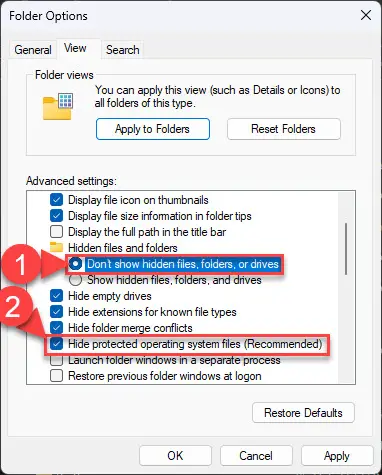
In the case of both Windows 10 and Windows 11, if you wish to hide the hidden folders again, all you need to do is reverse the action that you used to show them in the first place. To hide both the protected and hidden items, you must go to the View tab in Folder Options, check the box next to “Hide protected operating system files” and select the “Don’t show hidden files, folders, or drives” radio button.
View Hidden Files and Folders using Settings App
You can also show and hide the hidden files and folders from the Settings app in both Windows 10 and 11. Note that this will only work for the hidden items, and not the protected items.
Since the approach to display the hidden files and folders from the Settings app is slightly different for both Windows 10 and Windows 11, we have separated the 2 methods.
In Windows 11
-
Navigate to the following:
Settings appp >> Privacy & security >> For developers
-
Now click File Explorer to expand it.

Expand File Explorer settings -
Now toggle the slider in front of “Show hidden and system files” into the On position.

Enable “Show hidden and system files”
You will now be able to see the hidden items in File Explorer.
In case you want to hide the items again, simply toggle the same slider into the Off position.
In Windows 10
-
Navigate to the following:
Settings app >> Update & Security >> For developers
-
Here, scroll down to the File Explorer section and uncheck all the boxes except “Change settings to show hidden and system files,” and then click Apply.

Show hidden items from Settings app
You will now be able to see the hidden items in File Explorer.
View Hidden and Protected Files and Folders from Control Panel
You can also show the hidden as well as the protected files and folders in File Explorer from the Control Panel. Here is how:
-
Navigate to the following:
Control Panel >> Appearance and Personalization >> File Explorer Options
This will open the Explorer Options window.
-
Now switch to the View tab and select the “Show hidden files, folders, and drives” radio button.
This will show only the hidden items.

Show hidden items -
If you also want to view the protected items, then go ahead and uncheck the box next to “Hide protected operating system files.”

Also show protected items -
When done, click Apply and Ok to save the changes.
View Hidden and Protected Files and Folders from Windows Registry
You can also manipulate the Windows Registry manually to show or hide the hidden and protected items inside Windows Explorer. Here are the details for the registries that you can alter:
| Registry Value | Details | Default Value | Value to show |
| Hidden | Show/Hide hidden items | 2 (hidden) | 1 |
| ShowSuperHidden | Show/Hide protected items | 2 or 0 (hidden) | 1 |
Now follow these steps to make manual changes to the registries:
Note: Misconfiguration of critical values in the system’s registry could be fatal for your operating system. Therefore, we insist that you create a system restore point before proceeding forward with the process.
-
Open the Registry Editor by typing in regedit in the Run Command box.

Open Registry Editor -
Now paste the following in the navigation bar at the top for quick navigation:
Computer\HKEY_CURRENT_USER\Software\Microsoft\Windows\CurrentVersion\Explorer\Advanced

Quick navigation path in Registry Editor -
Here, you will find both Hidden and ShowSuperHidden values in the right pane. Double-click Hidden and change its Value Data to 1, and change the Value data of ShowSuperHidden if you also want to show the protected items.

Hidden and ShowSuperHidden values in Registry Editor -
When done, simply close the Registry Editor and refresh your Explorer window to show the hidden and protected items.
A system restart will not be needed.
You should now be able to see the hidden and protected files and folders in File Explorer.
If you want to revert these settings later and hide the items, you can do so by reverting the settings from within File Explorer Options, or you can change the Value Data for both Hidden and ShowSuperHidden to 2.
View Hidden and Protected Items in Command Prompt
You can also view the hidden and protected files and directories inside the Command Prompt. This method will show you only the items with the hidden attribute, and the items that are already visible in File Explorer will not be shown.
Moreover, this won’t show the hidden items in File Explorer, but only inside the Command Prompt.
Follow these steps to see the hidden and protected files and folders in any given directory:
-
Open an elevated Command Prompt instance and then use the “CD” cmdlet to change your directory and navigate to the directory in which you want to view the hidden items:
CD /d [PathToDirectory]
Change directory We used “../..” since we wanted to go to the root of the C drive.
-
Once in the right directory, run the following cmdlet to see the hidden items:
dir /ah
Show hidden items in Command Prompt
Now, you will see the hidden and protected items, but only inside the Command Prompt.
View Hidden and Protected Items in PowerShell
You can also view the hidden and protected files and directories inside Windows PowerShell. This method will show you the items with the hidden attribute as well as the other items that are already visible.
Like the Command Prompt, this won’t show the hidden items in File Explorer, but only inside the PowerShell instance.
-
Open an elevated PowerShell instance and then use the “CHDIR” cmdlet to change your directory and navigate to the directory in which you want to view the hidden items:
CHDIR [PathToDirectory]
Change directory -
Once in the right directory, run the following cmdlet to see everything inside the directory, including the hidden and protected items:
dir -force
Show hidden items in PowerShell
Now, you will see the hidden and protected items, but only inside PowerShell.
Show Files and Folders Hidden by Virus/Malware
If your computer has been infected by a virus and all your files and folders have disappeared, it is likely that the virus has hidden them and is still present on your computer. To confirm this, you can view the hidden items using either Command Prompt or Windows PowerShell.
To view the items hidden by a virus, run the following cmdlet in an elevated Command Prompt or PowerShell:
Note: This cmdlet will show recursive hidden items, which means that all files and folders inside the hidden folders will also be displayed, which makes the list rather long. Moreover, the “attrib” cmdlet makes changes to the attributes of these files and folders, which isn’t recommended unless absolutely necessary.
To avoid any negative impact on the operating system, we recommend that you create a system restore point before proceeding.
attrib -s -h -r /s /d *.*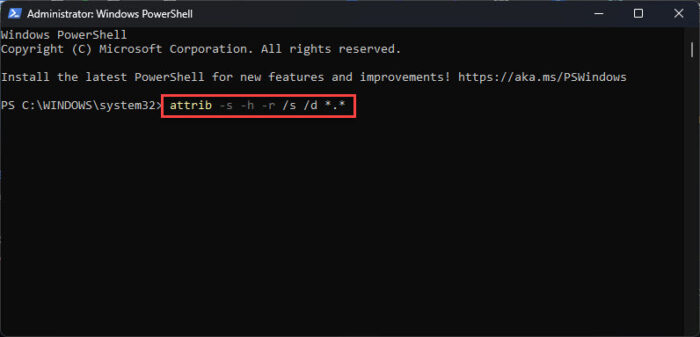
The table below tells which switch in the “attrib” cmdlet does what:
| Switch | Details |
| -s | Clears the system attribute. |
| -h | Clears the hidden attribute. |
| -r | Clears the read-only attribute. |
| /s | Executes whatever file attribute display or changes you’re making on the subfolders within whatever drive and/or path you’ve specified, or those within the folder you’re executing from if you don’t specify a drive or path. |
| /d | This option includes directories, not only files, to whatever you’re executing. |
Closing Words
The hidden and protected items inside the Windows operating system are so for a reason. Therefore, we only recommend that you unhide them if you know what you are doing, as deleting or editing them can be fatal for your operating system.

