Windows 10 comes with default app settings that can be used to choose default apps for opening specific types of files.
The most common default apps include email, maps, music player, video player, photo viewer, and web browser etc.
You can also set default apps by filetype or even protocol.
There are times when a file is not open in your desired application. In this article, we will discuss this situation and how to fix it by adjusting Windows settings in different ways.
Table of Contents
Why is the file not opening in the desired program?
The main reason behind files not opening in your desired program is that the program is not set as a default for that particular file type or protocol. Binding the file type with the app will fix this issue.
How do I configure files to open in the desired program?
1. Using Windows Settings
For higher versions of Windows, you can easily adjust which file should open in what program. Here’s how:
- Open Windows Settings by pressing Windows key + i.
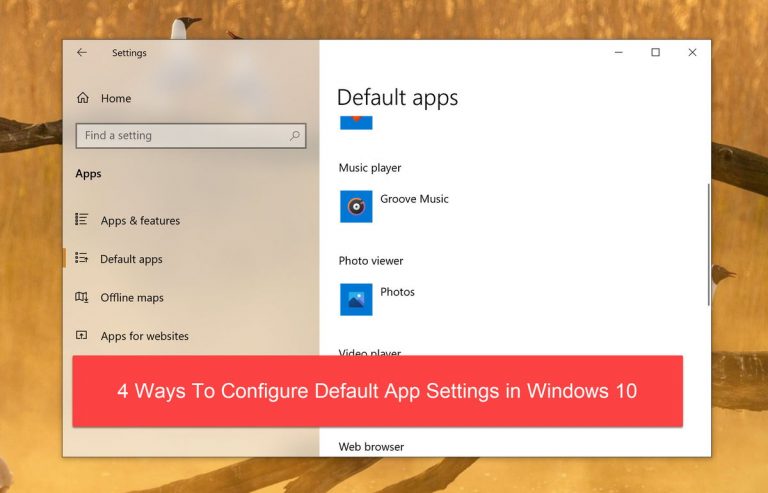
- Go to Apps and then open the default apps menu.

- You will find a list of apps and with which apps they open, right-click on the app and choose another app.

For example, to play music, Microsoft suggests I use the groove music app. But I wish to change it.
Simply click on the app and it will show you other options to play with. If I select Windows Media Player, it will be set as the default app and next time Windows will always play music with Windows Media Player
Similarly, you can select the app you wish to open the file with, using the same procedure I provided in example
2. Using Open With Menu
You can also select with which app you want to open the file while opening it. Here’s how:
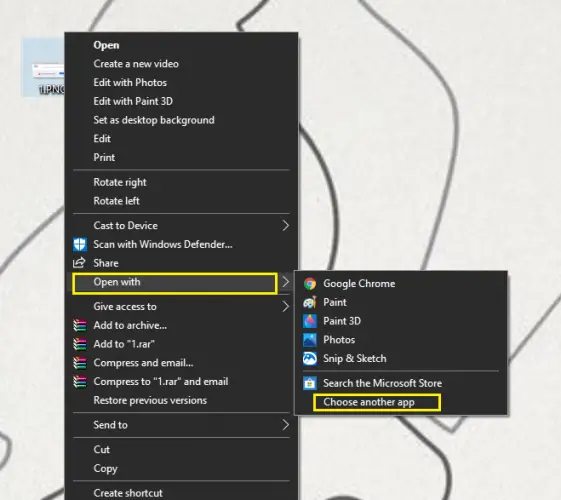
- Right-click on the file you want to open and select Open With.
- Select Choose another app.

- Select your desired program from the list. If you can’t find it in the list, click on More apps and then Look for another app on this PC. You will need to browse your desired app executable.
- Once you have selected the app, select Always use this app to open .filetype files and press the OK button.

3. Using Group Policy Editor
If you are a sysadmin or a Power user who wants to set the filetype defaults as per your own requirements, you can use the Group Policy to implement it on multiple users and computers.
We will go through all the steps of using the group policy editor to create a default associations file and then applying it on the complete network using Active Directory group policy or on a single computer but for all users.
- Go to Run –> gpedit.msc. This will open the local group policy editor.
- Go to the following tree in the left hand pane:
Computer Configuration –> Administrative Templates –> Windows Components –> File Explorer
- In the right-hand pane, double-click on Set a default associations configuration file
- Select Enabled and give the path of the file associations xml file.

- To create the default file, you can run the following command in administrative command prompt:
Dism.exe /Online /Export-DefaultAppAssociations:C:\DefaultFileAssociations.xml - After configuring the group policy, run the following command in command prompt:
gpupdate /force
This will apply the group policy immediately.
4. Using the Windows Registry
If the above mentioned methods don’t work, you can use the Windows Registry to set and tweak the default file associations.
The Registry method is also useful when you want to create a single file and distribute it to other users to apply the same settings without configuring anything. Simply running the registry file will make the required changes.
- Go to Run –> regedit. This will open the Registry editor.
- Right-click HKEY_CLASSES_ROOT and go to New –> Key
- Give the name to the key that is exactly the extension name. For example, I wanted to create a new file type extension .itt. So I will name the key as .itt.

- If the name already exists, skip step 3.
- In the right-hand pane, set the Default value to file type name. For example, I will set the default value of .itt to itechticsFile.
- Now create another key under HKEY_CLASSES_ROOT with the name itechticsFile.
- Under itechticsFile, create a new sub-key with the name DefaultIcon.
- Set its default value to C:\Path\Executable,0
- Under itechticsFile, create another sub-key with the name shell.
- Under the shell key, create a sub-key named open.
- Under open, create another sub-key named command.
- Set the default value of the command key to the following:
“C:\Path\to\executable\program.exe” “%1”
This is a long process to create a new file type. You can easily change the current file types easily using the same method.
Also see: How to monitor the system for Registry changes.
How do I reset the default program for opening files?
If you want to reset the default programs for opening files you can do that using Windows settings. Follow these steps:
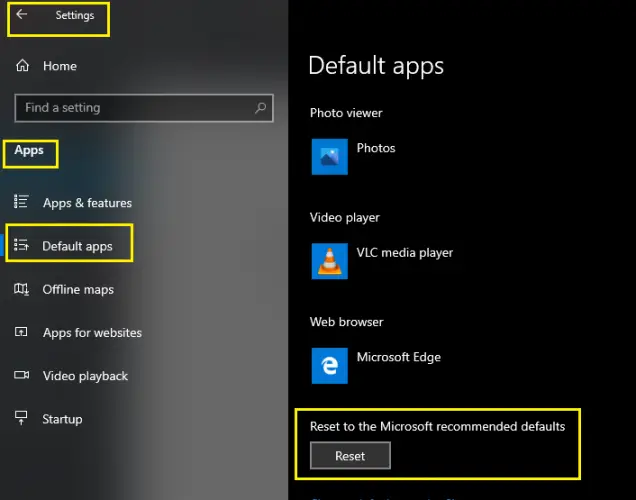
- Open Windows Settings by pressing Windows key + i.
- Go to Apps and then the Default Apps section.
- Scroll down for the option Reset to Microsoft recommended defaults.
- Click Reset. All your files will open with the default Microsoft recommended programs.





1 comment
David Gray
Your first suggestion alerted me to a feature of which I was unaware. Problem solved!👍