Privacy browsing is a mode of browsing that will not keep track of your browsing history, passwords, or any other user activity. Users can use private browsing to protect their privacy or to ensure the security of their personal information.
If you want to open something that you do not want to add to your browser history, you can use the in-private mode, also known as the “Incognito mode.”
However, if multiple users use your computer and you want to keep track of the history of what users are opening in the browser, you should disable in-private browsing in all installed browsers. Disabling the in-private option from the browser will remove the option from its menu, and it will no longer open using the keyboard shortcuts either.
This is especially useful for parents who want to keep track of what their children are doing online, or for individuals who don’t want to get distracted and remove the option to go incognito.
Let us now continue to see how to open incognito windows across different web browsers, and how to disable them if needed.
Table of Contents
Enable or Disable Private Mode in Browsers
By default, all modern web browsers use the CTRL + Shift + N shortcut keys that will instantly open the in-private browsing window of the selected browser. While some browsers have the option to change or disable the shortcut keys, some do not offer to disable in-private or incognito browsing at all.
Alternatively, you can also find the option to open an in-private window somewhere in the browser’s window.
To exit the incognito/private window, all you need to do is close the window just like any regular browser. However, sometimes users want to disable the option to open a private browsing window altogether – this means that all browsing will need to be done in regular mode.
The different sections below show you how to enable and disable in-private browsing across common web browsers.
Enable or Disable Incognito Browsing in Google Chrome (Incognito Mode)
Open New Incognito Window in Chrome
An in-private window in Google Chrome is referred to as “going incognito” or “incognito mode.”
To open a new incognito window in Google Chrome, click on the ellipses (3 dots) in the top-right corner of the browser, and then click “New incognito window.” Alternatively, you can use the CTRL + Shift + N shortcut keys to open it directly.
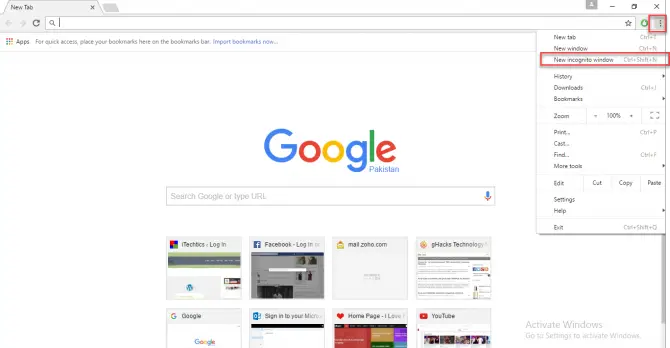
Clicking on this button will open a new window that contains the image of a hat with glasses in the center of your browser’s window. The hat with glasses (a.k.a. incognito mode) window conceals all your activity.

In the incognito window, you can still bookmark pages and download anything, but your extension will not function.
If you want to exit the incognito mode, simply close the incognito window and again start using your browser in normal browsing mode.
Disable Incognito Mode in Chrome
To disable the incognito browsing option in Google Chrome, you need to make changes to the Windows Registry. Use the following steps to disable in-private browsing in Google Chrome:
Note: There will be several sections in this post that suggest making changes to the Windows Registry manually. Misconfiguration of critical values in the system’s registry could be fatal for your operating system. Therefore, we insist that you create a system restore point before proceeding forward with the process.
You can also use our top selection of disk imaging and backup software so you never lose your data or operating system again.
-
Open the Registry Editor by typing in “regedit” in the Run Command box.

Open the Registry Editor -
Paste the following path in the navigation bar:
Computer\HKEY_LOCAL_MACHINE\SOFTWARE\Policies\

Navigate to Policies key -
Create a new key under Policies by the name “Google.”

Create the Google key Right-click Policies, expand New, and then click Key. Name this key “Google.”
-
Now create a new key under Google by the name “Chrome”.

Create the Chrome key Right-click Google, expand New, and then click Key. Name this key “Chrome.”
-
Create a new DWORD in Chrome by the name “IncognitoModeAvailability”.

Create the IncognitoModeAvailability value Right-click Chrome, expand New, and then click “DWORD (32-bit) Value“. Name this key “IncognitoModeAvailability.”
-
Change the Value Data for IncognitoModeAvailability to “1”.

Set Value Data for IncognitoModeAvailability to 1 -
Now restart the Chrome browser, and you will see that the “New incognito window” option would will be grayed out.

Incognito mode disabled in Chrome
A user would no longer be able to open an incognito window in Chrome; nor from the menu, or using the CTRL + Shift + N keyboard shortcuts.
If you want to re-enable private browsing in Chrome in the future, all you need to do is either change the Value Data for “IncognitoModeAvailability” in the Registry Editor to “0,” or delete it completely.

Enable or Disable Private Browsing in Mozilla Firefox (Private Window)
Enable In-Private Browsing in Mozilla Firefox
Like Chrome, an in-private window, also known as private browsing, in Firefox does not track your online activity.
To open a private window in Mozilla Firefox, click on the 3 lines (menu) button in the top-right corner of the browser, and then click “New private window.”

Alternatively, you can also use the CTRL + Shift + P shortcut keys in Firefox to open a private browsing window.
A blue private browsing window will appear, and now you can surf the internet privately. It won’t save visited pages, cookies, temporary files, and searches. But it saves your downloads and bookmarks.

Even if you browse privately, your employer and internet service provider is still able to track your online activities. In addition, the “Tracking Protection” feature blocks all tracking mechanisms in websites that could be used to keep your personal information, so you do not have to worry about being tracked.
If you want to exit private browsing, close the private window.
Disable Private Browsing Mode in Firefox
Similar to chrome, you need to make changes to the Windows Registry for Firefox to disable private browsing.
-
Open the Registry Editor by typing in “regedit” in the Run Command box.

Open the Registry Editor -
Paste the following in the navigation bar for quick navigation:
Computer\HKEY_LOCAL_MACHINE\SOFTWARE\Policies\Mozilla\Firefox

Navigate to Firefox key -
Create a new DWORD in Firefox by the name “DisablePrivateBrowsing”.

Create the DisablePrivateBrowsing value Right-click Firefox, expand New, and then click “DWORD (32-bit) Value“. Name this key “DisablePrivateBrowsing.”
-
Change the Value Data for DisablePrivateBrowsing to “1”.

Set Value Data for DisablePrivateBrowsing to 1 -
Now restart the Firefox browser, and you will see that the “New private window” option will no longer be available.

New private window disabled in Firefox Using the CTRL + Shift + P shortcut keys would also not work.
The private browsing mode in Firefox will be disabled indefinitely. If you want to re-enable it in the future, all you need to do is either change the Value Data for “DisablePrivateBrowsing” to “0,” or delete it entirely.

Enable or Disable InPrivate Browsing in Microsoft Edge
Open InPrivate Window in Microsoft Edge
To open a new in-private window in Microsoft Edge, click on the ellipses (3 dots) in the top-right corner of the browser, and then click “New InPrivate window.”

Alternatively, you can also use the CTRL + Shift + N shortcut keys to open a new InPrivate browsing window.
Another Microsoft Edge window will now open in private mode with the title “InPrivate Browsing.” You can now continue to browse the internet in secret with no trace of your online activity.

When done browsing, all you need to do is close the InPrivate window to hop back into regular browsing mode.
Disable InPrivate Browsing in Microsoft Edge
InPrivate mode in Microsoft Edge can be disabled from the Registry Editor as well. Here is how:
Note: There is also a Group Policy by the name “Allow InPrivate browsing” using which you can disable InPrivate mode in Edge. However, after testing it, we found that it didn’t work. Therefore, we recommend that you use the following steps instead and disable it from the Registry.
-
Open the Registry Editor by typing in “regedit” in the Run Command box.

Open the Registry Editor -
Paste the following in the navigation bar for quick navigation:
Computer\HKEY_LOCAL_MACHINE\SOFTWARE\Policies\Microsoft

Navigate to Microsoft key -
Create a new Key in Microsoft by the name “Edge.”

Create the Edge key Right-click the Microsoft key, expand New, and then click Key. Name this key “Edge.”
-
Create a new DWORD in Edge by the name “InPrivateModeAvailability”.

Create the InPrivateModeAvailability DWORD Right-click Edge, expand New, and then click “DWORD (32-bit) Value“. Name this key “InPrivateModeAvailability.”
-
Change the Value Data for InPrivateModeAvailability to “1”.

Set Value Data for InPrivateModeAvailability to 1 -
Now restart the Edge browser, and you will see that the “New InPrivate window” option will be greyed out.
Note: You must end the “edge.exe” task from the Task Manager and then relaunch Microsoft Edge to restart it. Otherwise, simply losing and re-opening the Ege browser won’t work, since the edge.exe process keeps running in the background.

InPrivate browsing disabled in Microsoft Edge Using the CTRL + Shift + N shortcut keys would also not work.
If you want to re-enable InPrivate browsing in Microsoft Edge in the future, then you must either change the Value Data for “InPrivateModeAvailability” to “0,” or delete the value itself.

Enable or Disable Private Browsing in Vivaldi
Open Private Window in Vivaldi Browser
To open a new private window in Vivaldi, click on the menu button in the top-left corner of the browser, expand File, and then click “New Private Window.”
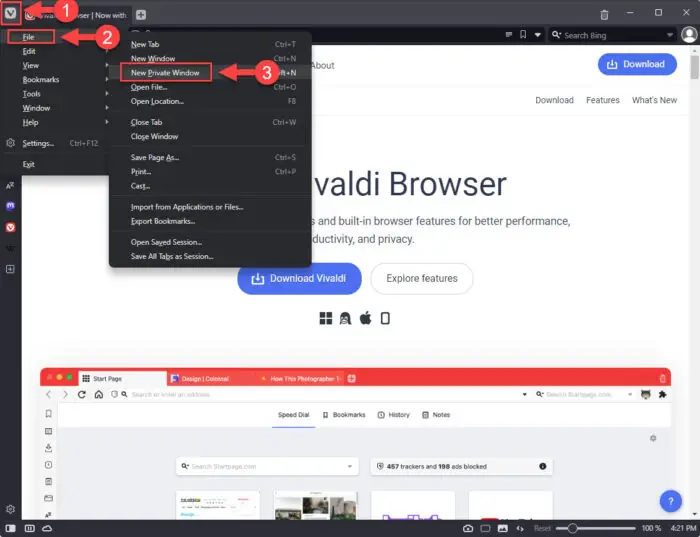
Alternatively, you can use the default CTRL + Shift + N shortcut keys to open a new private window in Vivaldi, or the shortcut keys that you have configured since Vivaldi allows you to set the shortcut keys yourself.
You will then see a blue-ish new Vivaldi window in front of you with the title “Private Window.”

Disable Private Browsing in Vivaldi
Disabling private mode/browsing in Vivaldi is different than what we have discussed above. To disable private browsing in Vivaldi, you must disable the shortcut keys and remove the “Open Private Window” option from the menu separately.
Use these steps to disable private browsing in Vivaldi:
-
Open Vivaldi settings by clicking on the gear icon in the bottom-left corner of the browser.

Open Vivaldi settings -
Switch to the “Keyboard” tab.
-
In the Window section, hover over the “New Private Window” field and click the adjacent “X” (cross) mark.

Clear the new private window shortcut in Vivaldi This will clear the shortcut key assigned for opening a private window.
-
Now switch to the “Appearance” tab and scroll down to the MENU section.
-
In the Content section, click “File” to expand it. Then, right-click “New Private Window” and click “Delete” from the context menu.

Delete the “New Private Window” option from Vivaldi’s menu
As you may notice, the “New Private Window” option will no longer be available in Vivaldi’s menu, and neither will any shortcut work to open a private browsing window in Vivaldi.
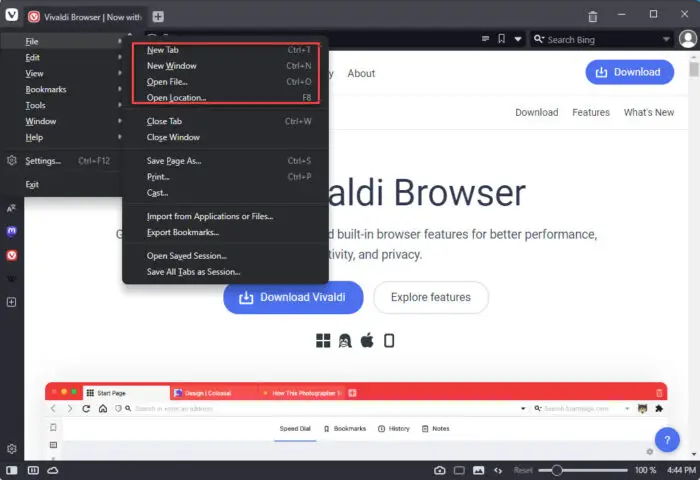
If you want to enable the option in the future, you can set a custom shortcut for it again in the Keyboard settings, or restore the default menu by clicking “Restore Default Menu” in the Appearance tab.

Enable or Disable Private Browsing in Opera
Open Private Window in Opera Browser
Like most other browsers, you can open a “New private window” in the Opera browser. To open one, click on the Opera icon in the top-left corner of the browser, and then click “New private window.”
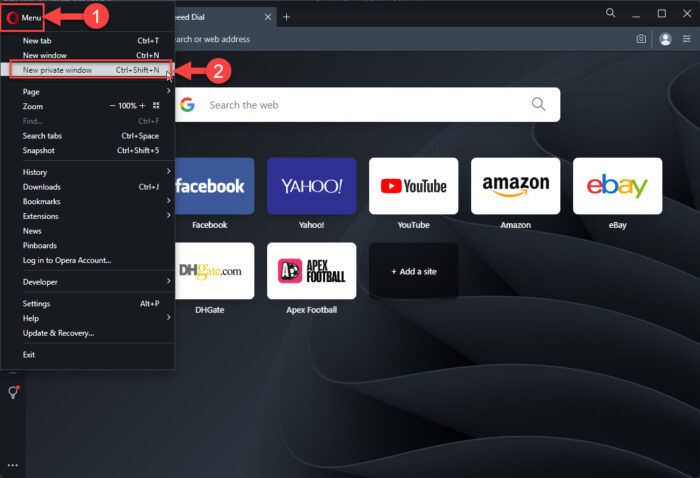
Alternatively, you can use the CTRL + Shift + N shortcut keys to open a private window in Opera.
You will then see a new window open in front of you stating “You are in private mode.” Thus, you can now begin browsing without being tracked on the internet.

Disable Private Browsing in Opera
Unlike most modern web browsers, there is currently no setting within Opera, or in the Windows Registry, that you can modify to disable private browsing.
If you still wish to disable this feature, you can use a third-party tool to disable private browsing which we have discussed at the end of this post.
Enable or Disable Private Browsing in Brave
Open Private Window in Brave Browser
To open a private browsing window in Brave, click on the menu button (3 lines) in the top-right corner of the browser, and then click “New private window.”
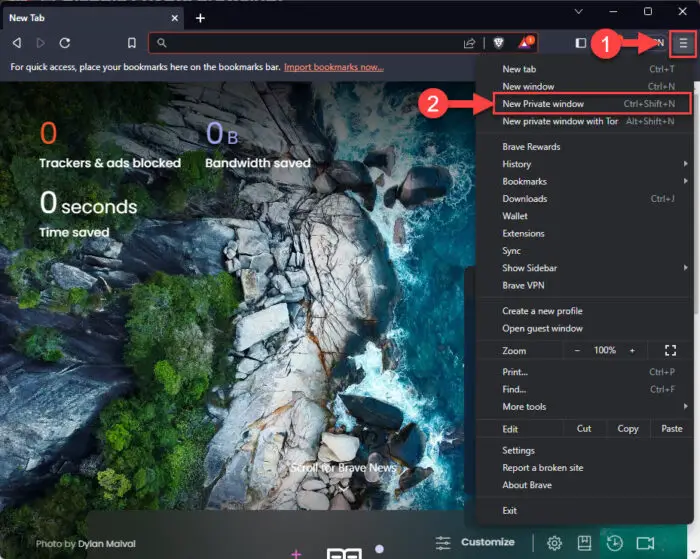
Alternatively, you can also use the CTRL + Shift + N shortcut keys to open a private window directly.
If you notice, you also get a “New private window with Tor” option in Brave’s menu, which can be opened using the Alt + Shift + N shortcut keys. This is another kind of private browsing window with integrated Tor. Tor is a web browser used to access the Dark Web.
Both of these private windows look alike, as in the following image, from where you can begin browsing the web without leaving a trace of evidence.

If you wish to exit the private mode in Brave browser and return to normal browsing, all you need to do is close the window.
Disable Private Browsing in Brave
You can disable both private browsing and Tor private browsing in Brave through the Windows Registry. Here is how:
-
Open the Registry Editor by typing in “regedit” in the Run Command box.

Open the Registry Editor -
Paste the following in the navigation bar for quick navigation:
Computer\HKEY_LOCAL_MACHINE\SOFTWARE\Policies

Navigate to the Policies key -
Create a new Key in Policies by the name “BraveSoftware.”

Create the BraveSoftware key Right-click the Policies key, expand New, and then click Key. Name this key “BraveSoftware.”
-
Now, create a new Key in BraveSoftware by the name “Brave.”

Create the Brave key Right-click the BraveSoftware key, expand New, and then click Key. Name this key “Brave.”
-
To disable private browsing, create a new DWORD in the Brave key by the name “IncognitoModeAvailability” and set its Value Data to “1”.

Disable private browsing in Brave Right-click Brave, expand New, and then click “DWORD (32-bit) Value“. Name this key “IncognitoModeAvailability.” Then, double-click the DWORD and set its Value Data to “1.”
-
To disable private browsing with Tor, create a new DWORD in the Brave key by the name “TorDisabled” and set its Value Data to “1”.

Disable private browsing with Tor in Brave Right-click Brave, expand New, and then click “DWORD (32-bit) Value“. Name this key “TorDisabled.” Then, double-click the DWORD and set its Value Data to “1.”
-
Now restart the Brave browser, and you will see that the “New Private window” option is grayed out, and the “New Private window with Tor” option will no longer be available.

Private browsing and private browsing with Tor have been disabled in Brave browser Using the CTRL + Shift + N or the Alt + Shift + N shortcut keys would also not work.
If you want to re-enable these features, delete the respect value/entry in the Windows Registry that you created earlier.

Enable or Disable Private Browsing in Internet Explorer
Note: Internet Explorer has been discontinued and therefore these methods are no longer valid.
Enable In-Private Browsing in Internet Explorer (InPrivate Mode)
Since some users still use Internet Explorer, I will also discuss how to enable In-Private Browsing in Internet Explorer. You can find the steps by scrolling down the page
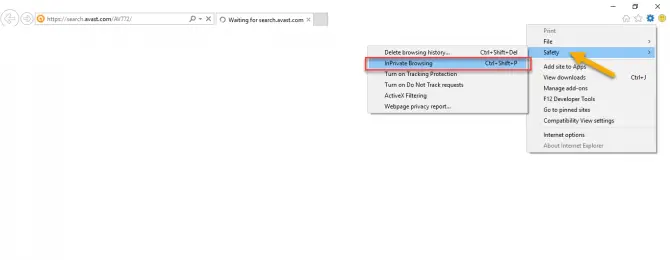
Open your Internet Explorer Browser. Then click on the Gear icon which is available on the top right side of the browser, click on it and select “Safety” and then In-Private Browsing.
A new window will appear, and on the Address bar, a blue mark will appear that shows the private mode. Whether you search or browse, it will not go into your history. No tracking will be recorded of your activities over the Internet. All your extensions will be disabled in Private mode.
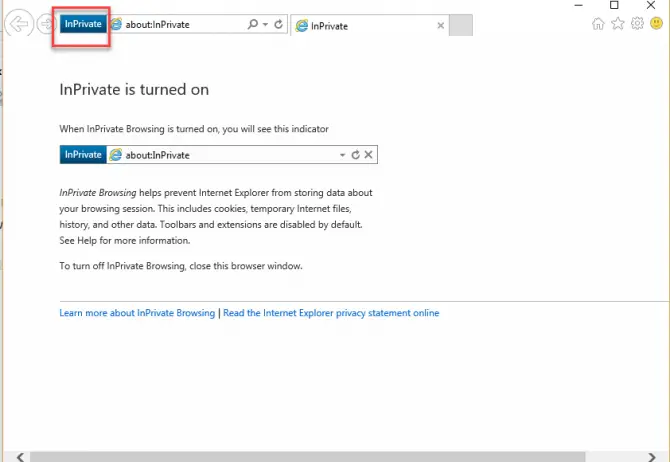
If you want to disable it, close the window and the Safe mode will close.
For other users who use the system, it is important to keep their activities recorded. For this, In-Private Browsing must be disabled. See below how you can disable it for any browser.
Disable InPrivate Mode in Internet Explorer
Internet Explorer’s In-Private browsing can be disabled by making simple and easy changes to the Group Policy Editor. Follow the steps below to disable inPrivate mode in Internet Explorer.
For this type “gpedit.msc” in the Run dialog and you’ll have the window of Group Policy Editor. Now go to the following Registry
“Computer Configuration/ Administrative Templates/Windows Components/Internet Explorer/privacy”

In the right-hand window, you’ll see the first result “Turn Off In-Private Filtering”. Double-click on it and click on “Enable”, to enable this feature.

Use Third-Party App to Disable Private Mode
IncognitoGone is a small tool that helps you block or disable In-Private Mode for all browsers. All activities of any user will be recorded. The history of each page the user visits will be available in History. Downloads will be also tracked by disabling the In-Private Browsing

This is a very light resource on your system and is compatible with Windows Vista, Windows 7, Windows 8.1, and Windows 10. It can also work on Windows 11.
Closing Thoughts
Find out what you want to do with your browsing for each browser, whether to be tracked or not to be tracked. It is good for every user not to play with settings. Keep them as they are. Private browsing also helps in troubleshooting your system but in case of need, you can disable the In-Private browsing for any browsers by applying the above steps.


2 comments
Corey
IncognitoGone is incomplete, doesn’t actually work for Firefox. It doesn’t do anything different than setting registry keys manually, and only works on HKLM.
Barb
How about safari?