Windows is programmed to assign drive letters automatically when a new partition is created. If you do not like the drive letter assigned to a partition, or for any other reason, you can change it.
Windows assigns drive letters in alphabetical order, starting with “C.” “A” and “B” are reserved for floppy disk drives. Since the first partition to be created is the system drive, it is usually labeled “C” by default.
For a partition to show up in Windows Explorer, it must have a drive letter assigned to it. Otherwise, you cannot access the partition. This is also true in case you attach a USB flash drive to your computer.
Table of Contents
On This Page
Is it Possible to Change System Drive Letter?
Before we discuss how to change a drive letter, we must inform you that you cannot change the drive letter of the system drive, after the operating system has been installed on it. This is because many dependent applications and programs are installed which require the complete path to files to function properly.
If the drive letter in the path to a file is changed, the associated app may no longer function. For example, if the initial path “C:\Windows\System32” was changed to “J:\Windows\System32,” certain components of the app may no longer find the file required.
Similarly, if an app or program is installed on another partition other than the system partition, and it does not automatically pick up the changed path (which most modern apps usually do), you may have to make manual changes to the Windows Registries to provide the new path.
Let us now show you 5 ways to change drive letters in Windows.
How to Change Drive Letters in Windows
Change Drive Letter using Disk Management Console
The Disk Management Console provides several options to manage your storage partitions and volumes, such as formatting or creating new partitions, shrinking or expanding them, or assigning/changing drive letters.
Follow the steps given below to change the partition’s assigned drive letter:
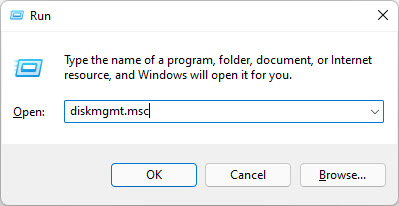
Open the Disk Management Console by typing in “diskmgmt.msc” in the Run Command box.
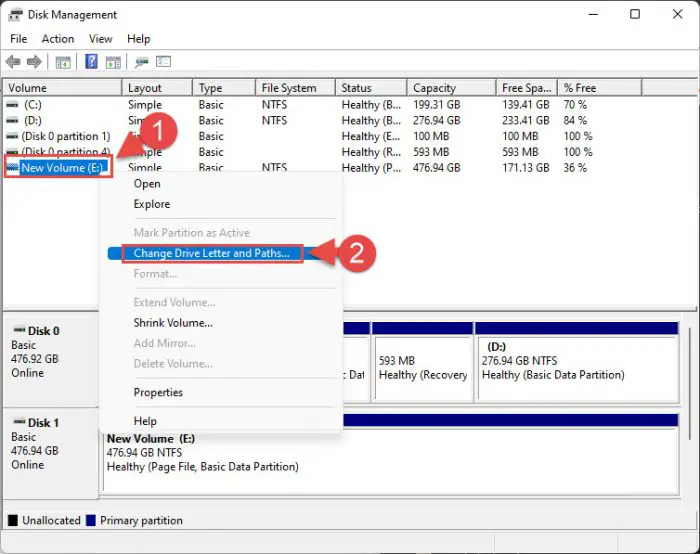
Open the Disk Management Console Right-click on the partition you want to change the letter for, and then click “Change Drive Letter and Paths” from the context menu.
Note: If you see that the option is not available or has been greyed out, then the partition’s drive letter cannot be changed.
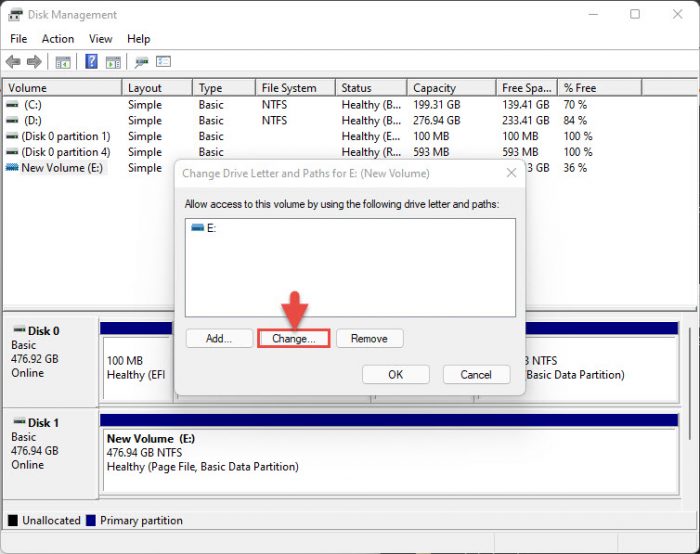
Change the drive letter or path from the Disk Management Console From the pop-up wizard, click Change.
Change the drive letter Select an available drive letter from the drop-down menu in front of “Assign the following drive letter:” and then click Ok.
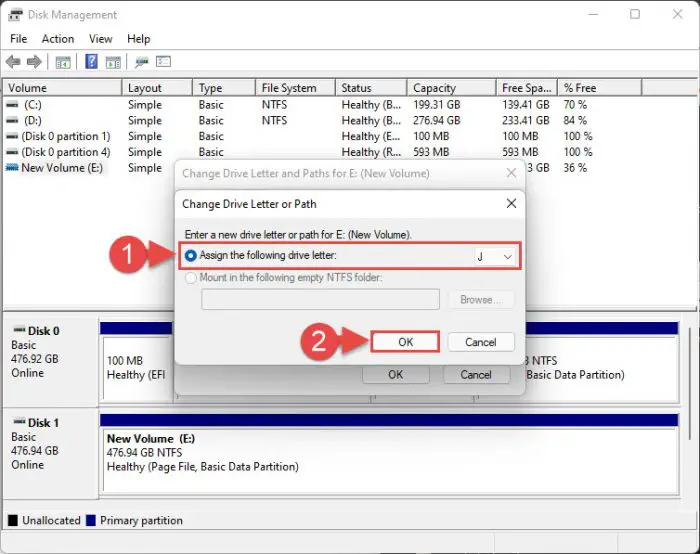
Assign a new drive letter from Disk Management Console Click Yes on the confirmation dialog box.
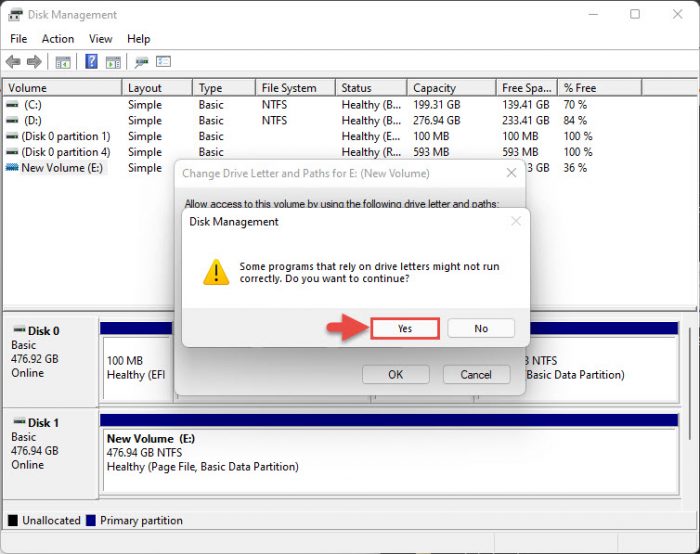
Confirm drive letter assignment [Conditional] You may then see another warning message. If you do, click Yes again, and then restart your computer for the changes to fully take effect.

Intimation for drive letter in use
You will now see that the drive letter has been successfully changed.
Change Drive Letter using Command Prompt
If you are a command-line guy, you can also change the drive letter of a partition using the Command Prompt. Here is how:
Enter the disk partition mode by typing in the following, and then hitting Enter:
Diskpart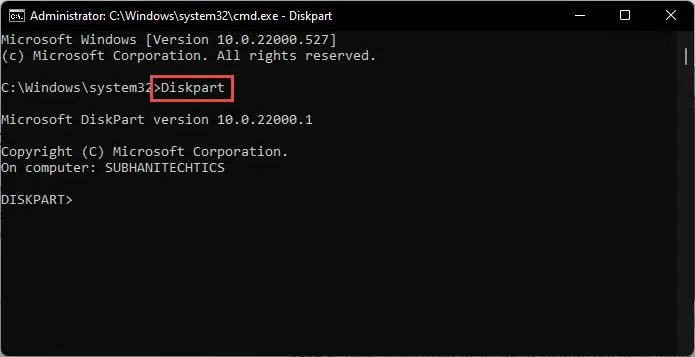
Enter the Disk Partition mode in Command Prompt Run the following to obtain a list of current partitions and their details.
List Volume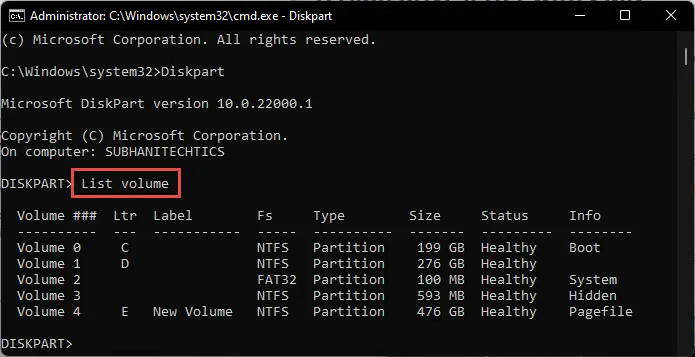
List all volume details in Command Prompt Now select the volume for which you wish to change the drive letter by running the following cmdlet.
Replace [Number] in the command below with the volume number you see in the table obtained in Step 3 above.
Select Volume [Number]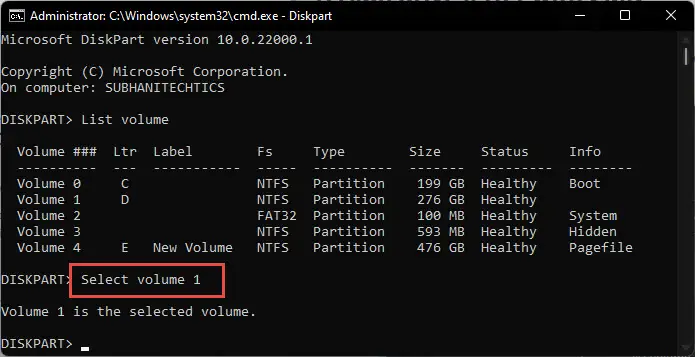
Select a volume Now use the following command to assign a new, vacant drive letter to this volume.
Replace [Alphabet]] with the new drive letter that you want to assign.
Assign Letter=[Alphabet]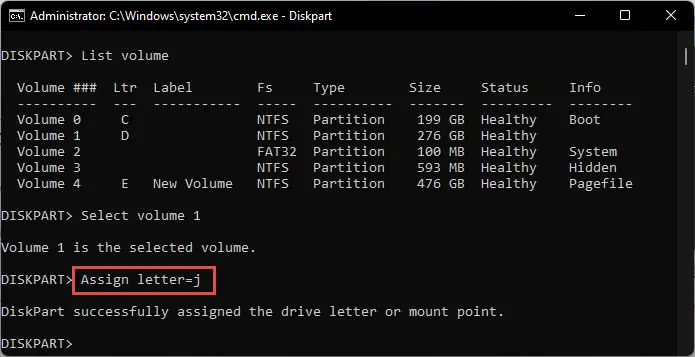
Assign a new letter to partition using Command Prompt
The new drive letter will now be assigned. You may now close the Command Prompt since the partition will now automatically open in Windows Explorer.
Change Drive Letter using PowerShell
Changing the drive letter using Windows PowerShell allows you to do so using the Command Line Interface (CLI) in a few easy cmdlets, as opposed to the lengthy process of using the Command Prompt. Here is how:
Run the following cmdlet to get the current partitions and their associated details:
Get-Volume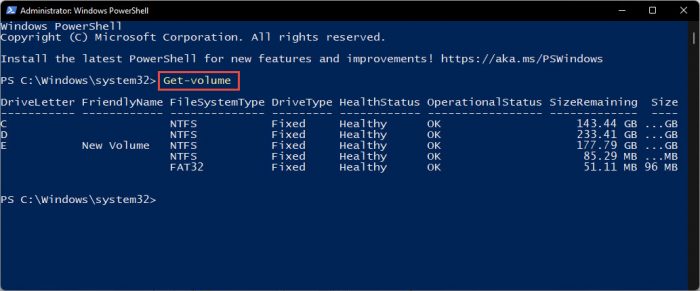
Get volume details in PowerShell Now use this information to change a partition’s drive letter.
Replace [OldLetter] with the current drive letter for volume, and [NewLetter] with the new drive letter which you want to assign to the volume.
Get-Partition -DriveLetter [OldLetter] | Set-Partition -NewDriveLetter [NewLetter]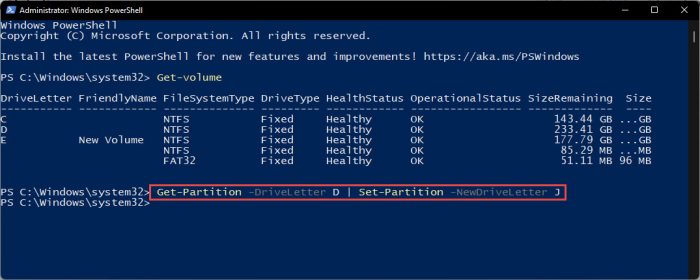
Assign a new drive letter using PowerShell
The drive letter will now change, and the partition will now automatically open in Windows Explorer.
Change Drive Letter from Windows Registry
You can also change the drive letter directly from the Windows Registry. Here is how:
Note: Misconfiguration of critical values in the system’s registry could be fatal for your operating system. Therefore, we insist that you create a system restore point or a complete system image backup before proceeding forward with the process.
You can also use our top selection of disk imaging and backup software so you never lose your data or operating system again.
Open the Registry Editor by typing in “regedit” in the Run Command box.

Open the Registry Editor Now paste the following into the navigation bar at the top of the Editor for quick navigation:
Computer\HKEY_LOCAL_MACHINE\SYSTEM\MountedDevices
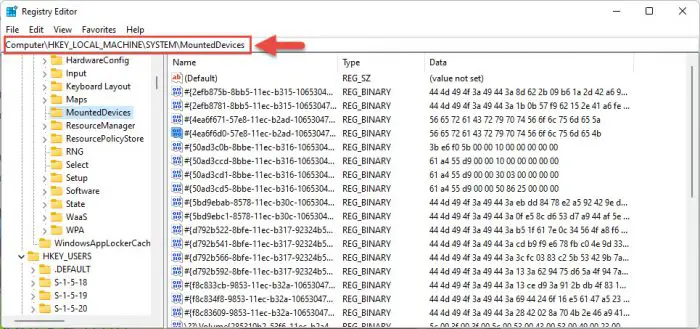
Navigate to the MoutedDevices key In the right-hand pane, look for the values whose name starts with “\DosDevices.” This will display the current drive letters for the partitions on your computer.
Right-click on the drive letter you want to change, and then click Rename from the context menu.
For example, to change “J”, right-click “\DosDevices\J:” and then click Rename.
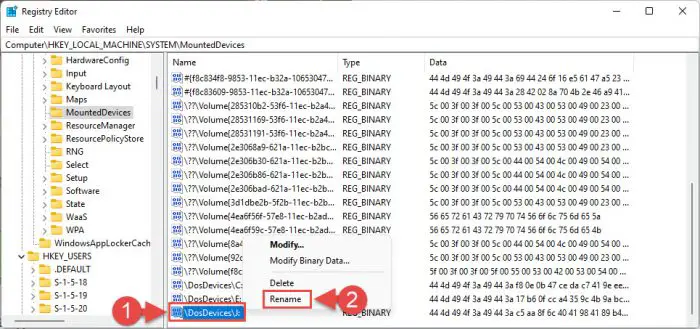
Rename Windows Registry to change the driver letter Now rename the value and replace the old drive letter with the new one, as we did in the image below.
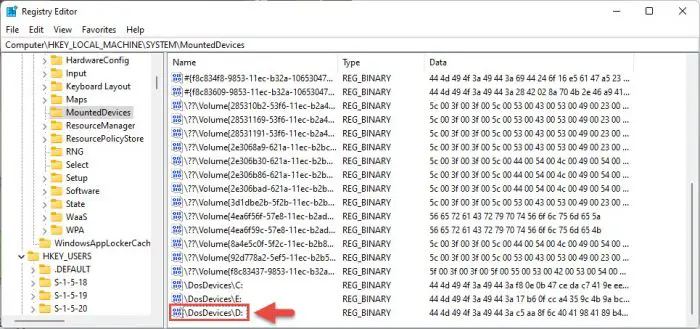
Change drive letter from Windows Registry Now restart your computer for the changes to take effect.
When the computer reboots, you will see the drive letter has been changed.
Use Drive Letter Changer
Drive Letter Changer is a third-party freeware that can be used to perform a number of different tasks, including changing a partition’s drive letter. Moreover, it is portable software, which means it does not need to be installed on your PC.
Perform the following steps to download and use Drive Letter Changer to change drive letters:
Download the Drive Letter Changer here.
Extract the contents of the compressed folder.
Run the application labeled “dChanger.”
The application will now automatically detect existing partitions and drive letters.
Right-click on the drive letter you want to change, expand “Change drive letter,” and then select a vacant drive letter that you wish to assign.
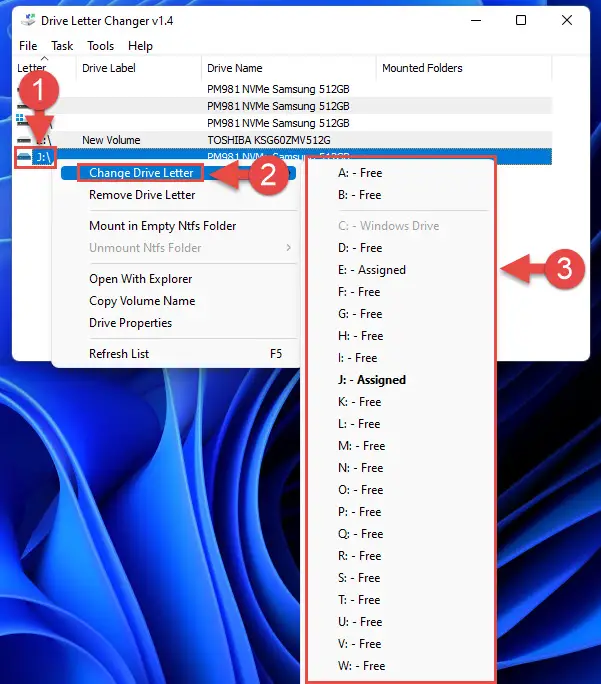
Change drive letter using third-party software
The drive letter will now change in an instant.
How to Swap Drive Letters Between Volumes
Unfortunately, there is no direct way of swapping drive letters between 2 partitions; you can only assign a vacant drive letter or remove it.
Therefore, if you wish to swap drive letters between two partitions, you must first change the drive letter of the primary partition to something else, so its initial drive letter becomes vacant. Then, change the drive letter of the secondary partition and assign the drive letter recently vacated from the primary partition. Now you can assign the vacated drive letter from the secondary partition to the primary partition.
This can be a bit confusing, so we have drafted down the process in the methods below.
Swap Drive Letter from Disk Management Console
Open the Disk Management Console by typing in “diskmgmt.msc” in the Run Command box.

Open the Disk Management Console Right-click on the primary partition and click “Change Drive Letter and paths“ from the context menu.
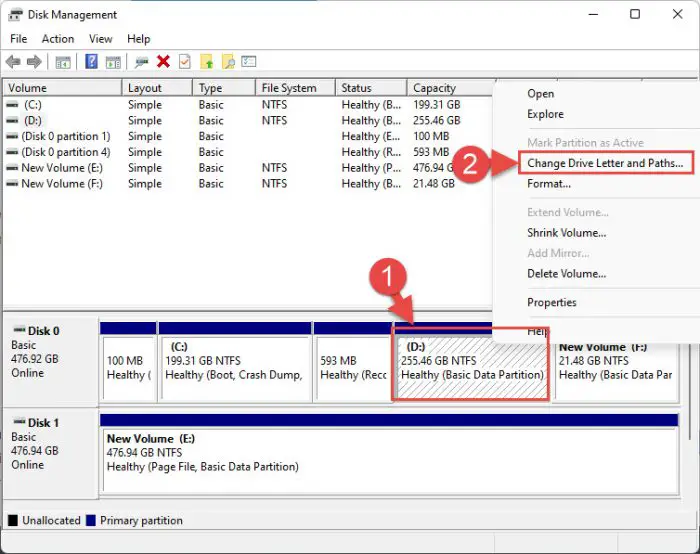
Change drive letter from the Disk Management Console From the popup wizard, click Remove.
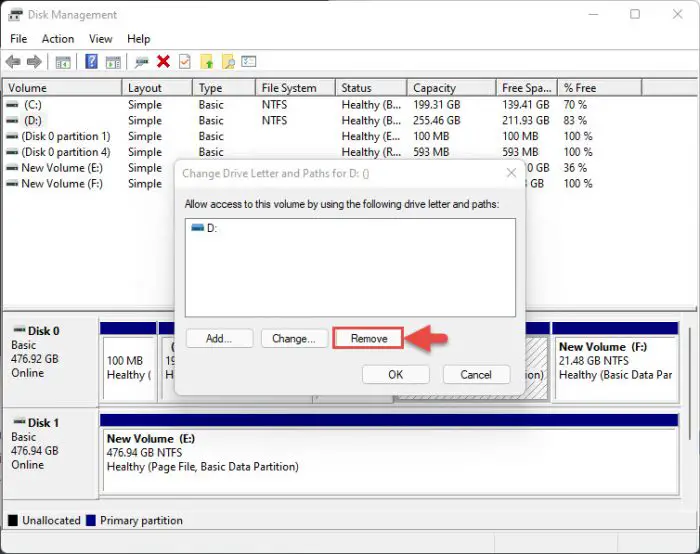
Remove a drive letter If prompted for a confirmation, click Yes.
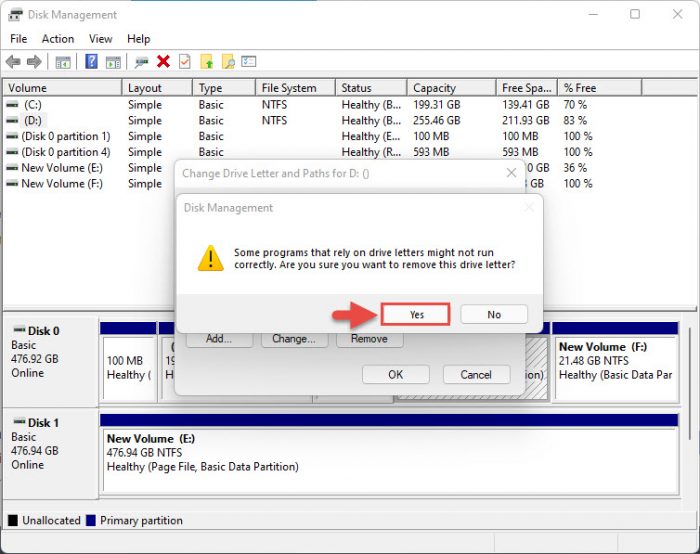
Confirm drive letter removal You may then see another warning message. If you do, click Yes again.

Intimation of drive being in use Now right-click on the secondary partition and click “Change Drive Letter and paths” from the context menu.
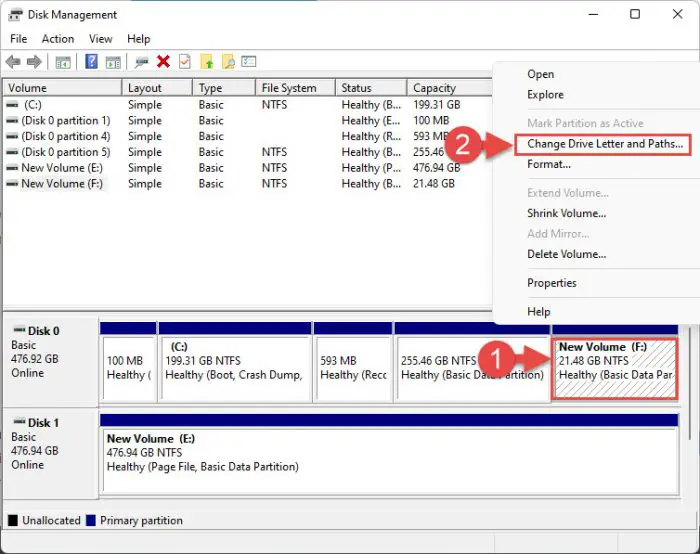
Change the drive letter of the secondary drive From the pop-up wizard, click Change.

Change the drive letter Now assign the drive letter from the primary partition and click Ok.
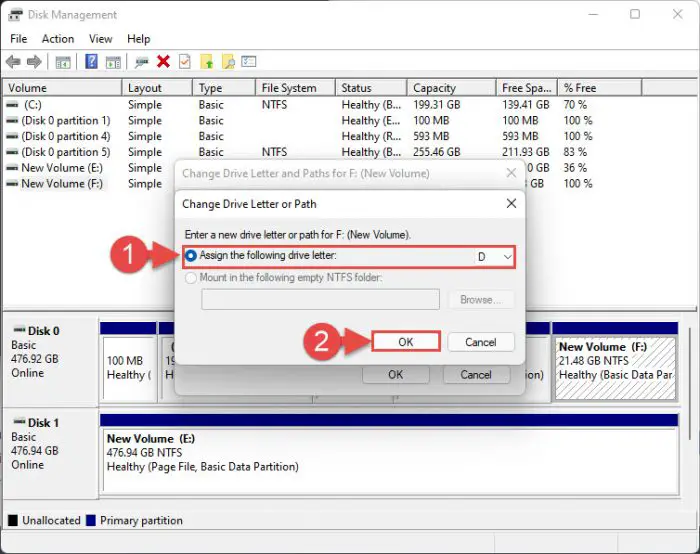
Assign the primary drive’s letter to the secondary drive In the confirmation box, click Yes.
Now right-click on the primary partition again, and click “Change Drive Letter and Paths” from the context menu.
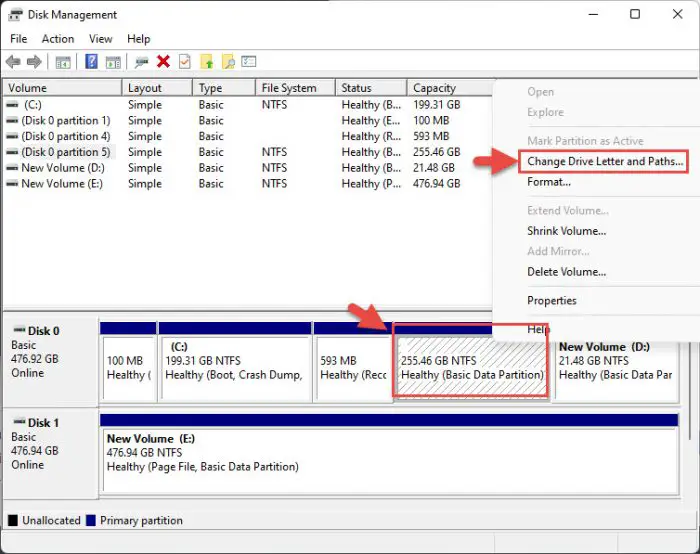
Change the drive letter of the primary drive again From the pop-up wizard, click Add.
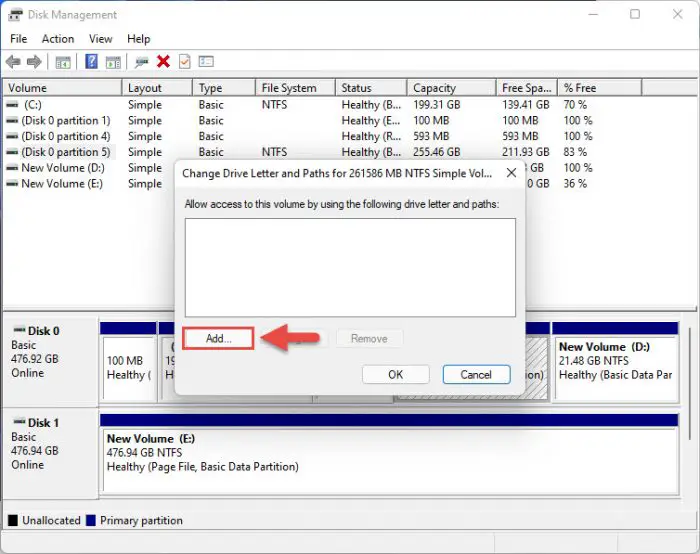
Add a new drive letter Now assign the drive letter initially assigned to the secondary partition, and click Ok.
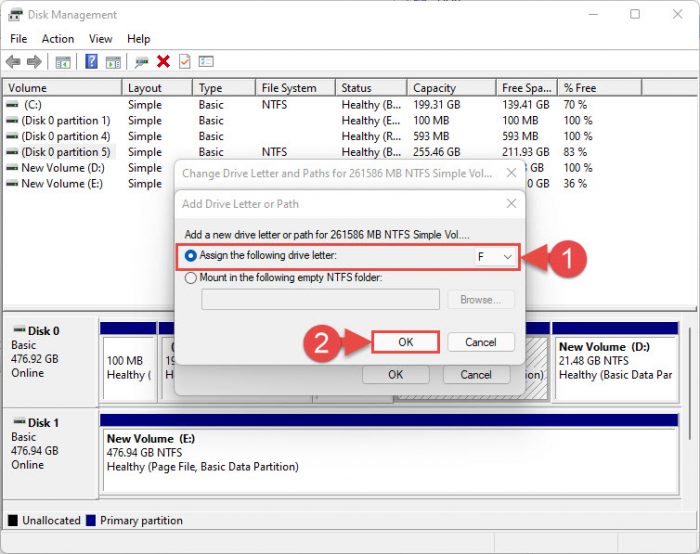
Assign a new drive letter to the primary drive (Optional, but recommended) Now restart your computer so the changes can be finalized.
You can apply the same logic to switch drive letters between 3 or more partitions as well.
Swap Drive Letter using Command Prompt
You can also switch the drive letters between 2 partitions (or more) using the same logic. Here is how:
Enter the disk partition mode by typing in the following, and then hitting Enter.
Diskpart
Enter the Disk Partition mode in Command Prompt Now paste the following to obtain a list of current partitions and their details:
List Volume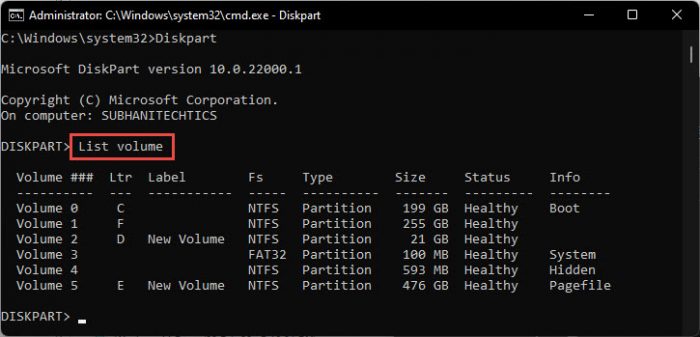
List volume details in Command Prompt Now select the primary volume using the cmdlet below.
Replace [Number] in the command with the volume number you see in the table obtained in Step 3 above.
Select Volume [Number]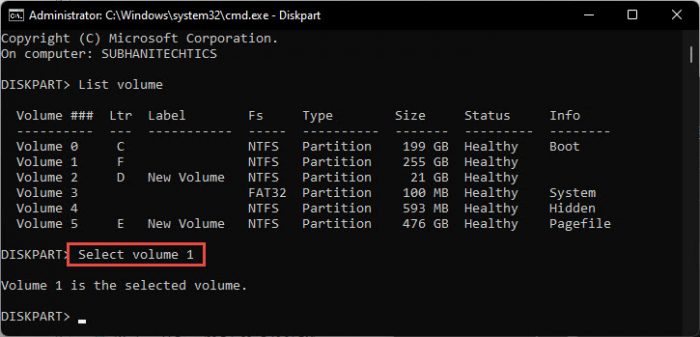
Select a volume Now remove the assigned drive letter using the following cmdlet.
Replace [Alphabet] with the drive letter currently assigned to this volume.
Remnove Letter=[Alphabet]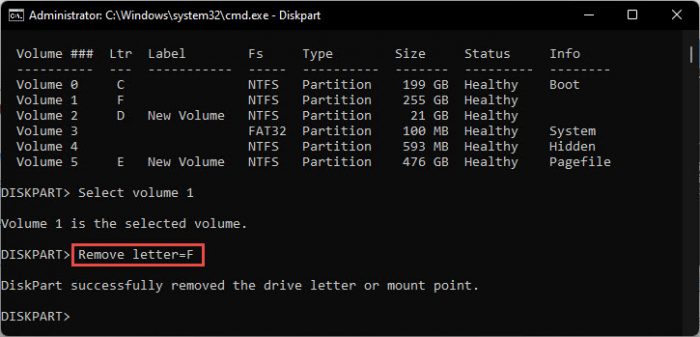
Unassign dive letter from Command Prompt Now select the secondary volume using the cmdlet below.
Replace [Number] in the command with the volume number you see in the table obtained in Step 3 above.
Select Volume [Number]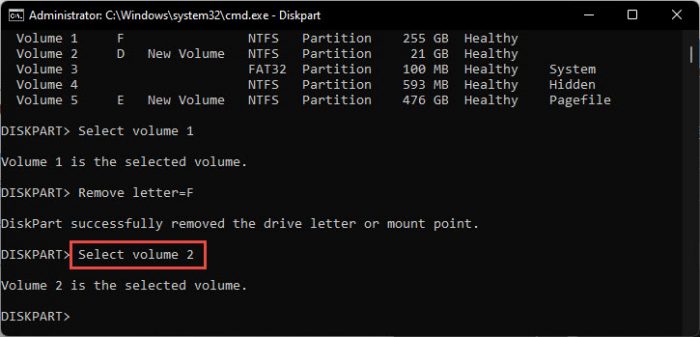
Select the secondary volume Now assign the recently-vacated drive letter from the primary partition to this volume using the given cmdlet.
Replace [Alphabet] with the drive letter initially assigned to the primary volume.
Assign Letter=[Alphabet]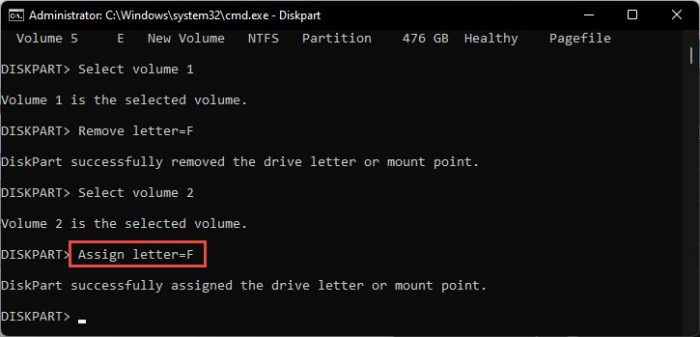
Assign the primary drive’s letter to the secondary drive using Command Prompt Now select the primary partition again.
Select Volume [Number]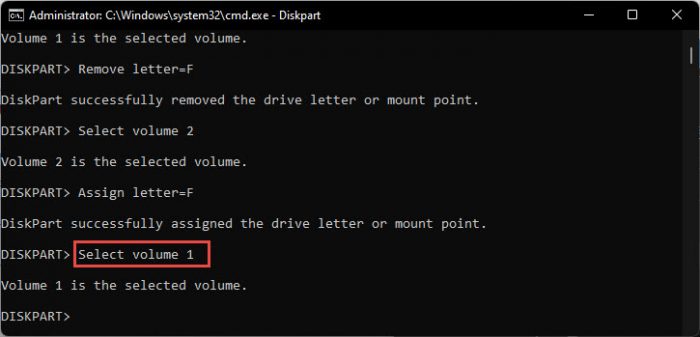
Select the primary volume again Now assign the drive letter from the secondary partition to this volume.
Assign Letter=[Alphabet]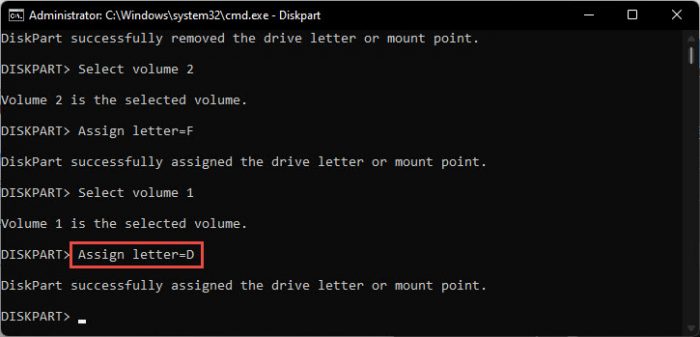
Assign the secondary drive’s letter to the primary drive
The drive letters have been swapped successfully. You can now close the Command Prompt.
You can apply similar logic to other methods to swap drive letters between 2 or more drives. This can be done using Windows PowerShell, Windows Registry, and the Drive Letter Changer software.
How to Fix Affected Programs After Changing Drive Letter
As we already mentioned, changing a drive letter where an app or program may be installed might break it. If the problem is not fixed automatically after a reboot, you may have to fix it manually. Here are a few solutions that might work.
Change Path for Shortcut
If you are trying to run an app or program using its shortcut, then just fixing the path of the shortcut might fix the problem.
Right-click on the shortcut and click Properties.
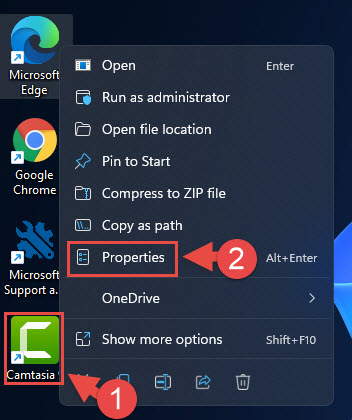
Open item properties Switch to the Shortcut tab, change the drive letters in the “Target” and “Start in” fields with the new drive letters, and then continue to click Apply and Ok.
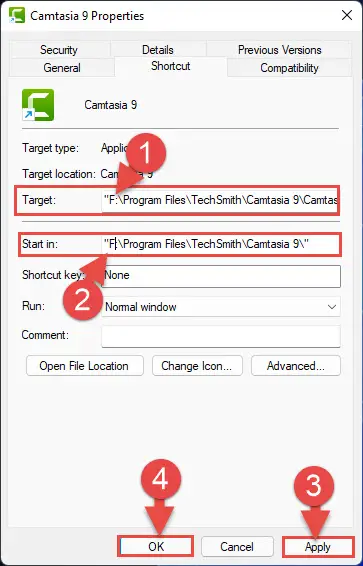
Fix issues with apps affected by changing drive letters
Now try re-running the program using the shortcut.
Revert Drive Letter
If the issue occurs after changing the drive letter, then you can try changing it back to the old one using the given methods above.
This is not an ideal case, but it will probably solve the problem.
If you do not wish to revert to the drive letter, you can skip this method and try out the ones discussed below.
Change Drive Letter in Windows Registry
It may be possible that the drive letter change has not been updated in the Windows Registry, therefore it needs to be manually updated. Here is how:
Open the Registry Editor by typing in “regedit” in the Run Command box.

Open the Registry Editor From the Registry Editor, click Edit and then click Find.
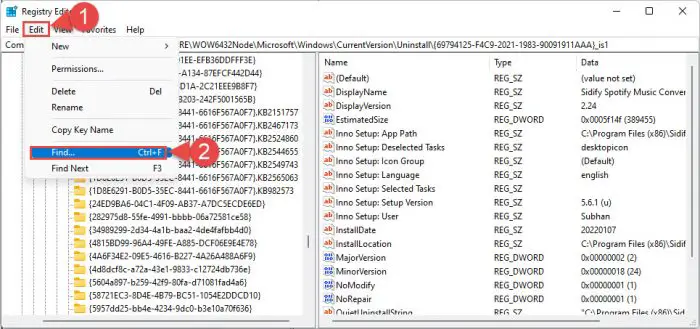
Search inside the Registry Editor Type in the old location for the app you are trying to troubleshoot, and then click “Find Next.”
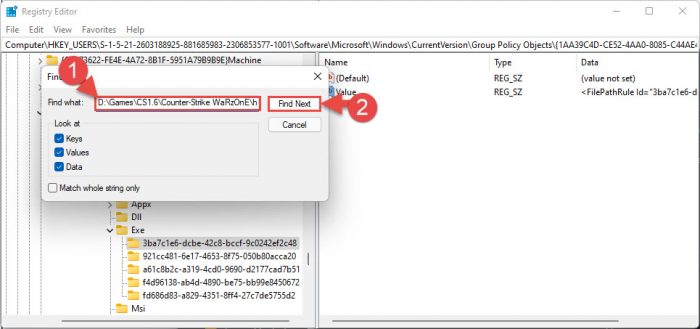
Look for the old path inside Windows Registry When the search wizard finds a match, double-click on the Value in the right pane, and then change the old drive letter with the new one in the text field under “Value Data.”
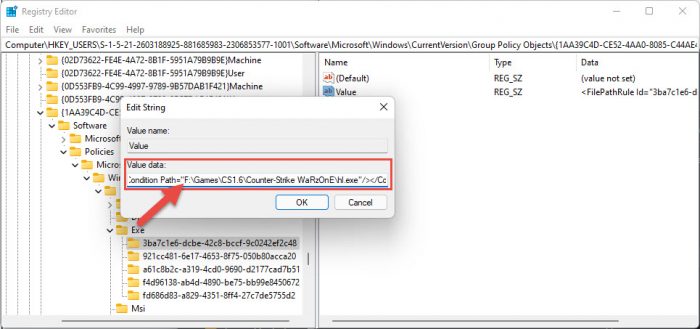
Fix app issue caused by changing drive letter from Windows Registry Now repeat steps 2 through 5 until all paths have been updated with the new drive letter.
Once done, close the Registry Editor and restart the computer for the changes to take effect.
After the computer reboots, check to see if the issue has been resolved.
Reinstall Program
If none of these methods have worked for you, you can try reinstalling the program. Simply delete the app, download the new setup from the vendor’s website, and perform a new install.
Closing Words
People often mistake the drive letter for the name of the volume. However, these 2 are totally different. A drive letter is an alphabet defining a volume/partition on the disk, whereas a name could be anything you want it to be.
By default, Windows names a new volume as “New Volume.” You can change the name of the system volume, but cannot change its drive letter.
That said, we would like to know what prompted you to change the drive letter(s) on your system.


