Key Points
- If you see the error “Windows was unable to complete the formatting” while formatting a USB drive, then you can fix it through the command line.
- You can use the Diskpart utility in the Command Prompt, or use PowerShell instead to format a USB drive, or any other drive for that matter.
Experiencing issues with USB flash drives, especially if you change them between bootable and regular storage devices, is quite common on Windows devices. Sometimes, this leads to being unable to use them at all.
In File Explorer, you might not be able to open a USB storage drive. When you attempt to format it using the Graphical User Interface (GUI), you are met with the error: “Windows was unable to complete the formatting.” This is when you must take desperate measures, format the USB flash drive the hard way, and get it working again.
In this post, we are going to show you how to format a USB flash drive from the Command Prompt and PowerShell, which should surely work in formatting the drive, even if the regular methods aren’t working.
Here are 5 ways to format USB drives on Windows 10.
Table of Contents
On this page
Format USB drive from Command Prompt
If you are unable to access or format the USB drive using File Explorer, then you should try the methods given below with the Windows command line. The command line gives more control over the USB drive and its properties, therefore allowing you to modify its parameters.
Use the following steps to format a USB drive from the Command Prompt:
First, we must determine the disk number of the USB drive. Start by connecting the USB drive to the computer.
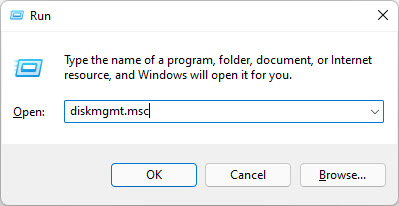
Press the Windows Key + R to open the Run Command box.
Type in “diskmgmt.msc” and press Enter to open the Disk Management Console.

Open the Disk Management Console In the bottom section of the console, look for the Disk number in the left column for the USB drive.
Make sure to note down the correct disk number, as an incorrect disk number will lead to formatting the wrong disk, and significant data could be lost.

Note the disk number for the USB drive Now, press the Windows Key + R again, type in “cmd” and press CTRL + Shift + Enter to open the Command Prompt with administrative privileges.
In the Command Prompt, type in the following and press Enter. This will enter the disk management interpreter.
Diskpart
Enter Diskpart Run the following to list all the disk partitions and their details:
List Disk
List disk information You will notice that the disk number listed for the flash drive is the same as noted in the Disk Management Console in Step 4.
Use this disk number in the following command while replacing [DiskNumber] to select it:
Select Disk [DiskNumber]
Select the disk Now run the following command to remove any read-only files and folders from the drive:
Attributes disk clear readonly
Remove all read-only files and folders Now clean the drive with the following command:
Clean
Clean the drive Now, to create a partition of the unallocated disk, run this command:
Create partition primary
Create the primary partition Quick-format the drive with the following command. You can replace the variable [FileSystem] with either of the following formats that you want for the drive:
- NTFS
- fat32
- exFAT
Click here to learn about the different file systems.
Format fs=[FileSystem] quick
Format the drive Now run this command to assign a drive letter to the drive:
Assign
Assign a drive letter Once it is formatted, run the following command to exit the Diskpart mode:
Exit
Exit the Diskpart mode
Your USB flash drive has now been formatted successfully and should be accessible through File Explorer and other means.
Format USB drive from Windows PowerShell
PowerShell is another powerful command-line tool in Windows. If you prefer using the PowerShell instead of the Command Prompt, use these steps:
Run the following command and note down the disk number for the USB drive:
Get-disk
Get disk information in PowerShell Now run the following command while replacing [DiskNumber] with the actual number noted above:
Clear-Disk -Number [DiskNumber] -RemoveData
Clear the disk When asked for confirmation, type in “A” for Yes to all.

Confirm data deletion Now run this command to create a new partition. Remember to change the variables in the square brackets accordingly.
Note: Make sure that the drive letter you use in this command is not being used by another partition.
New-Partition -DiskNumber [DiskNumber] -UseMaximumSize -IsActive -DriveLetter [NewDriveLetter]
Create a new partition Once created, use the following command to format the drive into your preferred file system. Replace all the variables in the square brackets accordingly.
Format-Volume -DriveLetter [NewDriveLetter] -FileSystem [FileSystem] -NewFileSystemLabel [VolumeLabel]
Format USB drive from PowerShell
The USB flash drive will now be formatted and accessible via all methods.
That said, to make sure that the USB drive is now working perfectly, as it should, you should perform a small test.
Check USB for proper functioning
Now that you have successfully formatted the USB drive and it has become accessible, it is still recommended to check for any bad sectors that caused it to become unformattable in the first place. For that, you can use the CHKDSK utility.
CHKDSK, or Check Disk, is a tool that scans your hard drive for corrupted files and fixes them. It also scans for bad sectors on the disk and attempts to repair them. If it fails to repair any discovered bad sectors, it informs the operating system not to use them.
Here are the steps to scan the USB drive with the CHKDSK utility:
Press the Windows Key + R to open the Run Command box.
Type in “cmd” and press CTRL + Shift + Enter to run the Command Prompt with administrative rights.
Now use the following command to run the CHKDSK utility while using the appropriate drive letter for the USB disk:
Chkdsk [NewDriveLetter]: /f /r /xThe
/fswitch is used to fix errors on the disk, the/rswitch locates bad sectors and recovers readable information, and the/xswitch is responsible for forcing the volume to dismount first if needed.
Scan the USB drive using CHKDSK utility Note that this step can take some time to complete.
When the scan completes, go through the end results and check whether it has any bad sectors or not. If it does, we recommend that you change your USB drive at the earliest.

Closing thoughts
If you are experiencing issues with your USB drive and are unable to format it, then in this post you shall find two methods to successfully format it using the Windows command line. Using the command line gives you more control and options over the system devices, including the connected storage devices.
If you find that you still cannot get the USB drive to format, maybe it is because it does not show up in the list of disks, then it is likely that the USB flash drive is dead and needs to be recycled.


