We usually give direct download links to Windows Updates on this blog, so users can install the updates manually on multiple systems, saving Internet bandwidth. Some users have reported that they encounter an error code 0x800b0101 when trying to install Windows Update using an MSU file.
The issue can be resolved by changing a few things, such as running Windows Update troubleshooter, changing the system date and time, and performing SFC and DISM scans. This will ensure the integrity of your system files and the accuracy of your system clock.
In this article, we will discuss all these topics in detail.
Table of Contents
Windows Update Standalone Installer 0x800b0101 Error

Users often encounter a prompt such as the above stating the following:
Windows Update Standalone Installer
Installer encountered an error: 0x800B0101
A required certificate is not within its validity period when verifying against the current system clock or the timestamp in the signified file.
This error occurs when you try to manually install a standalone Windows update package (.msu file).
An MSU file is installed using the Windows Update Standalone Installer (WUSA) utility. This utility is placed in the %windir%\System32 directory in Windows. If you do not install a Windows update, it throws an error with the relevant error code.
Fix Windows Update Standalone Installer Error 0x800b0101
We have listed the following methods you can mitigate this error in Windows. Since the issue can occur due to several different reasons, any one of these methods could work for you.
Run Windows Update Troubleshooter
Both Windows 11 and 10 come with a pre-installed troubleshooter for several different services and features of the OS. This troubleshooter can be executed automatically to check for Windows Update issues, and then suggest the necessary action to be taken.
To run this troubleshooter, navigate to the following:
Settings app >> System >> Troubleshoot >> Other troubleshooters
Click Run in front of Windows Update.

The troubleshooter will now launch. It will then display any identified issues and ask you to take the appropriate action(s). It is recommended that you perform the necessary actions and see whether the issue is resolved.
Correct System Date and Time
The error message claims it is having trouble verifying the timestamp for the associated certificate. It may be possible that your system’s time or date is out of sync and needs to be corrected. Follow the steps below to do so:
- Open the Date and Time settings by typing in timedate.cpl in Run.
- From the window, switch to the Internet Time tab, and then click Change settings.

- From the Internet Time Settings pop-up, check the box next to “Synchronize with an Internet Time Server,” select time.windows.com from the drop-down menu, and then click Update now. Click OK when done.

- Back in the Date and Time window, click Apply and Ok.
Now restart your computer and try reinstalling the Windows update.
Clear Software Distribution folder
The Software Distribution folder can be found in C:\Windows. This folder contains temporary files within a sub-folder (download) that are required to install a Windows update. Quite often, a Windows update fails to install and experiences an error code because of these corrupted files. In this case, these temporary files need to be removed, and the update process needs to be started from the top.
Navigate to the following location using File Explorer:
C:\Windows\SoftwareDistribution\Download
Now, select all the items by using the Ctrl + A shortcut keys. Then delete all selected items using the Del key while holding down on the Shift key to remove them permanently.

Once removed, restart the computer and try reinstalling the Windows update.
Scan for Corrupted System Files
Windows comes with a built-in tool to fix system files that may have been corrupted. This tool is the System File Checker (SFC), which automatically repairs corrupted system files that may be redundantly available on your PC, or have just gone missing. What it does is replace any damaged or missing files.
Perform the following to run the tool:
- Launch Windows PowerShell with administrative privileges and then enter the following command:
sfc /scannow - Now allow some time for the command to fully run and scan your PC, and make any fixes if possible along the way.

- Restart the computer.
Once done, check if you can now install the Windows update. If not, perform the next step to rule out system file corruption.
Repair Windows image
Deployment Image Servicing and Management (DISM) also fixes your Operating System automatically, like the SFC scan.
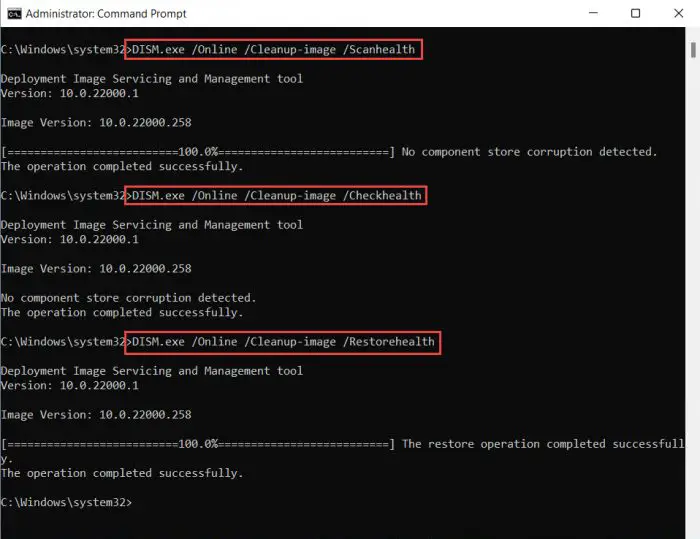
To begin the scan, launch Command Prompt with administrative privileges and enter the following 3 commands, one after the other:
DISM.exe /Online /Cleanup-image /Scanhealth
DISM.exe /Online /Cleanup-image /Checkhealth
DISM.exe /Online /Cleanup-image /Restorehealth

It can take a few minutes for the commands to execute completely. Do not close the Command Prompt and allow them ample time to run.
Once completed, check to see if the issue has been resolved.
Remove Expired Certificates
Digital certificates are used to authenticate software that is who they claim to be, not an imposter. Each certificate is valid until a certain time, after which they expire and need to be renewed (usually automatically). However, expired and faulty certificates can cause the Windows Update Standalone Installer to fail and throw an error.
In that case, the certificate needs to be removed. Follow the steps below to remove expired certificates:
We suggest you create a system restore point if a critical system certificate is removed.
- Open the Certificate Management Console by typing in certlm.msc in Run.
- From the left pane, navigate to the following:
Certificates - Local Computer >> Trusted Root Certification Authorities >> Certificates - Now, in the right pane, look for the expired certificate (using the Expiration Date column), right-click it, and then click Delete from the context menu.

- Repeat the last step until all expired certificates are removed.
- Restart the computer.
Once the computer restarts, check to see if the issue has been resolved.
Closing Words
There are a bunch of errors and error codes associated with Windows updates. Most of them, however, are solved by certain troubleshooting techniques. Applying these methods can save you from repairing, resetting, or redoing your entire operating system.
That is why we strongly recommend that you implement all of the methods given above to try and mitigate the issue.


