Key Points
- The display resolution setting can be grayed out because of outdated or corrupted drivers, incompatible refresh rates, and problematic Windows updates.
- If the display resolution setting is grayed out, try updating or reinstalling the graphics driver from the Device Manager.
- If that doesn’t fix it, uninstall any recently installed Windows updates, and try changing the monitor’s refresh rate.
The display resolution is a combination of pixels spread across the screen, where the first number denotes the horizontal pixels, and the second number denotes the number of vertical pixels on the display. It is written as “1920 x 1080,” or even 2K, 4K, etc.
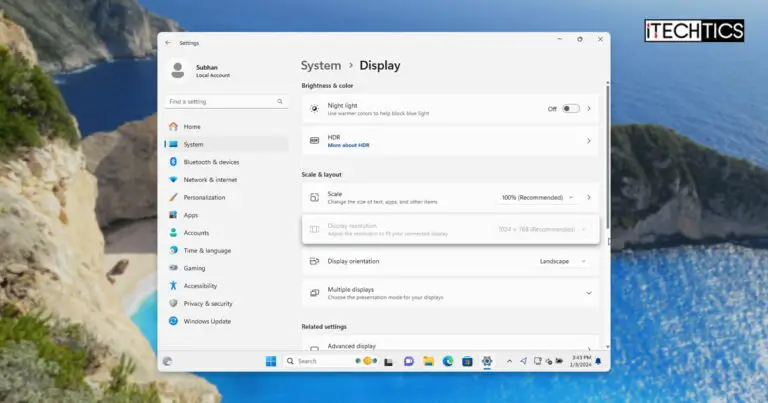
Windows users have often reported that they are unable to change their screen resolutions because the option, which is accessible from Settings > Display >Display Resolution, is grayed out and unresponsive.
This guide will show you how you can bring your screen resolution settings back to normal and set it according to your preferences.
Table of Contents
What causes display resolution setting to gray out?
The resolution settings can be grayed for different reasons, which can be any one of the following:
- The graphics driver becomes corrupted, removed, or outdated.
- A recent Windows update has affected the compatibility of the driver or the display hardware.
- You have configured an unsupported refresh rate.
Previously, even if the option to adjust the screen resolution was grayed out, users could set a custom resolution using the Intel Graphics and Media Control Panel. However, this tool was later rebranded as Intel Graphics Command Center, and when it was, the ability to set custom resolution was also removed as the modern hardware no longer supported it.
Now, if you encounter the same problem on your Windows 10 or 11 computer, you must apply the following fixes instead.
Fix display resolution grayed out
Update the display driver
Your first go-to solution should be to update the graphics driver. You can update the graphics driver automatically where Windows searches the web for the latest driver and installs it. If the latest driver is already installed, then you should try reinstalling the same driver. If that doesn’t work either, then you can download the graphics driver directly from the GPU manufacturer’s website.
Use the following steps to try and update the driver automatically:
-
Press the Windows Key + R to open the Run Command box.
-
Type in “devmgmt.msc” and press Enter to launch the Device Management Console.
-
Expand “Display adapters.”
-
Right-click the display adapter and click “Update driver.”

Update graphics driver from the Device Manager -
Click “Search automatically for drivers.”

Search automatically for drivers -
The wizard will now scan and install the latest graphics driver if one is available. You may then close the update wizard.

Update graphics driver
After performing these steps, check if the display resolution option has now become available again. If not, continue to perform the fixes given below.
Reinstall graphics driver
If the problem remains, then perform these steps instead:
-
Press the Windows Key + R to open the Run Command box.
-
Type in “devmgmt.msc” and press Enter to launch the Device Management Console.
-
Expand “Display adapters.”
-
Right-click the display adapter and click “Uninstall device.”

Uninstall graphics driver from Device Manager -
Select “Attempt to remove the driver for this device” and click Uninstall.

Confirm driver removal Note: At this point, it is normal for the screen to flicker and the resolution to change drastically.
-
Now click on the “Scan for hardware changes” button at the top.

Scan for hardware changes in the Device Manager -
Restart the computer.
This step is optional and would only reassure the driver reinstallation.
Once the driver is reinstalled, and the problem persists, then continue to perform the next solution.
Install driver from the GPU manufacturer
Often, drivers from Microsoft encounter issues with the onboard hardware, which in this case, would be the GPUs. To rule out this potential cause, try installing the latest GPU driver after downloading it directly from the manufacturer’s website.
Click on the links below to download a driver from your GPU’s manufacturer:
Download display driver for AMD GPU
Download display driver for Nvidia GPU
Download display drivers for Intel GPU
Once on the respective website, download the driver designed for your specific hardware.
Learn how to find your GPU information.
Once downloaded, use the following steps to install the driver manually:
-
Press the Windows Key + R to open the Run Command box.
-
Type in “devmgmt.msc” and press Enter to launch the Device Management Console.
-
Expand “Display adapters.”
-
Right-click the display adapter and click “Update driver.”

Update graphics driver from the Device Manager -
Click “Browse my computer for drivers.”

Browse the computer manually for drivers -
Browse for the downloaded driver, select it, and then click Next.

Select the downloaded driver to install The driver will now be installed. It is normal for the screen to flicker during this time.
-
Once installed, close the wizard.
Now check whether the screen resolution setting has come back online. If it hasn’t, there is still one more trick you can perform with the graphics driver that might fix the problem.
Install the OEM-recommended graphics driver
-
Press the Windows Key + R to open the Run Command box.
-
Type in “devmgmt.msc” and press Enter to launch the Device Management Console.
-
Expand “Display adapters.”
-
Right-click the display adapter and click “Update driver.”

Update graphics driver from the Device Manager -
Click “Browse my computer for drivers.”

Browse the computer manually for drivers -
Now click “Let me pick from a list of available drivers on my computer.”

Pick from a list of drivers -
Select the option “Show compatible hardware.”
-
Select the latest OEM driver available from the list and click Next.

Select the latest OEM-recommended graphics driver The OEM driver will now be installed.
-
Once installed, close the wizard.
Now check to see if these steps resolve the problem.
If the problem persists and the display resolution setting is still grayed out, then we recommend installing the latest available graphics driver again at this point and then continuing with the remainder of the possible fixes shared below.
Change refresh rate
It is also possible that an incompatible refresh rate is causing the screen resolution to remain fixed, graying out the option to change it. Therefore, we shall try changing the refresh rate to see if it fixes the issue.
Note: Not all displays support multiple refresh rates. Therefore, it is not necessary that this solution applies to you.
-
Press the Windows key + i to open the Settings app.
-
Click System.
-
Open Display settings.

Open the Display Settings -
Scroll down and click “Advanced display.”

Open Advanced display settings -
In the Display information section, inside the primary display menu, click “Display adapter properties for display X,” where “X” is a number assigned to the display device.

Open the display adapter properties -
Switch to the Monitor tab.
-
Select a different refresh rate from the drop-down menu and click Apply and OK.

Change the refresh rate
Uninstall a recent Windows update
It may be possible that a recent Windows update has affected the computer and made the screen resolution adjustment setting unavailable. To rule this out, try uninstalling the recent update using these steps:
-
Press the Windows key + i to open the Settings app.
-
Go to “Windows Update.”
-
Click “Update history.”

Open Windows Update history -
Scroll down and click “Uninstall updates.”

Open uninstall Windows update Settings page -
Click Uninstall in front of the update that was recently installed, after which the resolution option was grayed out.

Uninstall recently installed Windows update -
Click Uninstall again to confirm.
-
Restart the computer to finalize the Windows update removal.
Once the update is removed, check to see whether you are now able to change the display resolution again.
Reset Windows
Not the solution you want to hear, but as a last resort, if the problem still hasn’t been fixed, resetting the operating system just might fix it. You can perform the following steps to reset the computer while maintaining your personal files and folders:
Note: I prefer performing a cloud reset as it downloads new copies of the critical system files.
-
Press the Windows Key + i to open the Settings app.
-
Click System.
-
Now go to Recovery settings.

Open Recovery settings -
Click “Reset PC.”

Reset PC The reset PC wizard will now open.
-
Select “Keep my files.”

Keep files and data -
Select “Cloud download.”

Cloud download -
Click Next.

proceed with resetting Windows -
Click Reset.

Reset Windows from Cloud while keeping files
The wizard will now begin downloading fresh files from Microsoft servers and then reset your computer. This step can take a while depending upon your internet connection, and your PC may restart.
Once the computer resets, the resolution adjustment issue should be resolved.
Ending words
Adjusting the screen resolution according to your own preferences is important, otherwise, the entire computer experience is ruined. The icons are;t the right size, the visibility and readability are poor, and the windows are often not inside the frame. However, not being able to adjust it is a new kind of frustration.
This is why I have compiled a list of practical solutions that will help revert whatever it was that grayed out the display resolution setting and restore it so that you can continue to adjust it according to your preferences.


