The Chrome web browser is the most-used web browser in the computer industry. However, it also has its caveats. Even though it is a famous browser, primarily because of its features and performance, it is also notorious for high memory consumption.
As the days go by, the Chrome browser is being updated every 4 weeks. However, somehow, it is also taking up more and more RAM. But what if your computer runs out of memory to give to Chrome? This is when you are met with the “Out of memory” error code. This issue disrupts your browsing experience, leaving you puzzled and in need of a solution.
But fear not, within this challenge lies an opportunity to overcome memory limitations and unravel the mysteries of Chrome’s out-of-memory conundrum. Today, we will navigate the intricate labyrinth of this enigma, discovering ways to triumph over memory constraints and restore seamless browsing on Chrome.
Table of Contents
On This Page
What Causes the “Out of Memory” Error in Chrome?
As the error code suggests, you may encounter it when the Chrome browser runs out of memory to operate. This error indicates that the browser has run out of memory, and in some cases, the computer may still have available RAM. However, the problem usually arises because the system resources (RAM) are occupied by Chrome and other processes.
This causes the issue to rise unexpectedly, without any prior warnings or specific indications. This error can occur on any webpage, whether randomly or on specific sites, and it is not related to a particular website’s configuration.
Several factors could contribute to this error, such as the unavailability of excess memory, problematic extensions, a corrupted user profile, or an incompatible version of Chrome. Given the diverse potential causes, there are multiple solutions available to address this issue.
These solutions aim to troubleshoot the specific underlying cause. By applying the appropriate solution, users can resolve the error and regain normal browsing functionality without encountering the error message repeatedly.
Fix Out of Memory Error in Chrome
While the general causes for the “Out of Memory” error code have been outlined above, the specific circumstances of each occurrence may vary. Therefore, it is recommended to analyze the individual situation and choose the most relevant solution accordingly.
Following are some of the most effective ways of getting rid of the Chrome error code.
Restart the Computer
In many cases, a straightforward solution to resolve various issues in your system is to restart your PC. Therefore, if you encounter a Chrome error code “out of memory”, it is advisable to begin troubleshooting by restarting your system.
A system restart reboots all services and processes. If any item had previously encountered an error, malfunctioned, and took up significant RAM resources, then it could potentially be fixed by a simple restart.
If the problem persists despite the restart, then you can proceed to explore alternative methods for resolving the issue.
Close Unnecessary Tabs
If you have a plethora of tabs open in Chrome, we recommend that you close the ones you are not using.
Background tabs still consume system memory, and may take up significant amounts of RAM. Therefore, we advise that you close all unnecessary tabs to make room for the more useful web pages, and then reload the page on which you encountered the “out of memory” error.
If this fixes the issue, it means that you are running more processes than the system is meant to handle. In this case, we suggest that you increase the installed memory capacity of your computer.
Close RAM-Hungry Applications and Processes
Just like the tabs, you should also close any background applications and programs that may be consuming significant amounts of RAM. Closing them would vacate the RAM resources for Chrome, and this could potentially resolve the “out of memory” error and open the web page.
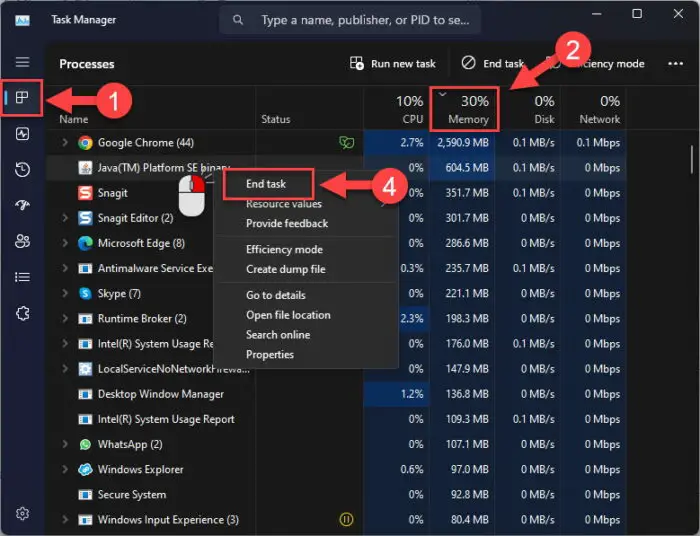
To close any processes consuming system memory, open the Task Manager and switch to the Processes tab. Click on the “Memory” column header to sort the processes in descending order, and then kill the apps/processes that you do not need.

Update Chrome to Latest Version
You might be using an older version of Chrome due to which the error code popped up. Check your Chrome version and download the latest (64-bit) version. Here are the steps:
Open Google Chrome and click on the ellipses (3 dots) in the top-right corner.

Click the ellipses Expand Help and click “About Google Chrome.”
The About page will now open and the browser will automatically begin downloading the latest available Chrome version.

About Google Chrome Once the update is complete, click “Relaunch.”
Note: The browser closes when you click Relaunch and then reopens, restoring all closed tabs.

Relaunch Chrome
Once the browser is updated, check to see if the error goes away. If it is still there, continue to perform the remaining solutions provided below.
Clear Browsing Data and Cache
Regularly clearing your browsing history and cache in Chrome is highly recommended for a smooth browsing experience. When you visit websites, Chrome saves browsing data to provide quick access to previously visited sites and keep you logged in. However, this stored data can occasionally interfere with Chrome’s functionality, leading to random errors.
Browsers, including Chrome, accumulate temporary files and cached data, such as images and videos, to speed up website loading and improve efficiency. Unfortunately, over time, these files can become corrupted or outdated, causing problems. If left uncleared, they may trigger Chrome error codes and disrupt your browsing activities.
By clearing your browsing history and cache, you can address these issues effectively. Firstly, it helps maintain your privacy by removing traces of the websites you have visited, ensuring that sensitive information remains confidential. Secondly, it frees up valuable storage space on your device, which can be especially useful if you have limited storage capacity.
To clear the browsing data and cache, follow these steps:
Open Chrome and press Ctrl + H.
It will open the browsing history.

Click on Clear Browsing Data From the left side of the screen, click on “Clear Browsing Data.”

Clear browsing data in Chrome 
Clear browsing history and cache from Chrome Tick the boxes for “Browsing history” and “Cached images and files.” Make sure to set the time range to “All time.”
If you wish to sign out your accounts from different sites, you can also select “Cookies and either data sites” as well.

Clear browsing history and cache from Chrome Click “Clear data.”
Once done, close the Chrome window and open it again. Check to see if the “out of memory” error has been mitigated.
Disable or Remove Problematic Extensions
Browser extensions enhance Chrome’s functionality but can strain its memory. Each extension is allocated memory based on its needs. However, some extensions request excessive memory, depriving other components.
Like an orchestra, when an extension hogs memory, it disrupts the harmony, causing performance issues. Chrome’s memory capacity can be exhausted, leading to the out of memory error. That said, make sure to disable or remove the unused and problematic extensions.
On your Chrome browser, click on the “puzzle icon” on the top right corner of the browser and then click “Manage extensions.”

Manage Chrome extensions Locate the extension you want to remove and click on the “Remove” button.
If you want to disable the extension and not remove it, then toggle the slider instead.

Remove or disable Chrome extensions
Once the problematic web extensions have been disabled/removed, check to see if the issue has been resolved.
Reset Chrome settings
Do you remember the last time you made changes to your Chrome? Whenever you face any Chrome error codes, it is advised to reset the browser to its default settings.
Here are the steps to reset the Chrome browser:
Note: Resetting Chrome settings will remove your extensions and disable any customizations you have made. It will also clear your browsing history, cookies, and cache. Make sure to back up any important data before resetting, as it cannot be recovered.
In the browser, click on the ellipses (3 dots) in the top-right corner of the browser and then click “Settings.”

Open Chrome settings Click “Reset settings” from the left pane.

Open Chrome’s reset settings Click “Restore settings to their original defaults.”

Restore Chrome to default settings This will invoke a popup.
Click “Reset Settings.”

Reset Google Chrome
Create a New User Profile in Chrome
If you are repeatedly encountering the “out of memory” error, it is possible that your user profile in Chrome has become corrupted. In such cases, creating a new user profile could potentially resolve the issue.
Simply put, a user profile is like a personal space within Chrome where your settings, preferences, and browsing data are stored. Creating a new profile/account will enable you to start fresh with a clean slate. After creating the new profile, you can check if the error persists.
Follow these steps to create a new user profile on Chrome:
Open Chrome and click on your profile picture in the top right corner.
Click “Add” from the expanded menu.
Here, you can either sign in with your account or continue without signing in.

Create a new user account in Chrome
You can switch between user profiles by clicking on the profile icon located in the top right corner of the browser window. However, we advise that you continue to use your new Chrome account and see if it resolves the issue.
Disable Hardware Acceleration
Hardware acceleration refers to utilizing a computer’s hardware to perform tasks faster than software alone. It can significantly enhance application performance.
While it is generally recommended to keep hardware acceleration enabled, there are cases where disabling it may be necessary. Doing so forces an application to use software rendering, potentially impacting its performance.
In the context of Chrome, hardware acceleration uses the computer’s graphics processing unit (GPU) to enhance graphics rendering. However, excessive GPU memory usage can occur, leading to the “out of memory” error.
This happens when the GPU’s memory demands exceed available resources, depriving other critical components of memory. Striking a balance between performance and memory allocation is crucial to prevent this error and ensure a seamless browsing experience.
You can disable hardware acceleration in Chrome by following these steps:
Note: Remember that disabling hardware acceleration may affect the performance of certain graphics-intensive tasks in the browser, so it’s recommended to enable it unless you encounter specific issues.
Open “Settings” in Chrome from the three-dot menu and click “System” from the menu on the left side.
Alternatively, you can directly enter “chrome://settings/system” in the address bar to access the System settings.
Toggle the slider in front of “Use hardware acceleration when available” into the Off position.

Disable hardware acceleration from Chrome settings After disabling hardware acceleration, scroll back up and click on the “Relaunch” button to restart Chrome and apply the changes.
Increase Pagefile Size
The Pagefile, or virtual memory, is a hidden system file on your hard drive that is primarily there to compensate for low RAM. Pagefile serves as an extension to RAM. Data that cannot be processed in RAM due to lack of space is saved in pagefile and swapped in RAM when it is free.
When Chrome runs out of physical memory, virtual memory kicks in by temporarily moving data from RAM to the hard drive. This allows Chrome to free up precious RAM for other tasks, preventing the error.
Use the following steps to increase the pagefile size on a Windows computer:
Open the System Properties applet by typing in “sysdm.cpl” in the Run Command box.

Open the System Properties applet Switch to the “Advanced” tab and then click “Settings” under the “Performance” section.

Open performance settings Switch to the “Advanced” tab and click “Change” under the “Virtual memory” section.

Click Change from Virtual Memory settings Uncheck the “Automatically manage paging file size for all drives” checkbox and select the “Custom size” option and enter the initial (minimum) and the maximum size for the Pagefile.
In the Initial size (MB) field, enter the initial size of the virtual memory. This value represents the minimum amount of disk space allocated for virtual memory.
Whereas, in the Maximum size (MB) field, enter the maximum size of the virtual memory. This would be the maximum amount of disk space that can be used for virtual memory.

Enter values for virtual memory Once you have entered the values, click Set and then click Ok to save the changes.
Restart your computer for the new virtual memory settings to take effect.
Once the computer restarts, check to see if the “out of memory” error has been resolved in Chrome.
Reinstall Chrome
If the issue persists, it is recommended to uninstall the Chrome browser. Uninstalling and reinstalling Chrome can be an effective way to fix the problem since it helps address potential issues with the browser’s installation or faulty core app files.
Go to the following:
Settings app >> Apps >> Installed apps
Scroll through the list of applications and locate “Google Chrome” then click on it. Click “Uninstall” and confirm your choice.

Uninstall Google Chrome from Settings Once the app is uninstalled, restart your computer.
After the reboot, download Google Chrome, and then run the setup to install it.
When it reinstalls, check to see if the issue has been mitigated.
Use a different browser as an alternative
If all of the aforementioned solutions fail, the only thing you can do is use a different browser as an alternative. Fortunately, there are numerous free and reliable options available. Here is a list of recommended free web browsers, along with their respective hyperlinks for easy access:
- Mozilla Firefox: It is a popular open-source web browser known for its strong emphasis on privacy, customization options, and support for extensions.
- Microsoft Edge: Developed by Microsoft, it offers a fast and secure browsing experience with features like seamless integration with Windows 10 and compatibility with Microsoft services.
- Opera: It is a feature-rich browser that focuses on speed and efficiency, providing users with a built-in ad blocker, VPN, and customizable user interface.
- Brave: It is a privacy-oriented browser that blocks ads and trackers by default. It also offers a unique feature that allows users to earn cryptocurrency by opting into privacy-respecting ads.
- Vivaldi: Designed for power users, it is a highly customizable browser. It offers a range of advanced features, including tab stacking, quick commands, and extensive customization options.
Final Words
Encountering the Chrome error code “out of memory” while browsing the internet can be frustrating. But don’t worry. We have delved into the depths of the mysterious Chrome error code “out of memory” to find solutions for you.
However, it’s important to keep in mind that not every solution will work. So, be persistent and open-minded, and try the different methods listed in this article. Remember, versatility is crucial in overcoming this common problem in the digital world.


