On Windows 11 and 10, you can install certain optional features that do not come as standard. These include Remote Server Administrator Tools (RSAT), language packs, fonts, and many other handy tools and utilities.
However, due to one reason or another, you may not be able to download or install them using the conventional method. This is usually because of an applied setting, or an issue encountered by the operating system.
Additionally, you may or may not see an error prompt when the feature fails to install. If prompted, you may come across the statement “Couldn’t install” with no additional information.
If you are experiencing such an issue, then you have come to the right place. Here, we will show you the many ways to troubleshoot optional features that refuse to install on a Windows computer.
Table of Contents
What are Windows optional features
Optional features are not required to operate the OS, since they are not critical features. However, they do add extra functionalities.
When installed, optional features take up space on your local hard drive. Moreover, each individual may need different features. For example, a server administrator may need RSAT tools to manage their servers remotely. Whereas another person may not need these features, but instead requires additional language packs to communicate with people.
Both the users have different demands, and can thus install different optional features as per their preferences.
On Windows, you can install optional features from two places:
- The Control Panel (Optional Features applet)
- The Settings app
While both of these are optional features, both offer different kinds of features.
In the Control Panel applet, you find the optional feature that is specific to the operating system functionality and its features, like Hyper-V, .NET, etc. The files for these features may already be available on your and only need to be installed, or the OS can automatically download them for you.
The optional features offered within the Settings app are different. These are features that give extra functionalities and tools.
Here, we discuss troubleshooting the installation of the optional features found within the Settings app.
Learn how to install Windows optional features from the applet without the internet.
Why optional features won’t install
While trying to install the optional features, you may come across an error message or a popup stating the following:
Something happened and we couldn’t install a feature
The error message may also include an error code, something like “0x0089ac0.”
Such errors usually occur when the source files for the optional feature are not available on your computer locally. In that case, Windows automatically tries to download the files from the internet. However, if there is no internet connection either, then the feature installation would fail.
Other reasons for optional feature installation failure include corrupted system files, outdated Windows versions, or incorrect system configuration.
Moreover, you may not be able to see the Windows optional features at all because of two reasons:
- You are logged in from a standard user account.
- A Group Policy is configured to hide the optional features.
If it is the latter, then this issue has been addressed in one of the fixes below.
Troubleshooting optional features not installing
If the optional features are not installing or you are unable to see them in the designation regions, perform the following steps to troubleshoot it in the given chronological order.
Pre-troubleshooting
The Windows OS often encounters temporary issues that can be resolved by meeting specific requirements. For example, to install the Windows optional features, you must be logged in from a privileged account.
Here are two things that you need to ensure before you can successfully install the optional features:
- Restart the computer before proceeding to apply the following solutions.
- Make sure that you are logged in from an administrative account.
Your first approach toward fixing the optional features not installing issue should be restarting the PC. Once done, log in from a privileged user account and then retry installing the optional feature.
If the issue persists, perform the rest of the solutions provided below.
Disable “Hide Windows features” policy
A Group Policy in Windows disables all optional features from being installed. Therefore, you may not be able to see them at all. If this is the case, then you can use the following steps to show the optional features and then successfully install them.
Note: Another reason why you won’t be able to see the optional Windows features is because of a standard account type. Make sure that you are logged in from an administrative account.
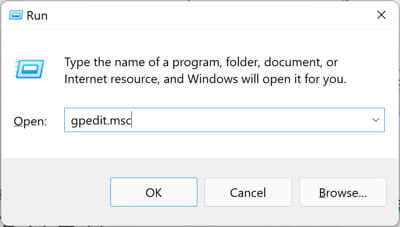
Press the Windows Key + R to open the Run Command box.
Type in “gpedit.msc” and press Enter to open the Group Policy editor.

Open the Group Policy editor Navigate to the following path from the left pane:
Local Computer Policy >> User Configuration >> Administrative Templates >> Control Panel >> Programs
Double-click the policy “Hide Windows Features” in the right pane.
Select “Disabled” and then click Apply and Ok.

Disable hidden optional features Now press the Windows Key + R again to open the Run Command box again.
Type in “cmd” and press Enter.
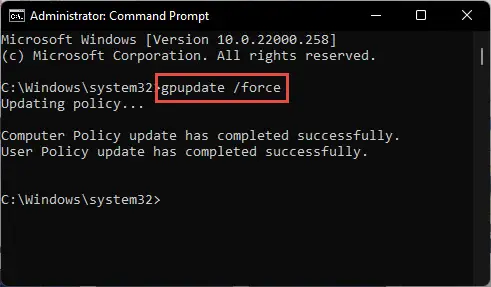
Now run the following command to implement the Group Policy changes:
GPUpdate /Force
Enforce Group Policy changes
Disable metered connection
A metered connection in Windows refers to an internet connection that has a limited data allowance or charges based on the amount of data used. It is commonly used with mobile or portable devices, such as smartphones or laptops, to manage and control data usage. When a connection is set as metered, certain background tasks and automatic updates are restricted to avoid excessive data consumption.
However, when a metered connection is active, Windows reduces the network bandwidth allocated to the optional and non-critical downloads to conserve data usage. This limitation can result in the optional features not being able to install.
If you are unable to install optional features on your Windows PC, it is recommended to check if your connection is set as metered. Disabling the metered connection option can help fix this issue.
Perform the following steps to check and disable an internet connection as a monitored connection:
Go to the following:
Settings app >> Network & internet >> Wi-Fi >> Manage Knwon Networks
Click on the network you are connected to.

Open the wi fi connection properties Ensure that the slider in front of “Metered connection” is in the Off position.

Disable metered connection
In the case you are connected to an ethernet cable, then instead of going to the Wi-Fi settings page, go to the Ethernet page, and disable “Metered connection” from there.
Restart Windows Module Installer
The Windows Module Installer, also known as “Trusted Installer,” is a Windows service responsible for checking and installing Windows updates and associated packages. When behaving abnormally, it can result in Windows components not being able to install.
Try restarting this service to fix the issue using these steps:
Press the Windows key + R shortcut keys to open the Run Command box.
Type in “cmd” and press CTRL + Shift + Enter to run the Command Prompt with elevated privileges.
Now execute the following command to stop the Trusted Installer service:
net stop trustedinstaller
Stop the Windows Modules Installer service Now run this command to restart the Trusted Installer service:
net start trustedinstaller
Restart the Windows Modules Installer service
Run Windows Update troubleshooter
The Windows operating system comes with built-in troubleshooters, including the Windows Update troubleshooter. This troubleshooter may not seem associated with the Windows optional features, but that is not true.
The Windows Update troubleshooter can scan and potentially fix any detected issues relating to Windows updates and the optional features.
Perform the following steps to run the Windows Update troubleshooter:
Press the Windows Key + i to open the Settings app.
Navigate to the following:
System >> Troubleshoot >> Other troubleshooters
Here, click Run in front of “Windows Update.”

Run Windows Update troubleshooter The troubleshooter will now run and scan for any anomalies. If any are found, it will attempt to fix them, as in the image below. You can then Close the troubleshooter.

Attempted to fix any issues
If any issues were detected and resolved, check to see if you can now install the optional features.
Fix corrupted files with DISM and SFC
Windows comes with preinstalled tools to help fix the OS. Apart from the built-in troubleshooter you can find in the Settings app, Windows also comes with a Deployment Image Servicing and Management (DISM) tool, System File Checker (SFC), and a Check Disk (CHKDSK) utility, where each performs a different scan and attempts to automatically fix any glitches in the OS.
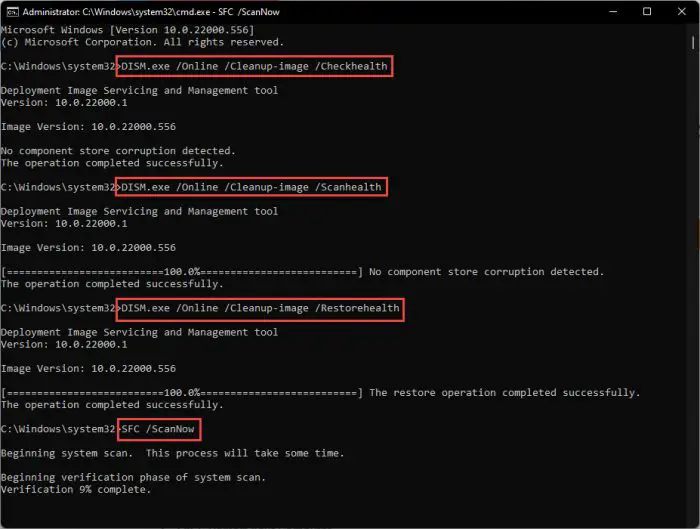
Run the following cmdlets in the given order to attempt and repair the current Windows OS installation.
DISM.exe /Online /Cleanup-image /Checkhealth
DISM.exe /Online /Cleanup-image /Scanhealth
DISM.exe /Online /Cleanup-image /Restorehealth
sfc /scannow
After all the scans are performed, check to see if the if you can now download and install the optional features.
Reset Windows Update components
Windows Update Components is a set of services, files, and directories that work in coherence to download and install Windows updates, as well as the optional features. An issue with either of the components can prevent the optional updates from installing.
You can reset all the Windows Update components by running the following commands, in the given order, one after the other, in an elevated Command Prompt.
net stop bits
net stop wuauserv
net stop appidsvc
net stop cryptsvc
Del “%ALLUSERSPROFILE%\\Application Data\\Microsoft\\Network\\Downloader\\*.*”
rmdir %systemroot%\\SoftwareDistribution /S /Q
rmdir %systemroot%\\system32\\catroot2 /S /Q
regsvr32.exe /s atl.dll
regsvr32.exe /s urlmon.dll
regsvr32.exe /s mshtml.dll
netsh winsock reset
netsh winsock reset proxy
net start bits
net start wuauserv
net start appidsvc
net start cryptsvc
If none of the solutions have worked for you thus far, then the next one should.
Enable Windows feature from PowerShell
As a last resort, if you are still unable to install a Windows optional feature from the settings app, then you can install it using PowerShell. Here is how:
Open Windows PowerShell and run the following command:
Get-WindowsOptionalFeature -Online
List all Windows optional features in PowerShell This will list all the optional features in PowerShell.
Highlight and copy the name of the feature that you want to install.
Now run the following command while replacing [FeatureName] with the name of the feature that you install:
Enable-WindowsOptionalFeature -Online -FeatureName [FeatureName]
Install optional feature using PowerShell
The optional feature will now be installed. Note that your system may or may not need a restart. This will be given in the outcome after installing the feature.
Ending words
Optional features are a great way for getting extra value installed on your PC with existing specs and no additional costs. However, it can be frustrating when you know you have the option but are unable to install the feature.
If you are experiencing issues with Windows optional features and cannot install them, try all of the solutions above in the given order to fix the issue.


