Group Policies in Windows control the computer’s environment by implementing policies configured by administrators. Normally used within enterprises on devices connected with a domain, these policies control how a system will behave, what will be allowed, and what will be restricted.
Group Policy Objects (GPOs) are a set of policies governed by a Domain Controller. However, in case your computer is not connected to a domain, it can still be managed through the Group Policy Editor (Run >> gpedit.msc).
If you or our administrator have recently made changes to the policies, then you can run the following cmdlet in Command Prompt to implement those changes without having to restart the computer:
GPUpdate /ForceThis cmdlet fetches fresh policies from the server and applies them to your PC. However, we have found users have trouble implementing the policies and can often encounter an error.
If you find yourself in a similar situation, then this is where you’ll find all the possible solutions to the problem.
Table of Contents
Why GPUpdate /Force isn’t Working
Sometimes you may encounter either one of the following (or similar) errors while running the “GPUpdate /Force” cmdlet:
User policy update failed.
Computer policy could not be updated successfully.
At other times, you may find that the command has been executed successfully, but no changes have been made from the implemented policies.
This can happen due to multiple reasons:
- Windows Registries have been corrupted.
- Insufficient privileges to run the command.
- Due to malware.
- The computer is not connected to the domain.
- The user profile is corrupted.
For whatever reason, the following given solutions should mitigate the issue, after which you can try rerunning the “GPUpdate /Force” cmdlet.
Fix GPUpdate /Force Not Working
Restart the Computer
If running the “GPUpdate /Force” cmdlet is not throwing any errors inside the Command Prompt and is running successfully, then it probably means that there aren’t any significant corruptions inside the system.
In this case, restart your computer so it can fetch new policy settings from the server. This usually resolves the issue.
Use an Administrator Account
There are 2 types of user accounts in a Windows computer; a standard user and an administrative user account. If the PC is joined to a domain, then you will also get a third account type, which is a domain administrator. This last account type is different from the local administrator account.
If you are an administrator, then we suggest that you try running the “GPUpdate /Force” command from the domain administrator account. If you are a regular user, then try running the account from the local administrator account.
Learn how to change account types in Windows.
Fix Corrupted Files with DISM and SFC
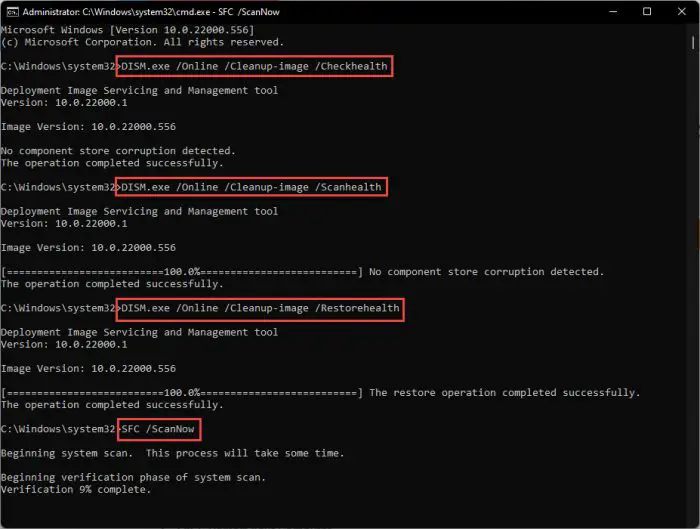
Deployment Image Servicing and Management (DISM) and System File Checker (SFC) are built-in tools in Windows that can scan and repair system files. Use the following steps to run the DISM and SFC scans in an attempt to repair any corrupted system files that may be affecting the Group Policies:
-
Launch an elevated Command Prompt.
-
Execute the following commands one after the other:
DISM.exe /Online /Cleanup-image /Checkhealth DISM.exe /Online /Cleanup-image /Scanhealth DISM.exe /Online /Cleanup-image /Restorehealth -
Then run the SFC scan using this cmdlet:
SFC /ScanNow
Execute DISM and SFC cmdlets to repair system files
Once the scans have run successfully, check to see if the problem has gone away. If it persists, we recommend that you continue to perform the solutions given below.
Restart Group Policy Service
The Windows “Group Policy Client” service is responsible for applying the policies implemented by the administrators. It is possible that the service isn’t functioning as it should, and needs a restart.
However, upon attempting to restart the service, you will find that the options are greyed out, and you encounter an “Access is denied” error in the Command Prompt.

This happens because the Group Policy Client service can only be managed by the System account. Therefore, you will need to use the psexec.exe tool from SysInternals to restart the service.
Follow these steps to learn how to restart the “Group Policy Client” service (or any other greyed-out service):
-

Download Sysinternals Suite -
Extract the downloaded compressed file.
-
Open an elevated Command Prompt and change the directory to the extracted Sysinternals Suite folder.
CD /d [PathToSysinternalsSuiteFolder]
Change the directory to Sysinternals Suite -
Run the following cmdlet to run the Command Prompt from the System account:
psexec.exe -s -i cmd.exe
Run CMD from System account -
If prompted for an agreement, click Agree.

Agree to license terms -
In the new Command Prompt window, run the following cmdlet to stop the “Group Policy Client” service:
Net Stop gpsvc
Stop Group Policy Client service -
Now run this cmdlet to restart it:
Net Start gpsvc
Restart Group Policy Client service
Once the Group Policy Client service restarts, check to see if the new policies have been implemented, or whether the “GPUpdate /Force” cmdlet now has any effect.
Rename the Group Policy “Machine” Folder
A subdirectory on your local computer stores the Group Policy files applied to your PC, which may have been corrupted that caused the error in the first place. This is the “Machine” folder, which can be found at the following path:
C:\Windows\System32\GroupPolicy\Machine
You can simply rename this folder and allow a new folder to be created so that fresh files are created.
Follow these steps to successfully rename the “Machine” folder:
-
Navigate to the following using File Explorer:
C:\Windows\System32\GroupPolicy
-
Right-click the “Machine” folder and click Rename.

Rename the folder -
Change its name to “Machine.old”.

Rename Machine folder to Machine.old -
Restart the computer and then try rerunning the “GPUpdate /Force” cmdlet.
Reset Group Policy
If the solution above did not work for you, then the issue might be with the Group Policy configurations. Reset all Group Policy settings and bring them to their default settings by performing these steps:
-
Launch an elevated Command Prompt.
-
Run the following commands one after the other to reset the Group Policy:
RD /S /Q "%WinDir%\System32\GroupPolicy"
RD /S /Q "%WinDir%\System32\GroupPolicyUsers"
Reset all Group Policies -
Rerun the following cmdlet to check if the issue has been resolved:
GPUpdate /Force
Run GPUpdate /Force
Recreate the Registry.pol File
The “registry.pol” file exists inside the “Machine” folder which we had discussed earlier. It stores the Group Policies for your computer. If this file is corrupted or missing, then any policies pushed to your PC will have no effect.
Follow the steps below to get rid of the existing file and create a new one:
Note: Before proceeding, we recommend that you create a system restore point so that you can revert to your old settings in case things don’t go as planned.
You can also use our top selection of disk imaging and backup software so you never lose your data or operating system again.
-
Navigate to the following using File Explorer:
C:\Windows\System32\GroupPolicy\Machine
-
Select “registry.pol” and press Shift + Delete to delete the file permanently.
-
Now run the following cmdlet in an elevated Command Prompt to recreate the registry.pol file:
GPUpdate /Force
Closing Thoughts
If you implemented all of the given solutions in this post, then your issue should have been resolved by now.
That said, it is always recommended that you execute the “GPUpdate /Force” cmdlet using an administrative account and inside an elevated Command Prompt so you do not face any privilege issues.


