Hyper-V is Microsoft’s proprietary virtualization platform using which you can run other operating systems on top of the Windows OS. In Windows 11, this feature is disabled by default since not everyone needs it. However, you can enable it when required.
Hyper-V comes preinstalled in Windows 11 Professional, Enterprise, and Education editions, and only needs to be enabled. However, in other editions, such as Windows 11 Home, the option to enable Hyper-V is missing.
That said, there is still a method you can install and enable Hyper-V on Windows 11 Home edition.
In this guide, we are going to show you how to install Hyper-V on Windows 11 Home, and then how to enable it successfully. The enablement method is the same for all Windows 11 editions.
Table of Contents
Check Hardware Virtualization Compatibility
Not all computer hardware is designed to run hypervisors. Therefore, you must first confirm if your hardware supports it at all. There are four basic requirements for Hyper-V to be installed on a Windows 11 computer:
- VM Monitor Mode Extensions
- Virtualization enabled in firmware
- Second Level Address Translation (SLAT)
- Data Execution Prevention
All four of these requirements can be easily checked through a Command Prompt cmdlet. Run the following cmdlet in an elevated Command Prompt and obtain the results on the four requirements:
systeminfoThis will generate a list, and you will find the section “Hyper-V Requirements” at the end of the list containing the details of the 4 requirements, as in the image below:
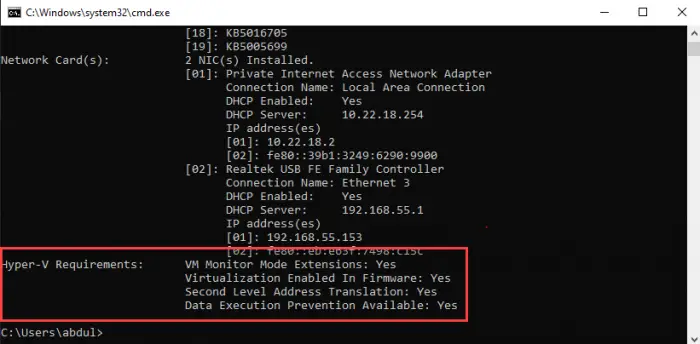
If these requirements are met, the results will display “Yes.” However, if you find that “Virtualization Enabled In Firmware” states “No,” you need to enable it using the guide below.
Enable Virtualization in Firmware/BIOS
Before you can install/enable Hyper-V on your Windows 11 PC, make sure that it is enabled from the system BIOS. In the steps above, if you found that “Virtualization Enabled In Firmware” states “No,” then you need to enable it. Here is how:
-
Restart your computer and enter the BIOS setup using the hotkey.
-
Here, look for the “Virtualization” tab and click on it, or use the arrow keys on the keyboard to highlight it and press Enter.
-
Now enable virtualization.

Enable virtualization from BIOS -
Now save the new settings and exit BIOS. The system will now reboot normally.
When it reboots, continue with the following steps to install and enable Hyper-V.
How to Install Hyper-V in Windows 11 Home
Note: Since Windows Home edition comes without Hyper-V, you must first install it. If you have the Pro, Education, or Enterprise editions, then you may skip this step and proceed to the next section of this article. To check which edition you have, type in winver in the Run Command box and obtain your operating system’s details.
If you have Windows 11 Home edition, then follow these steps to install Hyper-V:
-
Download Hyper-V Installer by clicking on the following link:
 Hyper-V Enabler for Windows 11 (384 bytes, 733 hits)
 -
Once downloaded, right-click on the file and select Run as Administrator from the context menu. This will trigger the installation script.

Run file as an administrator -
If prompted with a UAC, click Yes.

Click Yes on User Access Control It may take some time to complete the installation. Please let it complete without interruption.
-
Once complete, press Y to continue.

Press Y to continue The computer will now reboot and update.
Once rebooted, Hyper-V will have installed and automatically enabled on your Windows Home.
How to Enable Hyper-V on Windows 11 (Pro, Enterprise, Education)
The method given above automatically enables Hyper-V as well as installing it on a Windows Home. However, if you are running Windows Pro, Education, or Enterprise edition, then you can enable Hyper-V using any one of the following methods.
Enable Hyper-V from Optional Features
Since Hyper-V is an optional feature that one can enable when needed, you can enable it from the Optional Features applet. Here is how:
-
Open the Optional Features applet by typing in optionalfeatures in the Run Command box.

Open the Optional Features applet -
Now look for the “Hyper-V” option from the list and check the box next to it. Then click Ok.

Enable Hyper-V -
You will now see a window applying the changes. Click Close when it is done.

Close installation window
Hyper-V will now be installed and enabled. You can now access the Hyper-V manager by searching for it in the search box in the taskbar or through the Start menu.
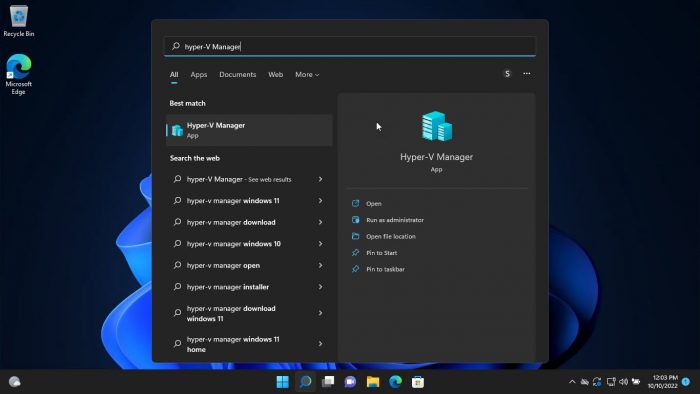
Alternatively, you can also use the other 2 command-line methods to enable Hyper-V on Windows 11.
Enable Hyper-V from Command Prompt
Follow these steps to enable Hyper-V using the DISM command tool in the Command Prompt:
-
Run the following cmdlet in an elevated Command Prompt:
DISM /Online /Enable-Feature /All /FeatureName:Microsoft-Hyper-V
Enable Hyper-V from Command Prompt -
When asked, enter Y to restart the computer:

Enter Y The computer will now restart, When it does, Hyper-V should be enabled successfully.
Enable Hyper-V from Windows PowerShell
If you’d rather prefer to use Windows PowerShell, here is how to enable Hyper-V:
-
Run the following cmdlet in an elevated PowerShell:
Enable-WindowsOptionalFeature -Online -FeatureName Microsoft-Hyper-V-All
Enable Hyper V using PowerShell -
When asked, enter Y and hit Enter to restart the computer:

Enter Y When the computer reboots, Hyper-V will have installed successfully.
These are the 3 methods to enable Hyper-V in Windows 11, provided that the hardware is supported and Hyper-V is installed.
How to Disable Hyper-V in Windows 11 (Home, Pro, Enterprise, Education)
If you no longer use Hyper-V, you can disable it using any one of the 3 methods you used to enable it in the first place.
-
From Optional Features
-
From Command Prompt
Run the following cmdlet in an elevated Command Prompt to disable Hyper-V:
DISM /Online /Disable-Feature /FeatureName:Microsoft-Hyper-V-all
Disable Hyper V from Command Prompt -
From PowerShell
Run the following cmdlet in an elevated PowerShell to disable Hyper-V:
Disable-WindowsOptionalFeature -Online -FeatureName Microsoft-Hyper-V-All
Disable Hyper V from Windows PowerShell
Closing Thoughts
A hypervisor may only be needed by IT professionals, developers, and people that need to perform secluded testing without putting their own operating systems at risk. On the other hand, a regular home user may not need a hypervisor and the software will only take up space on their hard drive, like any other bloatware.
This is why Microsoft only provides Hyper-V capabilities on selected Windows editions.
That said, you can still install and enable Hyper-V on other non-supported editions of Windows using the given guide above, provided that your system’s hardware supports it.

