If your Windows 11 shows errors that show Blue Screen of Death (BSoD) or simply behave abnormally, you can usually fix the problem that causes these errors without having to completely reinstall your operating system.
Windows comes with preinstalled tools to help fix the OS. Apart from the built-in troubleshooter you can find in the Settings app, Windows also comes with a Deployment Image Servicing and Management (DISM) tool, System File Checker (SFC), and a Check Disk (CHKDSK) utility, where each performs a different scan and attempts to automatically fix any glitches in the OS.
Continue reading this post if you are having trouble with your operating system and would like to learn how to perform these scans, and which one you should perform. Although the steps and screenshots in this post focus on Windows 11, the methods discussed are also applicable to Windows 10.
Table of Contents
What is a System File Checker (SFC) Scan
The System File Checker (SFC) performs a deep scan of your Windows system files and searches for missing or corrupted content. If it finds any anomalies, it replaces these files with redundant files on your PC that may be available at another location.
You can perform an SFC scan if you see that your PC is missing any DLL files, an app or program is behaving abnormally, or experiencing BSoDs. In short, an SFC scan is recommended when you think there is a software error.
You will learn to perform an SFC scan further down in this post. If you perform it, you may see any of the 3 possible outcomes:
- Windows Resource Protection did not find any integrity violations.
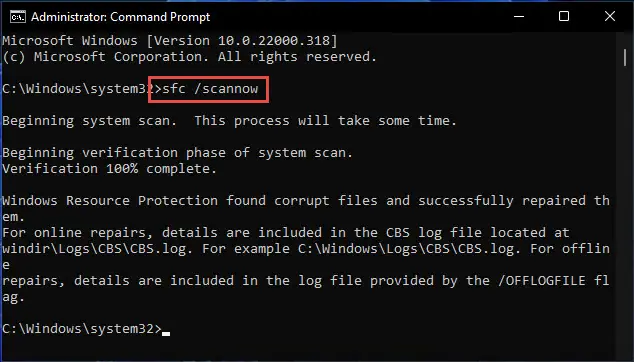
- Windows Resource Protection found corrupt files and successfully repaired them.
- Windows Resource Protection found corrupt files but was unable to fix some of them.
Each of these statements is self-explanatory. If you see that SFC was unable to fix the issue(s), it may be because SFC fixes the installation of your operating system and not the system’s image. For that, you may need to use the DISM command-line tool first and then perform the SFC scan again.
What is DISM Tool
Deployment Image Servicing and Management (DISM) tool is perhaps the most powerful repair tool in Windows. It can be used to prepare, modify, and repair system images. However, you need an active internet connection to download and replace corrupted content from Windows Update.
In terms of repairs, DISM is used in combination with other switches in the command line to fix different sorts of errors. It can be used when you experience issues with the operating system’s image, such as crashing, freezing, or errors with the OS.
Furthermore, DISM fixes the corrupt files in the component store of the OS’s image, which the SFC needs to perform a successful repair.
DISM is used with the following options to repair a system image:
- CheckHealth: This option allows the system to scan for corrupted files within the system image. However, it only detects the issues and does not fix them.
- ScanHealth: This option performs an advanced scan of the system image to check if there are any inconsistencies.
- RestoreHealth: This option will now attempt to repair the system image.
The options above are executed in the given order, so the health of the image is restored after the scans are performed. You will learn to execute these commands further down in this post.
What is Check Disk (CHKDSK)
CHKDSK, or Check Disk, is a tool that scans your hard drive for corrupted files and fixes them. It also scans for bad sectors on the disk and attempts to repair them. If it fails to repair any discovered bad sectors, it informs the operating system not to use them.
Occasionally, the CHKDSK utility runs automatically when booting up a PC if it detects any anomalies, such as an improper shutdown, or when Windows fails to load. However, in such scenarios, the utility does not perform any fixes unless instructed to.
Now that you understand how each of these tools is different, let us show you how to use them and repair your operating system.
How to Use DISM to Repair Windows
DISM Command to Repair Windows
Perform the following steps in the given order to attempt and repair your OS using the DISM tool:
- Launch the Command Prompt with administrative privileges.
- Now execute the following command:
DISM.exe /Online /Cleanup-image /Checkhealth
- The command above will run and should only take a few seconds. Run the following command when it is completed:
DISM.exe /Online /Cleanup-image /Scanhealth
- The command above may take a minute or two as it performs a deep scan. When finished, run the following command to repair the system image (if any anomalies are detected):
DISM.exe /Online /Cleanup-image /Restorehealth
Once the 3 commands have been executed, the DISM tool will be downloaded and replace any corrupted system files.
Use DISM With Install.WIM image to Repair Windows
The Install.wim file can be found inside the Windows installation media in the following path:
<installation media>\Sources
Install.wim is a compressed file that contains many Windows image files. If you have failed to repair your operating system using the DISM guide above, you can apply this method, which allows you to use a Windows installation media file to replace corrupted files, instead of downloading the files from Windows Update.
This method is especially useful if the computer you are trying to fix does not have an active internet connection. Follow the steps below to repair your OS using an Install.wim file:
- Download the Windows ISO file and mount it to your PC.
Note: The ISO file must be of the same Windows version. - Once mounted, note the associated drive letter as this will be required in the steps below.

- Now launch Command Prompt with administrative privileges.
- Use the following command while replacing DriveLetter with the drive letter of the mounted Windows image:
DISM /Online /Cleanup-Image /RestoreHealth /Source:<em>DriveLetter</em>:\Sources\install.wim /LimitAccess
The DISM tool will now attempt to repair the system image using the install.wim file within the Windows installation media.
How to Use SFC to Repair Windows
Once you are done with the DISM tool, you can now run the SFC scan and fix any corrupted system files. Here is how:
- Open Command Prompt with administrative privileges.
- Paste the following command to begin the scan:
sfc /scannow
The SFC command can take a few minutes to fully scan your PC and perform any repairs in case of any anomalies. We suggest that you allow ample time for the tool to perform its task.
How to Use CHKDSK to Repair Windows
Follow the steps below to repair Windows using the CHKDSK utility:
- Open Command Prompt with administrative privileges.
- Run the following command:
Chkdsk C: /f /r /x - You will be asked to schedule the CHKDSK utility the next time the computer reboots. Enter Y for yes.

- Now restart your computer. Once it reboots, the Check Disk utility will run and scan your hard drive. This can take a while, in some cases, hours. Let the scan finish and reboot into Windows.
You can replace “C” in the command above in step 2 with another drive letter to scan them. However, system files are usually saved in C drive by default, unless changed otherwise.
What Scan to Perform First: SFC, DISM, or CHKDSK
As we have already mentioned, occasionally, the SFC scan will fail to repair the OS because the system image is corrupted. In which case, you must first run the DISM cmdlets to fix the image, and then run the SFC scan to fix the OS.
However, we recommend that you run the CHKDSK utility before any of these, since it is the most advanced tool in Windows, and should solve any issues that could also be detected by either DISM or SFC.
Closing Words
We at Itechtics often face similar issues with our operating systems, and the tools we have mentioned in this post are the ones we occasionally resort to, instead of redoing the entire operating system.
That being said, you may find these tools failed to fix your issue. In that case, you may need to perform a clean install of your operating system if all else has failed.


