Most users are not comfortable sharing their activity or data on the computers with anyone, Microsoft included. However, Microsoft gathers the user’s data through a feature called Telemetry, where your computer collects and sends your data to Microsoft, which is then presumably used to make your Windows experience better.
The Telemetry and Data Collection feature in Windows is enabled by default. This feature collects data of user’s activity and sends it to Microsoft as feedback. It is used to:
- Keep Windows up to date.
- Keep Windows secure and reliable.
- Improve Windows through analyzing.
The data which is recorded includes the type of hardware, applications being used, application and network usage, and much more.
Let us now discuss how to manage and disable Telemetry in Windows.
Table of Contents
How to Manage Telemetry in Windows
Sometimes other data is also shared with Microsoft, such as the user’s current location, searches performed online, wallpapers or screen savers being used, etc. Some users might be uncomfortable with this and want to disable the feature entirely.
Unfortunately, you cannot disable it using the conventional method. However, you can choose to send only the required data, or the required data plus the optional data to Microsoft.
Follow the steps below to manage your Telemetry preferences via Windows Settings.
In Windows 11
- Navigate to the following:
Settings app >> Privacy and Security >> Disgnostics and feedback - Expand Diagnostic Data.

- Now toggle the slider under “Send optional diagnostic data” into the Off position to disable sending optional data.

In Windows 10
- Navigate to the following:
Settings app >> Privacy >> Disgnostics and feedback - Here, select “Required diagnostics data” to disable the optional data from sending to Microsoft.

If you are using an older version of Windows 10, you may see the following 3 options on the Feedback and Diagnostics page:
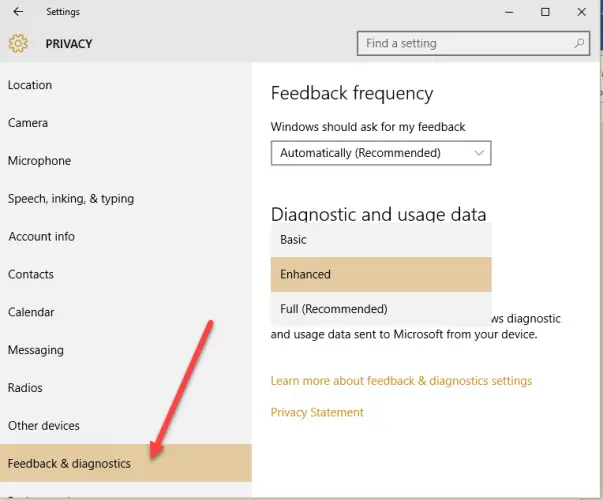
- Basic: This will give basic data of your device to Microsoft.
- Enhanced: This includes the basic data plus data about how you use Windows, which apps you use frequently, etc.
- Full (Recommended): This includes Enhanced data plus the advanced diagnostics information.
As you may find, the actions performed above will only disable Windows from sending the optional data. However, the required data will still be available to Microsoft. Which is why, if you wish to disable Telemetry and Data Collection entirely, you must perform any of the given solutions below in this post.
How to Disable Telemetry and Data Collection in Windows
Using Group Policy
This method is only valid for Windows 11. If you are using Windows 10, continue to the next section of this post.
Perform the following steps to disable Telemetry entirely on your Windows 11 PC using the Group Policy Editor:
- Launch the Group Policy Editor by typing in gpedit.msc in Run.

- Navigate to the following using the left pane:
Computer Configuration >> Administrative Templates >> Windows Components >> Data collection and Preview Builds - Now double-click the following Group Policy “Allow Diagnostic Data” in the right pane.
- From the popup window, select Enabled, then select Diagnostic data off under Options, and then click Apply and Ok.

- Now run the following command in Command Prompt with administrative rights for the changes to take effect:
gpupdate /force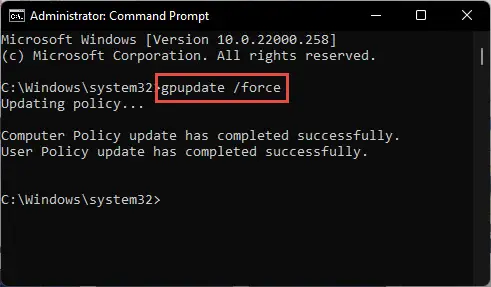
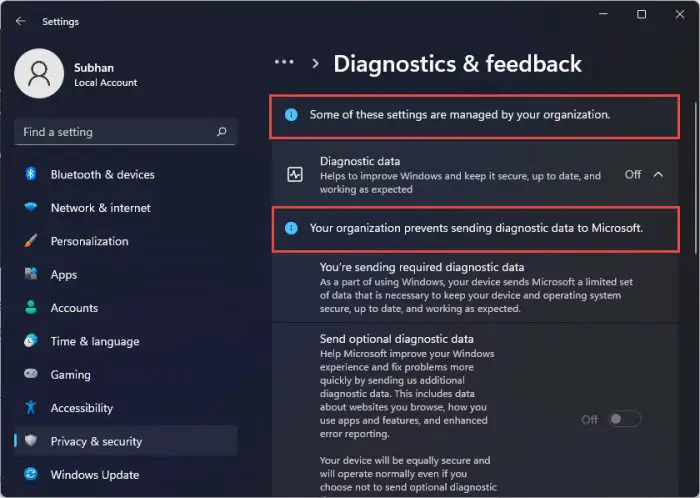
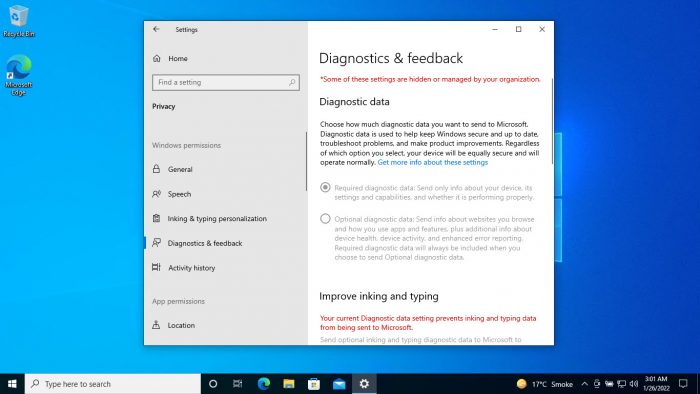
You will now find that Telemetry has been disabled for your PC. This can be confirmed when you see “Your organization prevents sending diagnostic data to Microsoft” written on the Diagnostics and Feedback Settings page.
From Windows Registry
Misconfiguration of critical values in the system’s registry could be fatal for your operating system. Therefore, we insist that you create a system restore point before proceeding forward with the process.
Perform the following steps to disable Telemetry on your PC using the Registry Editor:
- Open the Registry Editor by typing in regedit in Run.

- Now paste the following in the address bar at the top for quick navigation:
Computer\HKEY_LOCAL_MACHINE\SOFTWARE\Policies\Microsoft\Windows\DataCollection
- Right-click DataCollection key, expand New from the context menu, and then click DWORD (32-bit) Value.

- Name this DWORD “AllowTelemetry.”
- Double-click AllowTelemetry and set its Value Data to 0. Then click Ok.

- Now restart your computer for the changes to take effect.
You will now find that Telemetry has been disabled and the respective options in the Settings app have been greyed out.
By Disabling Services
You can also disable the Telemetry and Data Collection feature in Windows by disabling the respective service. Here is how:
- Open the Windows services page by typing in services.msc in Run.

- Here, double-click the service “Connected User Experience and Telemetry.” (If you are using an older version of Windows 10, the service’s name might be “Dignostics Tracking Service.”)

- From the popup properties window, select Startup Type as Disabled, then click Apply and Ok.

- Now restart the computer for the changes to take effect.
Once the computer restarts, the changes will be applied to your Registry settings and now your data won’t be accessible to Microsoft.
From Command Prompt
You can also disable Telemetry by performing the following task using Command Prompt. This is easier for the people who are familiar with the Command Line Interface (CLI) of Windows.
Launch the Command Prompt with administrative rights and then enter the following commands one after the other:
sc delete DiagTrack

sc delete dmwappushservice

echo “” > C:\\ProgramData\\Microsoft\\Diagnosis\\ETLLogs\\AutoLogger\\AutoLogger-Diagtrack-Listener.etl

reg add “HKLM\SOFTWARE\Policies\Microsoft\Windows\DataCollection” /v AllowTelemetry /t REG_DWORD /d 0 /f
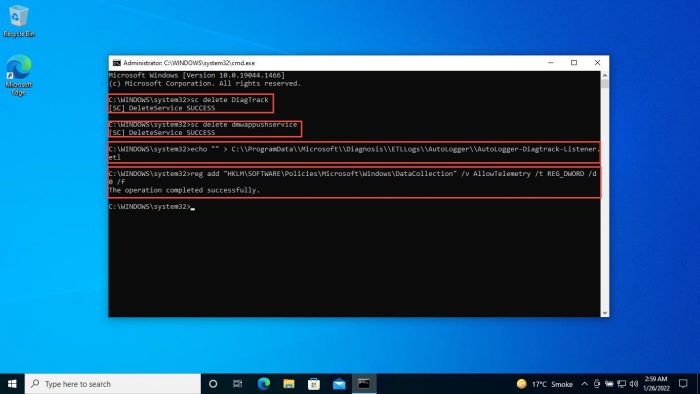
Now restart your computer for the changes to take effect. When it does, you will find that the Diagnostics and Feedback Settings page has been greyed out as Telemetry has been disabled.
Disable Microsoft Compatibility Appraiser
Using Task Scheduler
As with every automated process in Windows, the Task Scheduler run a task that manages Telemetry on your Windows PC. Once this task is disabled, as will telemetry. Follow the steps below to disable the scheduled task:
- Open Task Scheduler by typing in taskschd.msc in Run.

- Now navigate to the following from the left pane:
Task Scheduler Library >> Microsoft >> Windows >> Application Experience - Here, in the middle pane, right-click “Microsoft Compatibility Appraiser” and then click Disable from the context menu.

Windows Telemetry will now be disabled. You can also perform the same task via Windows PowerShell.
Using PowerShell
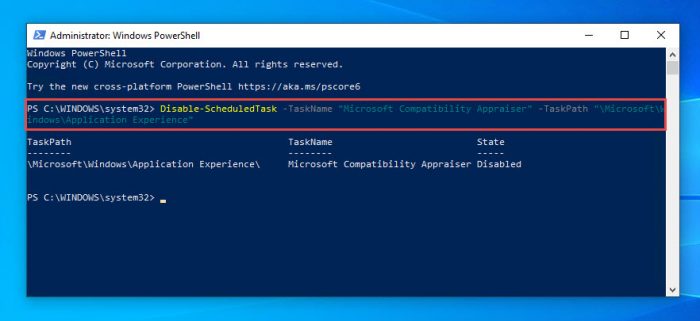
To disable Microsoft Compatibility Appraiser using PowerShell, launch Windows PowerShell with administrative privileges and then run the following command:
Disable-ScheduledTask -TaskName "Microsoft Compatibility Appraiser" -TaskPath "\Microsoft\Windows\Application Experience"
Closing Words
These methods are necessary for users for whom privacy and security are more important than any update or improvement by the manufacturer. That’s why they can easily disable the Telemetry feature from their system.





2 comments
Dave
Worked fine. Thanks for you article greatly appreciated.
Joe
Doesn’t work. Win 10 automatically restarts this service.
followed all above steps on my machine with
Version 1703 (os build 15063.966.
Pls advise