Key Points
- Dev Drives are optimized for faster development since they use the ReFS file system and Windows Security considers them as trusted volumes. Other optimizations are also made.
- You need at least 8 GB RAM and 50 GB free space to create a Dev Drive.
- To create a Dev Drive, go to Settings > System > Storage > Advanced storage settings > Disks & volumes > Create Dev Drive
Microsoft has introduced a new feature to Windows 11 that directly benefits the developers. This is the “Dev Drive,” and they have also introduced the “Dev Home” application. Dev Drives are a new volume partition optimized for development performance, whereas the Dev Home application is the controller for these drives, and contains other centralized controls.
That said, anyone can create a Dev Drive, even if you are not a developer. A Dev Drive is trusted by the Windows Security application, ignoring all security checks. With this performance improvement and other optimizations, Dev Drives can provide up to 30% performance gains over regular partitions.
If you are not aware of how to create a Dev Drive on Windows 11, this article will give you a step-by-step on how to create it, and what requirements your system should meet.
Table of Contents
What is a Dev Drive and its benefits
A Dev Drive is a storage volume that uses the Resilient File System (ReFS). ReFS is Microsoft’s new file system that is a category above the NTFS in performance parameters. The Dev Drive also includes other file system optimizations and settings that make it perform faster than the regular Windows partitions.
A Dev Drive is automatically considered a trusted drive by the built-in Windows Security software. Therefore, the security software does not perform the checks it usually does on other volumes, which in turn automatically increases the performance. With these combined optimizations and configurations, Dev Drives can perform almost 30% faster than regular partitions.
A Dev Drive can be created by anyone as long as the system satisfies the minimum requirements (discussed ahead). You can create a Dev Drive using unallocated disk space, shrink a volume, and then use the unallocated disk space, or create a Virtual Hard Drive (VHD) on top of your physical disk to create the Dev Drive. All of these methods have been discussed below.
Using a Dev Drive will increase the system’s performance, especially if you are using the drive for development purposes. It will allow you speedy access to project files, source code repositories, code libraries, etc. This in turn will help you increase your productivity by compiling the code quicker and getting the results faster.
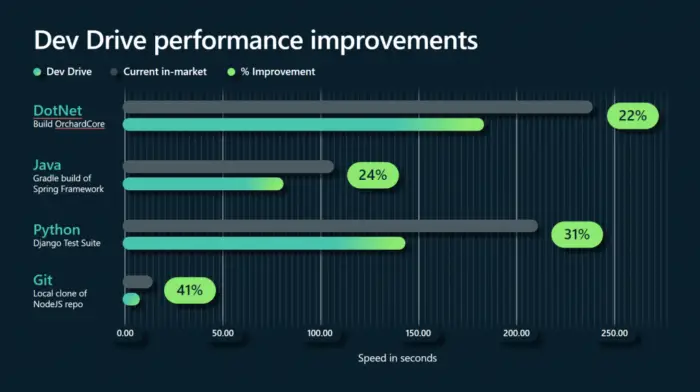
According to studies conducted by Microsoft, under certain conditions, a Dev Drive will perform 41% faster than a regular drive. Here is a graphical representation of the improvements observed by the tests performed by Microsoft on Dev Drives:
Requirements for a Dev Drive
Before we start setting up Dev Drives, there are a few conditions your system must meet.
- Your computer should have at least 8 GB RAM, whereas 16 GB is recommended.
- Have at least 50 GB of free disk space.
- Your OS should be Windows 11 22H2 Build 22621.2361 or above.
- Virtualization is enabled (in the case of VHD)
To check your OS version and build, type in “winver” in the Run Command box and press Enter.
How to create a Dev Drive on Windows 11
As mentioned earlier, a Dev Drive can be created by using unallocated disk space, shirking a volume to create additional space, or creating a VHD on top of the physical disk. We have discussed each of these methods step-by-step below.
Set up Dev Drive with VHD
To create a virtual Dev Drive on Windows 11, use the following steps:
Press the Windows Key + i to open the Settings app.
Go to System > Storage > Advanced storage settings >> Disks & volumes.
Select “Create new VHD” and then click Next.

Create a new VHD Dev Drive On the next screen, make the following configuration settings and click Create:
- Name the VHD
- Select a location
- Enter a size for the VHD
- Select whether to use VHD or a VHDX format
- Select disk type (fixed size or dynamically expanding).

Configure the VHD Dev Drive and create it
This will successfully create a virtual hard drive that you can use as a Dev Drive.
Set up Dev Drive using unallocated space
If you have unallocated space on your disk and want to create a Dev Drive using it, use these steps:
Press the Windows Key + i to open the Settings app.
Go to System > Storage > Advanced storage settings >> Disks & volumes.
In the popup screen, click “Unallocated space on disk X” where ‘X’ is the number assigned to the disk, and then click Next.

Create a new Dev Drive on unallocated disk space Assign a label and a drive letter to the Dev Drive, and then set its size. Click Format when done.
Note: You can also use its default size which will be for the entire unallocated space.

Create a new Dev Drive using unallocated space
The Dev Drive will now be created and seem like any other volume on the computer.
Set up Dev Drive by resizing existing volume
If you do not have unallocated space on your PC and do not wish to use a VHD as a Dev Drive either, you can shrink an existing volume and use the extra space as a Dev Drive. Here is how:
Press the Windows Key + i to open the Settings app.
Go to System > Storage > Advanced storage settings >> Disks & volumes.
In the popup, click “Resize an existing volume” and then click Next.

Create a Dev Drive by resizing the existing volume On the next screen, select the volume that you want to shrink and click Next.

Select volume to shrink Enter the new size of the existing volume and click Next.
Note: The size you enter is the new size of the volume you are shrinking, and not that of the unallocated/Dev Drive space. Also, make sure that you leave at least 50 GB of space for the Dev Drive, otherwise, the “Next” button will be grayed out.

Shrink the existing volume Now assign a label and a drive letter to the Dev Drive, and then set its size. Click Format when done.

Set up a Dev Drive by shrinking an existing volume
The Dev Drive will now be created that you can access using File Explorer.
How to delete a Dev Drive on Windows 11
So far we have discussed how to create a Dev Drive using all the methods. Now, let us see how to delete it if it is no longer required. You can delete it from the Settings app, or from the Disk Management console. Here is one of the more convenient methods that works if you used an unallocated disk space to create the Dev Drive instead of creating a VHD.
Press the Windows Key + i to open the Settings app.
Go to System > Storage > Advanced storage settings >> Disks & volumes.
Scroll down and click Properties in front of the Dev Drive.

Open Dev Drive properties Confirm the action by clicking “Delete volume.”

Confirm Dev Drive deletion
The Dev Drive will now be deleted.
However, if you created a VHD Dev Drive, then the method to delete it will be different. In this case, you must use either the Disk Management console to detach the VHD or delete it manually from File Explorer like to delete any regular file.
Takeaway
Dev Drives are like regular system volumes and can be used to store any kind of data. However, to gain complete benefit from these drives, you ought to use them for data that needs constant access and writing, like the repositories and libraries used to develop applications.
Dev Drives perform faster than regular volumes since they are optimized through multiple configurations. For example, their file system is now ReFS as opposed to NTFS, and they are trusted by Windows Security and thus do not require extreme scrutiny.
If you are a developer, upgrade yourself to the latest Windows 11 version to benefit from Dev Drives, and increase your productivity.


