Key Points
- You can create a bootable Windows USB drive from the Media Creation Tool, the Command Prompt, Rufus, and Ventoy.
- The easiest way to create a Windows 11 bootable flash drive is by using the Media Creation Tool, and the lengthiest method would be the Command Prompt.
- You can use Ventoy for a multi-operating system bootable USB drive, or Rufus to create a bootable USB using a Windows 11 ISO image.
A bootable installation media allows you to quickly install and upgrade operating systems with ease. If you are a Windows user, then having a Windows bootable USB flash drive on hand will let you perform clean installations and upgrades with convenience, and not have to copy/import ISO files every time.
Having a Windows 11 bootable USB drive will save you time by not having to move or download ISO files, and perform the installation then and there. Regardless of whether you are a sysadmin or a regular Windows user, learning the different methods to be able to create a Windows 11 installation USB media can greatly benefit you.
You can create Windows bootable media using the Microsoft-provided Media Creation Tool, or use pre-downloaded ISO image files in conjunction with other tools, like the Command Prompt and third-party apps, and implement the ISO file onto the USB flash drive, and make it bootable.
Table of Contents
Preparations to create Windows 11 bootable USB drive
Before we go heads-first to creating a Windows 11 USB flash drive, you must first have a few things ready:
A Windows 11 ISO file
If you do not already have one, download a Windows 11 ISO file (or any Windows version) before proceeding to create a Windows 11 bootable USB drive. Note that an ISO file is only needed if you are not planning to use the Media Creation Tool (MCT).
With the Windows Media Creation Tool, the ISO is automatically downloaded from Microsoft’s server and used to create the bootable USB drive.
A USB flash drive of at least 8 GB of space
You will also need a USB drive of 8 GB total space, or greater. Also, make sure to back up any data inside the USB beforehand since all data will be erased during the process of making it bootable, where the USB is formatted.
Creating a Windows 11 bootable USB drive
Create Windows 11 bootable media using Media Creation Tool
When using the Windows Media Creation Tool, it will automatically download the latest Windows 11 version from the Microsoft servers and generate a bootable USB flash drive. Here are the steps to use the tool to create one:
Note: An active internet connection is required to download the Windows 11 data. Charges may apply as per consumption.
Plug in the USB drive.
Download the Windows 11 Media Creation Tool and then run the setup.
Accept the licensing terms.

Agree to the licensing terms Uncheck the box with “Use the recommended options for this PC,” select the preferred language and Windows version from the drop-down menus, and click Next.

Select Windows version and edition Select “USB flash drive” and click Next.

Select the USB media Confirm that the correct USB drive is selected and click Next.

Confirm the attached USB The Media Creation Tool will now begin downloading and creating the bootable USB drive. You can see the progress percentage on the MCT wizard.
When done, click Finish.

Close the Media Creation Tool
You can now unplug the USB drive safely and continue to use it as a Windows 11 installation media.
Create Windows 11 bootable media using Command Prompt
You can also use the Command Prompt to create a bootable USB flash drive. All you need is a plugged-in USB drive and a Windows ISO image file.
Plug in the USB drive.
Press the Windows Key + R shortcut keys to open the Run Command box.
Type in “cmd” and press CTRL + Shift + Enter to run the Command Prompt as an administrator.
Now run this command to mount the Windows 11 ISO image file:
Replace [PathToISO] with the complete path to the Windows 11 ISO file.
PowerShell Mount-DiskImage -ImagePath "[PathToISO].iso"
Mount ISO Run the following command to enter the Disk Partition mode:
DiskpartRun the following command to view the associated drive letter for the mounted Windows 11 ISO file, and note it down.
List Volume
Find drive letter for mounted Windows 11 ISO Now run the following command to determine the USB flash drive:
list diskNow run this command while replacing [DiskNo] with the associated disk number for the USB drive.
select disk [DiskNo]Now run this command to delete everything from the USB flash drive:
CleanNow run this command to create the primary partition:
Create Partition Primary
List, select, clean USB disk, and create primary partition When prompted to perform a format, select Cancel.

Cancel automatic formatting Now select the partition with this command:
Select Partition 1Now quick-format the USB drive into the FAT 32 file system with this command:
format FS=FAT32 quickNow assign an available drive letter using this command. Pick a drive letter of your choice and insert it into the variable.
Assign Letter=[USBDriveLetter]Exit the Diskpart mode with this command:
Exit
Select and format partition, assign drive letter and exit Diskpart Now, access the directory for the mounted Windows 11 ISO using its drive letter (as noted in Step 6 above).
[ISODriveLetter]:Now enter the “boot” folder with this command:
cd boot
Change directory to the boot folder Update the volume boot code for the USB flash drive with this command:
bootsect /nt60 [USBDriveLetter]:
Update the volume boot code Now copy all the Windows 11 installation files to the USB flash drive from the mounted ISO file with this command:
xcopy [ISODriveLetter]:\*.* [USBDriveLetter]:\ /e /f /hNote: The switches “e”, “f”, and “h” copy all subdirectories (even if empty), displays source and destination file names, and copy files with hidden and system file attributes, respectively. Moreover, this step can take some time depending on the size of the ISO file and the system’s performance.

Copy the ISO to the USB drive
Once all of the content is copied, you can continue to use the USB drive as a bootable Windows 11 drive.
Create Windows 11 bootable media using third-party tools
Rufus
You can also use third-party tools to create bootable Windows 11 USB media. Here is how:
Plug in a USB flash drive.
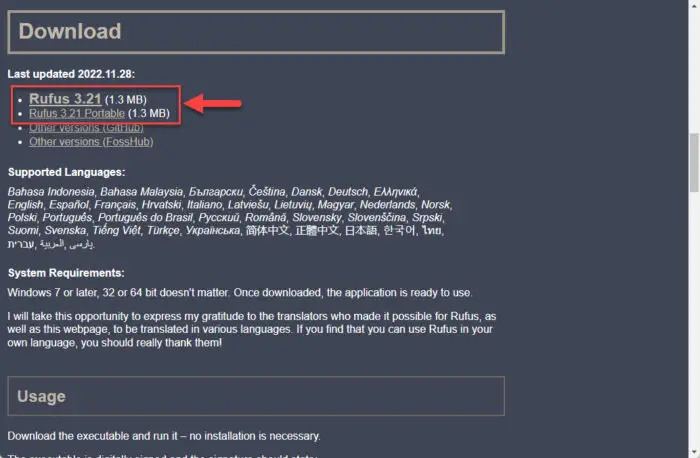
Download Rufus from its website and install it on your computer.

Download Rufus Once downloaded, run the Rufus software.
From Rufus, select the USB flash drive from the drop-down menu under Device.

Select the USB flash drive Then, click “Select” under “Boot selection,” navigate to the downloaded Windows 11 ISO file, and select it.

Select the Windows 11 ISO file Leave the rest of the settings to their default values and click Start.

Begin making a Windows 11 bootable USB flash drive Select the Windows 11 customization options as per your preferences and click OK.

Select Windows 11 customization options Your Windows 11 bootable USB drive will now be in the making. This step may take a few minutes to complete.
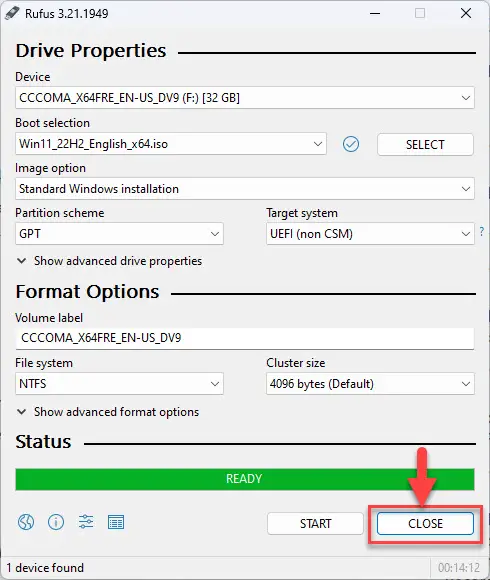
Once it is finished, “Ready” will be displayed with a green bar. You may then Close the app.

Close Rufus
You now have a bootable Windows 11 USB drive.
Ventoy
Ventoy is another third-party, open-source software that can be used not only to create a bootable USB drive but also to create one that supports multiple ISO files at the same time. This means that you can use a single USB drive to boot different operating systems that are stored at the same time.
Here are the steps to use Ventoy to create a Windows 11 bootable USB drive:
Plug in the USB flash drive.
Start by downloading Ventoy from their downloads page.
Extract the contents for the downloaded package and run the Ventoy2Disk app.

Run Ventoy Confirm that the correct USB is selected and click Install.

Install Ventoy on USB When asked for confirmation, click Yes (both times).

Confirm action Once Ventoy is installed on the USB drive, click OK.
Now use File Explorer to copy the Windows 11 ISO file onto the USB with Ventoy installed.
Once the ISO(s) have been copied onto the USB drive, it makes them bootable. Now all you need to do is plug in the USB into the computer that you want to install Windows 11 on, boot from the USB, and select the ISO you want to boot from.
Closing words
There are multiple methods for creating a Windows bootable USB drive. However, each of them offers a different solution. For example, with the Media Creation Tool, you do not have to download a Windows 11 ISO beforehand, and with Ventoy, you can deploy multiple ISO images onto the same USB drive and make it bootable, instead of carrying around multiple USBs for different operating systems.
Our advice for you is to pick which tool and method best fits your needs and use that method to create a bootable USB drive.
If you only create it once in a blue moon, then the Media Creation Tool or the Rufus method should work. However, if you need to create it often, then pre-downloading an ISO image would be better. If you need to install different operating systems from time to time, then using Ventoy would be the way to go.


