Not many Windows users may be familiar with the concept, but calibrating your screen colors may just improve your experience on the computer.
It may be possible that you have just added a new screen to your PC, or that your old display device has lost its novelty and the colors have kind of faded away. In such cases, you may want to recalibrate your screen often.
If you work with videos and images or play games on your PC, calibrating your monitor would assist you to achieve more natural colors. Not only that, but the colors of the images on your device may be nearly the same as on other devices if you are sharing.
Table of Contents
If all display devices were calibrated the same way, the colors of every item would appear to be the same on each display device. Sadly, each display monitor manufacturer has its own calibration configuration, bringing nonlinearity to the colors across different devices.
Thankfully, Windows 11 includes a free display calibration tool that helps you adjust your gamma, brightness, contrast, and color balance. The preinstalled Display Color Calibration tool allows you to adjust some settings through the tool, while some need to be adjusted through the menu on the display device itself.
Before we begin calibrating our display(s), let us show you 4 ways you can access the Display Color Calibration tool in Windows 11.
How to Open Display Color Calibration in Windows 11
Through Run
You can open the Display Color Calibration tool by typing in a small cmdlet in Run, which will open the tool for you. Type in dccw in Run and hit Enter to launch the tool.

By Search
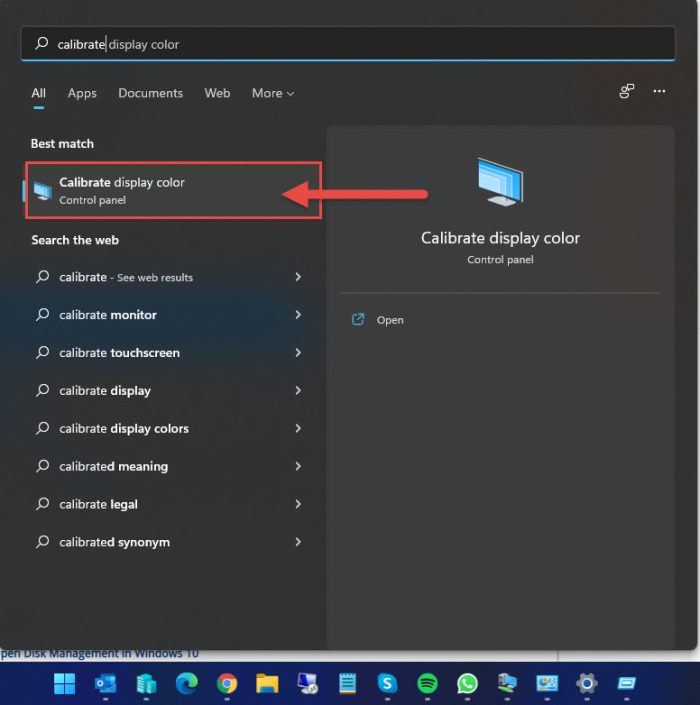
Another quick way to launch the tool is by searching from it through the Windows Search box. Search for “Calibrate” in the Search box. When Calibrate display color is highlighted, hit Enter on the keyboard.

Through the Control Panel
The calibration tool can also be accessed through the Control Panel. Here is how:
- Open up the Control Panel by typing in control in Run.
- Now select View by to Small icons, and then click Color Management.

- From the Color Management window, switch to the Advanced tab, and then click Calibrate display.

The Display Color Calibration tool will now be launched.
Through Settings App
The tool can also be accessed through the Settings app. Here is how:
- Navigate to the following:
Settings app >> System >> Display >> Advanced Display - Now click Display adapter properties for… under the Display information section.

- From the Properties window, switch to the Color Management tab, and then click Color Management.

- From the Color Management window, switch to the Advanced tab, and then click Calibrate display.

Now that you know how to access the tool, let us now continue to learn how to use it.
How to Calibrate Monitor Display Color in Windows 11
As we mentioned earlier, it is important to calibrate your display colors so that if you share your work with someone, they may see the same colors that you see on yours. It is not necessary that what may seem vibrant on your display device will seem the same way on another device.
Some users believe that calibration may only be needed once the display device is being set up for the first time. However, that is not entirely true. Yes, you should calibrate your monitor when it is being used for the first time. However, the best practice is to recalibrate it every 6 months.
This is because the display devices can lose their color sharpness, changing the output results from the actual colors. Here is how you can (re)calibrate your display device(s) easily (for free) using the built-in Display Color Calibration tool in Windows 11:
- Open the Display Color Calibration tool using any of the methods above.
- The tool will now launch where you can see instructions on each page guiding you on what to do. If multiple displays are connected, drag the tool window onto the screen that you want to calibrate, then click Next.

- You will then be asked to restore your display’s color settings to the default values through its own menu, which can be accessed directly through the button on the display device. What you can do is perform a factory reset to bring it back to the default value. Once done, click Next on the tool.

- The next page tells you what the perfect gamma settings should look like. Gamma is a mathematical combination of the colors red, green, and blue, that ultimately defines the amount of light emitted from your display device. Notice how the gamma images are different from each other. On the next screen, we must achieve the gamma settings manually to match the image in the center (Good gamma). Therefore, take a good, hard look at the center image and then click Next to begin the calibration process.

- On the next screen, adjust the slider on the left so that the small dots in the center of the circles are barely visible. If you think that the gamma settings are ideal to match the center image on the previous screen, click Next.

- You will be asked to adjust the brightness and contrast of your display. These settings are controlled directly through your display device. Therefore, click Next if your device has these settings, otherwise click Skip brightness and contrast adjustment.

- If you click Next in the last step, you will now see a guide to adjust your screen’s brightness to an optimized settings. Notice how the “Good Brightness” image looks. This is what you shall be trying to achieve on the next screen while calibrating your display’s brightness. Click Next to begin.

- On the next screen, you will see an image that will assist you in obtaining an optimized brightness level. Adjust your display device brightness level until you can distinguish the black shirt from the black coat, and then “X” is barely visible. Click Next when done.

- Next you shall adjust the display contrast using the center image. Notice how the wrinkles on the shirt are creating a shadow effect. This is what you will be using to achieve a good contrast. Click Next to begin.

- Now adjust your display device’s contract using its menu. The goal is to set the contrast as high as possible while still being able to see the wrinkles and the buttons on the shirt prominently. Once done, click Next.

- The next phase involves balancing out the red, blue, and green colors on the display device. This will be done using the Display Color Calibration tool, you may now close the display device’s menu. Notice how different combinations of excessive colors change the shade. We must try to achieve neutral grey colors on the next screen by adjusting the sliders for each color. Click Next to begin.

- On the next screen, scale up and down the slider beneath each color to achieve neutral grey shades and try different combinations. Once you are happy with the results, click Next.

- On the next screen, you can compare your previous calibration with the current one (with the new settings) and see the changes. Once you are sure you want to keep the new display color calibration, uncheck the box next to “Start ClearType Tuner when I click Finish to ensure that text appears correctly” and then click Finish.

Closing words
The Display Color Calibration tool has been around for some time now. If you are using Windows 10, you can also use this tool to calibrate your display settings there as well.
Another useful calibration tool in Windows is the ClearType Tuner. This tool helps you calibrate the text by adjusting its font, thickness, height, sharpness, etc. Not only that, you can use this tool for text calibration of each display monitor.
If you have the time, you can access the ClearType Tuner tool by keeping the box checked in step 13 above, or by searching for it through the Search box.


