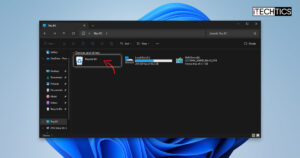
Key Points
- You can add Recycle Bin to File Explorer’s navigation pane by creating the DWORD “System.IsPinnedToNameSpaceTree” with a value of 1 at the location “Computer\HKEY_CURRENT_USER\Software\Classes\CLSID\{645FF040-5081-101B-9F08-00AA002F954E}” inside the Windows Registry.
- To add Recycle Bni to the “This PC” page, create the key “{645FF040-5081-101B-9F08-00AA002F954E}” in the location “Computer\HKEY_LOCAL_MACHINE\SOFTWARE\Microsoft\Windows\CurrentVersion\Explorer\MyComputer\NameSpace“.
The Recycle Bin temporarily stores your deleted files and folders if you need to recover them. There are multiple methods to access the Recycle Bin on a Windows PC. However, other than the option to access the Recycle Bin from the desktop, no other method is as convenient. It always requires a few extra steps.
If you are using File Explorer, you must either minimize it to go to the desktop and open the Recycle Bin, or type it in the address bar yourself. Another convenient method to access the Recycle Bin is to add it to File Explorer.
You can add the Recycle Bin to the File Explorer’s navigation pane on the left side, or on the “This PC” page, where you can access the Recycle Bin directly.
This guide will show you how to add the Recycle Bin to File Explorer on a Windows 11 computer.
Note: The methods in this post suggest to make changes to the Windows Registry. Misconfiguration of critical values in the registry could be fatal for your operating system. Therefore, we insist that you create a system restore point or a complete system image backup before proceeding forward with the process.
You can also use our top selection of disk imaging and backup software so you never lose your data or operating system again.
Table of Contents
Show Recycle Bin in File Explorer navigation pane
You can add the Recycle Bin option in the left pane inside the File Explorer with these steps:
-
Press the Windows key + R to launch the Run Command box.
-
Type in “regedit” and press Enter to open the Registry Editor.
-
Paste the following in the navigation bar and press Enter for quick navigation:
Computer\HKEY_CURRENT_USER\Software\Classes\CLSID\
-
Right-click the “CLSID” key, expand New, and click “Key“.
-
Name this key “{645FF040-5081-101B-9F08-00AA002F954E}“.
Note: You may or may not have this key already. If you do, you may skip Steps 4 & 5.
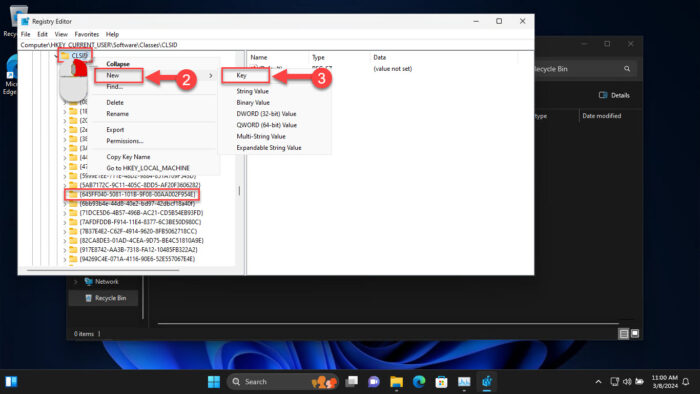
Create the key -
Right-click the “{645FF040-5081-101B-9F08-00AA002F954E}” key, expand New, and click “DWORD (32-bit) Value“.
-
Name the DWORD “System.IsPinnedToNameSpaceTree“.
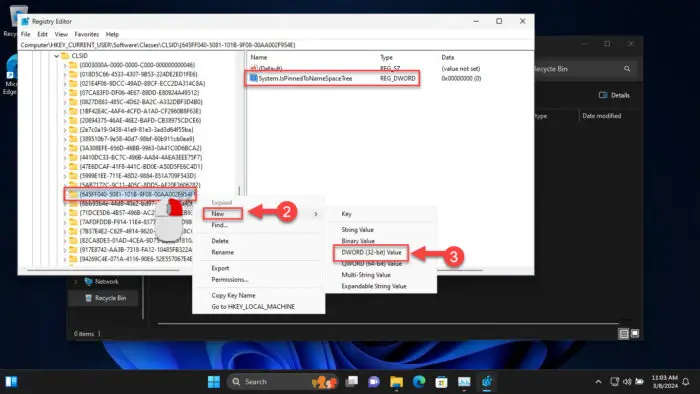
Create the DWORD -
Double-click the DWORD “System.IsPinnedToNameSpaceTree“, set its Value Data to 1, and click OK.
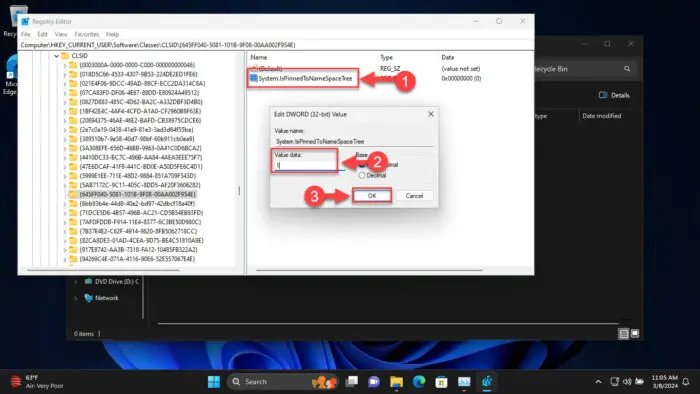
Show Recycle Bin in File Explorer Navigation pane from Registry -
Now either restart File Explorer, or the computer for the changes to take effect.
After performing the steps above, when you open File Explorer, you’ll notice that File Explorer has been added to the Navigation pane on the left.
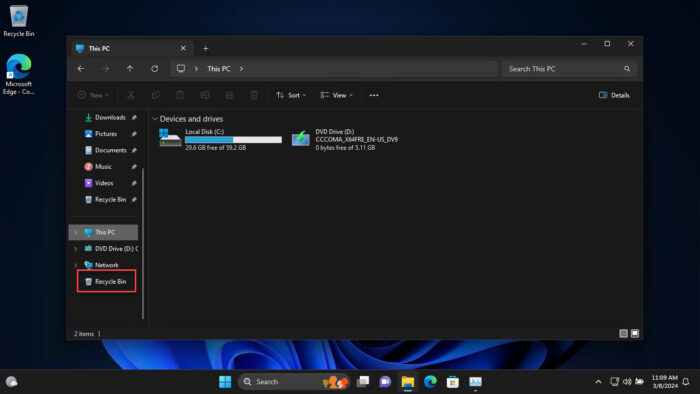
Note that the Recycle Bin appears at the bottom of the list, and it cannot be moved.
If you want to undo the changes, navigate to the “{645FF040-5081-101B-9F08-00AA002F954E}” key inside Windows Registry, and delete the DWORD “System.IsPinnedToNameSpaceTree“.
Alternative to the steps above, you can also use the following .REG files that will automatically add (or remove) the Recycle Bin to the File Explorer’s navigation pane.
 Add Recycle Bin File Explorer Navigation Pane (415 bytes, 283 hits)
 Remove Recycle Bin File Explorer Navigation Pane (420 bytes, 264 hits)
Simply download the respective ZIP file, extract the .REG file within, and run it. When asked for confirmation, allow the file to make the changes and then restart the computer to see the changes happen.
Show Recycle Bin in File Explorer “This PC” page
If you want to show the Recycle Bin icon on the “This PC” page inside File Explorer, perform these steps instead:
-
Press the Windows key + R to launch the Run Command box.
-
Type in “regedit” and press Enter to open the Registry Editor.
-
Paste the following in the navigation bar and press Enter for quick navigation:
Computer\HKEY_LOCAL_MACHINE\SOFTWARE\Microsoft\Windows\CurrentVersion\Explorer\MyComputer\NameSpace
-
Right-click the “NameSpace” key, expand New, and click Key.
-
Name the key “{645FF040-5081-101B-9F08-00AA002F954E}“.
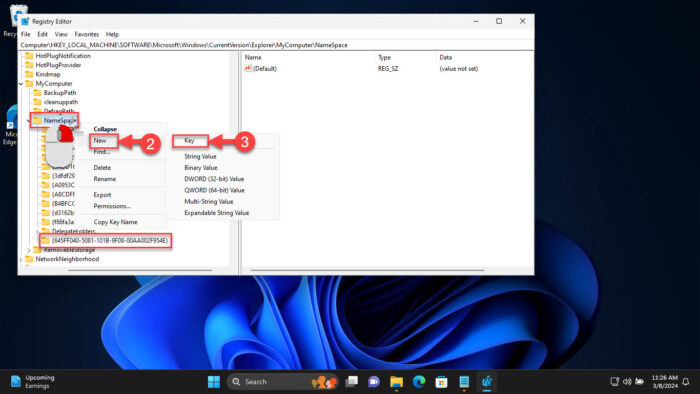
Create a new key -
Now either restart the File Explorer, or the computer for the changes to take effect.
After performing these steps, you will see the Recycle Bin icon on the “This PC” page inside the File Explorer.
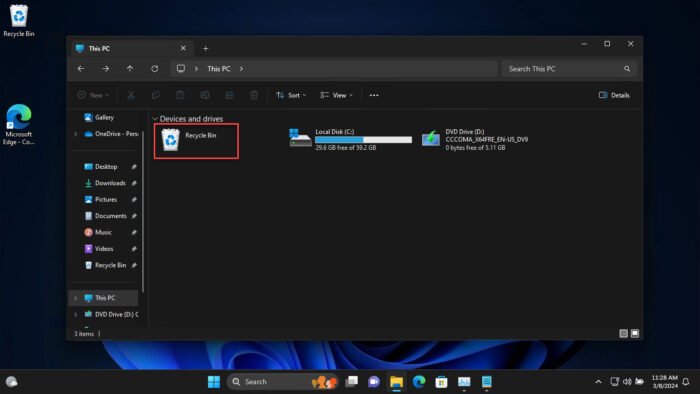
Like the navigation pane, you won’t be able to change the position of the Recycle Bin icon here either.
In case you want to undo the changes, you can use the provided .REG file below, or return to the “NameSpace” key inside the Registry Editor and delete the key “{645FF040-5081-101B-9F08-00AA002F954E}“.
Alternative to the steps above, you can use the following .REG files that will add (or remove) the Recycle Bin to the “This PC” page inside File Explorer:
 Add Recycle Bin This PC Page File Explorer (404 bytes, 272 hits)
 Remove Recycle Bin This PC Page File Explorer (409 bytes, 100 hits)
Simply download the respective ZIP file, extract the .REG file within, and run it. When asked for confirmation, allow the file to make the changes and then restart the computer to see the changes happen.
Add Recycle Bin to Home in File Explorer
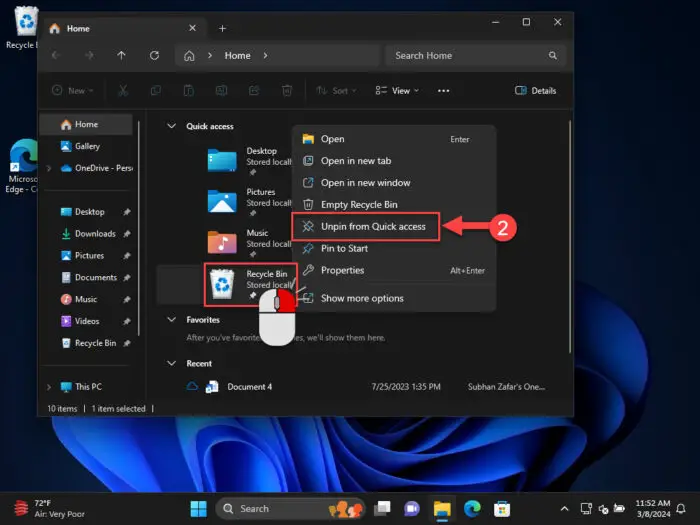
You can also add the Recycle Bin icon to the Home page in File Explorer on Windows, including Windows 10.
The Quick Access section on the Home page displays the pinned directories, along with your favorite documents, and the recently-accessed files.
You can add the Recycle Bin to the Quick Access section inside File Explorer by right-clicking an existing Recycle Bin icon, and then clicking “Pin to Quick access“.
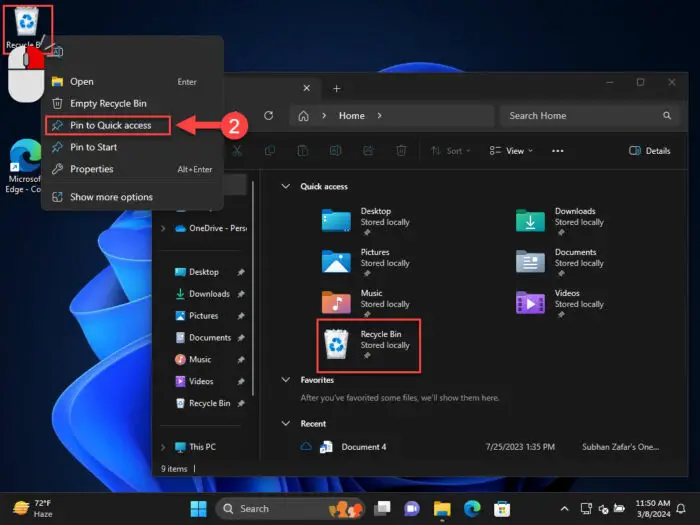
When you want to remove the Recycle Bin from the Quick Access section, simply right-click on the icon and click “Unpin from Quick access“.
Closing words
Although Microsoft is working hard to make its operating systems more customizable, certain settings that should be available just aren’t. For those purposes, we often tend to resort to changes to the Windows Registry or use third-party OS-tweaking tools, like ViveTool.
Having instant access to the Recycle Bin is often crucial for people who have to deal with deleting and recovering files, which is why you may want to add a shortcut for it in File Explorer. This post provides several methods to add the Recycle Bin to Explorer.


